Alumilite cast in Red Mallee burl

Signed-In Members Don't See This Ad
See more from MarkD

MarkD

Member
Joined
Jan 24, 2011
Messages
2,293
Location
Sayre, PA
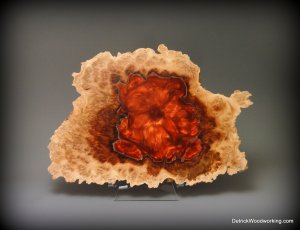
I have been doing quite a bit of Alumilite casting lately and this is my latest. This started out as a slice of Australian Red Mallee burl where termites had eaten away the the center portion of the burl. I used this opportunity to fill the void with a copper colored Alumilite. While I was at it I swirled a flower design into the Alumilite before it cured... yup, on purpose :) Sometimes it's better to be lucky than good!

Edit: You need to click on the picture to enlarge it to see the detail.
 
Last edited:
Signed-In Members Don't See This Ad

Bob Wemm

Member
Joined
Mar 9, 2012
Messages
1,994
Location
Kalbarri, Western Australia
Mark that is a terrible flower. LOL. OMG.
I dunno if you are good or lucky but that is one of the most INCREDIBLE freehand flowers I have ever seen.
CONGRATULATIONS on a fantastic result.
Thank you for sharing this with us,
Bob.
 

MarkD

Member
Joined
Jan 24, 2011
Messages
2,293
Location
Sayre, PA
Mark that is a terrible flower. LOL. OMG.
I dunno if you are good or lucky but that is one of the most INCREDIBLE freehand flowers I have ever seen.
CONGRATULATIONS on a fantastic result.
Thank you for sharing this with us,
Bob.

Thanks Bob....I think :confused: :biggrin:
 

RKB

Member
Joined
Mar 17, 2014
Messages
732
Location
Apollo, PA
That is some kind of great stuff right there, it is beautiful. :biggrin: I think you may have to do a tutorial on this one.

Rod
 

Ed McDonnell

Member
Joined
Oct 20, 2008
Messages
2,294
Location
Melbourne, FL
What caused the whitish/grayish border where the alumilite meets wood? Your pour / flower looks amazing, but my eye kept getting drawn to that border area.

It would be a shame to turn that and lose the flower effect.

Ed
 

MarkD

Member
Joined
Jan 24, 2011
Messages
2,293
Location
Sayre, PA
What caused the whitish/grayish border where the alumilite meets wood?
Ed

Ed, the burl this section was cut from was severely damaged by termites. The termites chewed away the area where I poured the resin. Unfortunately, as the the termite damage went deeper it did so at a very slight angle so where the resin meets the wood it's very thin causing the lighter color. If the darn termites had chewed at a 90 degree angle to the wood this effect would not be there.

As I was turning and realized what was going on I decided that turning more was not going to change the situation so I decided to stop there.

In hind site I probably should have used a die grinder to create a nice sharp 90 degree angle where the resin meets the wood. I'll do that on the next one :)
 

mark james

IAP Collection, Curator
Joined
Sep 6, 2012
Messages
12,764
Location
Medina, Ohio
I think the shading is beautiful as the colors move from the outside into the flower. And I actually do not mind the white edges in the least - kind of gives the flower an offset.

Well Done! :good:
 

Ed McDonnell

Member
Joined
Oct 20, 2008
Messages
2,294
Location
Melbourne, FL
In hind site I probably should have used a die grinder to create a nice sharp 90 degree angle where the resin meets the wood. I'll do that on the next one :)

Hi Mark. If the die grinder doesn't work out, maybe you can find some smart termites that you can train to chew at 90 degrees. :biggrin: We have the new hybrid super termites here in Florida. Let me know if you want any. :eek:

Ed
 

MarkD

Member
Joined
Jan 24, 2011
Messages
2,293
Location
Sayre, PA
In hind site I probably should have used a die grinder to create a nice sharp 90 degree angle where the resin meets the wood. I'll do that on the next one :)

Hi Mark. If the die grinder doesn't work out, maybe you can find some smart termites that you can train to chew at 90 degrees. :biggrin: We have the new hybrid super termites here in Florida. Let me know if you want any. :eek:

Ed

Thanks Ed but please keep them in Florida!
 
Top Bottom