
LL Woodworks
Member
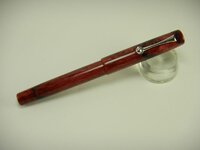
Well I was hesitant to put this in "Advanced Pen Making" because ... well you advanced pen makers will see why. Thanks to every one who answered so many of my questions as I researched the "component-less" aspect of pen making.
This is my 1st complete component-less after four practice grip sections, three practice caps and bodies and several feet of PR used in tap / die threading practice. I really had a hard time fitting the section to the body and the finial to the cap so they would appear seamless; failed to accomplish that! Improved skills needed in back cutting and parting in such small areas to remove shoulders, I think? Perhaps smaller or sharper parting tools - suggestions?
Details:
- 145 mm long (to long for my likes)
- 127 mm long body (nib's end to body end)
- 70 mm long cap
- M9 x 0.75 section & finial threads
- M12 x 1.0 cap & body threads
- #5 Bock nib & feed
- Cap does post very securely
I respectfully request constructive feed back that will help improve my next "component-less". I think the next one will be with 1/2 - 28 threads for cap and body while maintaining the M9 x 0.75 section & finial threads. Thanks again to all who helped and thanks in advance for the constuctive feed back.
- Lynn -
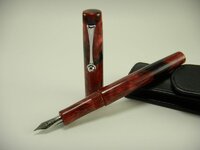
 Most of us live in America, so i post my stuff in inches and the rest can convert it to metric right:biggrin: I know we use metric taps and dies, but i measure everything else on my pens in inches.