
You are using an out of date browser. It may not display this or other websites correctly.
You should upgrade or use an alternative browser.
You should upgrade or use an alternative browser.
Adding Variable speed feed to your mini metal lathe
- Thread starter More4dan
- Start date
Signed-In Members Don't See This Ad
")
Signed-In Members Don't See This Ad
FGarbrecht
Member
Here is my 3d printed version.

FGarbrecht
Member
@FGarbrecht
Did you make your own HSS cutter ? .... same size and shape (circular ?) so that it's a drop-in replacement for the carbide insert ?
Also, can confirm that even a poorly made HSS cutter produces a better finish than a carbide insert.
Did you make your own HSS cutter ? .... same size and shape (circular ?) so that it's a drop-in replacement for the carbide insert ?
This was worth doing, best finish I've gotten on ebonite ever. Takes a little experimentation to set lathe and feed speeds, but having an independent feed control is great! Also, can confirm that even a poorly made HSS cutter produces a better finish than a carbide insert.
Thanks @More4dan
Wow, that didn't take long! Really nice work and I like the printed components. Very glad you are getting good results.
Danny
Sent from my iPad using Penturners.org mobile app
FGarbrecht
Member
I have a couple of bags of HSS tool blanks from Little Machine Shop, but this was the only cutter I've ground yet, and was specifically designed for cleaning up the small space behind the threading on kitless pen bodies; it has a cutting area that is about 1 mm in length oriented flat against the work piece. I'll have to grind a better tool with a full length cutting surface, but this tiny tool actually worked pretty well.@FGarbrecht
Did you make your own HSS cutter ? .... same size and shape (circular ?) so that it's a drop-in replacement for the carbide insert ?
darrin1200
Member
If you're interested in grinding a tool for Alumilite (and possibly other plastics as well) take a look here:
Bill
Excellent reference Bill. This info is really helping me get better results with my acrylics.
Here's a good series of articles on grinding your own HSS tools on a belt grinder. Note that it is Part 3; however it links back to parts 1 and 2. Worth a read IMHO.
If you're interested in grinding a tool for Alumilite (and possibly other plastics as well) take a look here:
Bill
Great article Bill. To give folks a sense of hardness the article is referring. The rubber on the spindle of an oscillating sander is typically about 80 durometer.
Here are some others I found online.
a. Shore 20A = Rubber Band
b. Shore 40A = Pencil Eraser
c. Shore 60A = Car Tire Tread
d. Shore 70A* = Running Shoe Sole
e. Shore 80A = Leather Belt
f. Shore 100A = Shopping Cart Wheel
Ebonite is Shore 100A.
Danny
Sent from my iPhone using Penturners.org mobile app
bmachin
Member
If you're interested in saving a few bucks and don't have any HSS blanks lying around, take note of what Mikey says about using keystock for practice. It's cheap and tools made from it would probably hold an edge for a long time up against the materials that we generally use for pens.
Bill
Bill
Here is an article on grinding a vertical shear tool in HSS. I'll give it a try this afternoon.
Sent from my iPad using Penturners.org mobile app
Sent from my iPad using Penturners.org mobile app
@More4dan
Please let us know how you like the vertical shear cutting tool, Danny.
Also, if you can, please post a photo of the ground end of the tool.
I am a little confused by the article. . Is the end face of the cutter as close to vertical as you can make it ?
And then there is the side ... the pic in the article seems to show that the side is ground at an angle, narrower at the top.
It's not clear which edge does the actual cutting; I assume it's the top of the end that cuts and not the side ... but then why the slope on the side ??
Last edited:
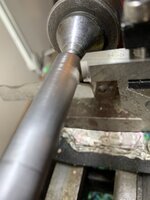
Here is my test of the vertical shear HSS lathe bit. I ground the angle at 15 degrees and with 15 degree relief across the front of the tool. This one was designed to cut from left to right and requires a slow feed rate.

Here is the resulting finish on Acrylic with a 0.001" finishing cut.
The vertical edge of the cutter rides along the material shearing a very fine cut. Material looks like fine hair. Steel shavings looks like steel wool.

I also ground a round nose scraper with a 15 degree relief.

The result is here with pretty much the same finish.
Danny
Here is the resulting finish on Acrylic with a 0.001" finishing cut.
The vertical edge of the cutter rides along the material shearing a very fine cut. Material looks like fine hair. Steel shavings looks like steel wool.
I also ground a round nose scraper with a 15 degree relief.
The result is here with pretty much the same finish.
Danny
Attachments
Last edited:
NT_2112
Member
Dan, that is very interesting work. Can't wait for my Maker Space to reopen. I want to try my hand at grinding a new cutter for Acrylic.
FGarbrecht
Member
Danny, I'm confused by the pictures of the shear tool. You state that the tool is ground to cut going left to right (headstock to tailstock) but the picture with the tool mounted on the lathe looks like it is oriented for cutting tailstock to headstock. What am I missing? (My spatial-geometric abilities seem to have gotten worse with age....  )
)
)Danny, I'm confused by the pictures of the shear tool. You state that the tool is ground to cut going left to right (headstock to tailstock) but the picture with the tool mounted on the lathe looks like it is oriented for cutting tailstock to headstock. What am I missing? (My spatial-geometric abilities seem to have gotten worse with age....
I made 2 tools, right hand and left hand. Sorry for the confusion. For some reason when turning toward the headstock, the finish isn't as good. Of course the first tool I made was that one.
I'll have to play with the tension on the carriage gibs to see if I can fix it, but in the mean time I just made another tool to turn toward the tail stock.
I did NOT get good results with either tool on Ebonite. I had problem with the temperature getting too hot. Maybe it just doesn't like shallow depths of cut. The tool did wear quickly.
Danny
Sent from my iPad using Penturners.org mobile app
Now for the next test for the lathe combining multiple modifications at once. I'm testing the slow speed feed along with my pattern tracer to see the kind of finish I can get. Before I started I added a 10mm x 4mm bearing to my tracing stylus to smooth the tracing.

Here is the result on a piece of acrylic. The last pass was about 0.005" cut, 1200 rpm, and 50% feed speed. I used the same 12mm round carbide cutter to turn from square all the way to the last pass. I will have to smooth out my pattern, I can see imperfections show up in the turning. i also used a stream of air blowing on the blank to keep it cool in the "valleys" for the last pass. With much of the tool in contact it can get hot enough to damage the material.


Here is the result on a piece of acrylic. The last pass was about 0.005" cut, 1200 rpm, and 50% feed speed. I used the same 12mm round carbide cutter to turn from square all the way to the last pass. I will have to smooth out my pattern, I can see imperfections show up in the turning. i also used a stream of air blowing on the blank to keep it cool in the "valleys" for the last pass. With much of the tool in contact it can get hot enough to damage the material.
OK .... I get it now !!! . Now I can see the reasons behind a lot of your activities !!!
Very well done, Danny !!!
Thanks Mal, this was a one time thing, I don't make many pens for sale. My cousin owns a quilt shop and wanted these for a class she teaches.
Sent from my iPad using Penturners.org mobile app
Very cool !!
A commendable "family enterprise" !!!
So the possibility now exists, that, after you have, FIRST, fulfilled the order, and now, SECOND, "automated" the process of making the gizmos,
you will be making many more of those gizmos in the future !!! . And more than one type of gizmo now that you've proven the concept and even taken it past the engineering stage !
Interesting how things work, eh ? . You couldn't NOT do what you did, and now that you have, I hope it pays off in any number of ways in future !!
Even other people like Fred G. have benefited from your ingenuity !! . I would like to be building a device like yours also, but can't quite justify.
It is certainly an inviting project to consider though. . And I have greatly enjoyed following along.
Thanks for all your contributions to "Pen Making Technology" !!!