
Well, for a while now, I've been trying to find a simpler and accurate way to cut my pen blanks. Thus far, I have been spending time to mark up each blank with various lines, through a process of placing the tube(s) on the blank, shifting them by an approximate 1/8" or so, etc. etc. The process works, but its a bit tedious, and it takes a more time than I want it to.
I originally was thinking about building a table-top sizing jig or tool that would make it easier to align the blank and the tube, and then add some extra length to the tube to allow for issues during drill exit and the like. All of those little experiments just didn't give me what I was looking for in the end, really...
So, the last few days, I've scrounged up some various scraps of wood from around my shop, and set about designing a very simple but precise and consistent spring-loaded blank sizing and cutting jig and sled. The general idea is very simple: Create a zero-clearance cutting board on some miter track rails, with a strait stop block, that I could align a blank and a tube on for accurate sizing cutting...and repeat cutting! If I'm making several of a given kind of pen is where my prior measuring and marking process got very tedious. I wanted something accurate, consistent and extremely easy. After some doodling on some graph paper, I ended up with this as my first draft of the concept:

The key was finding some way to make sure that the distance from the bandsaw blade to the end of the blank, was the same length as the tube. I eventually settled on the C-shaped "bracket" or spacing apparatus you see in the drawing above. The length of this apparatus could vary, depending on exactly how long of blank segments you needed to cut...in my case, this one can cut up to around 4 1/4" blanks, which I think would be sufficient for all the pen kits I currently have, including the longwood pencil kits (which use the longest blank i know of). If you needed to but longer blanks, such as for kitless/bespoke pens, you could just increase the length of the C Bracket.

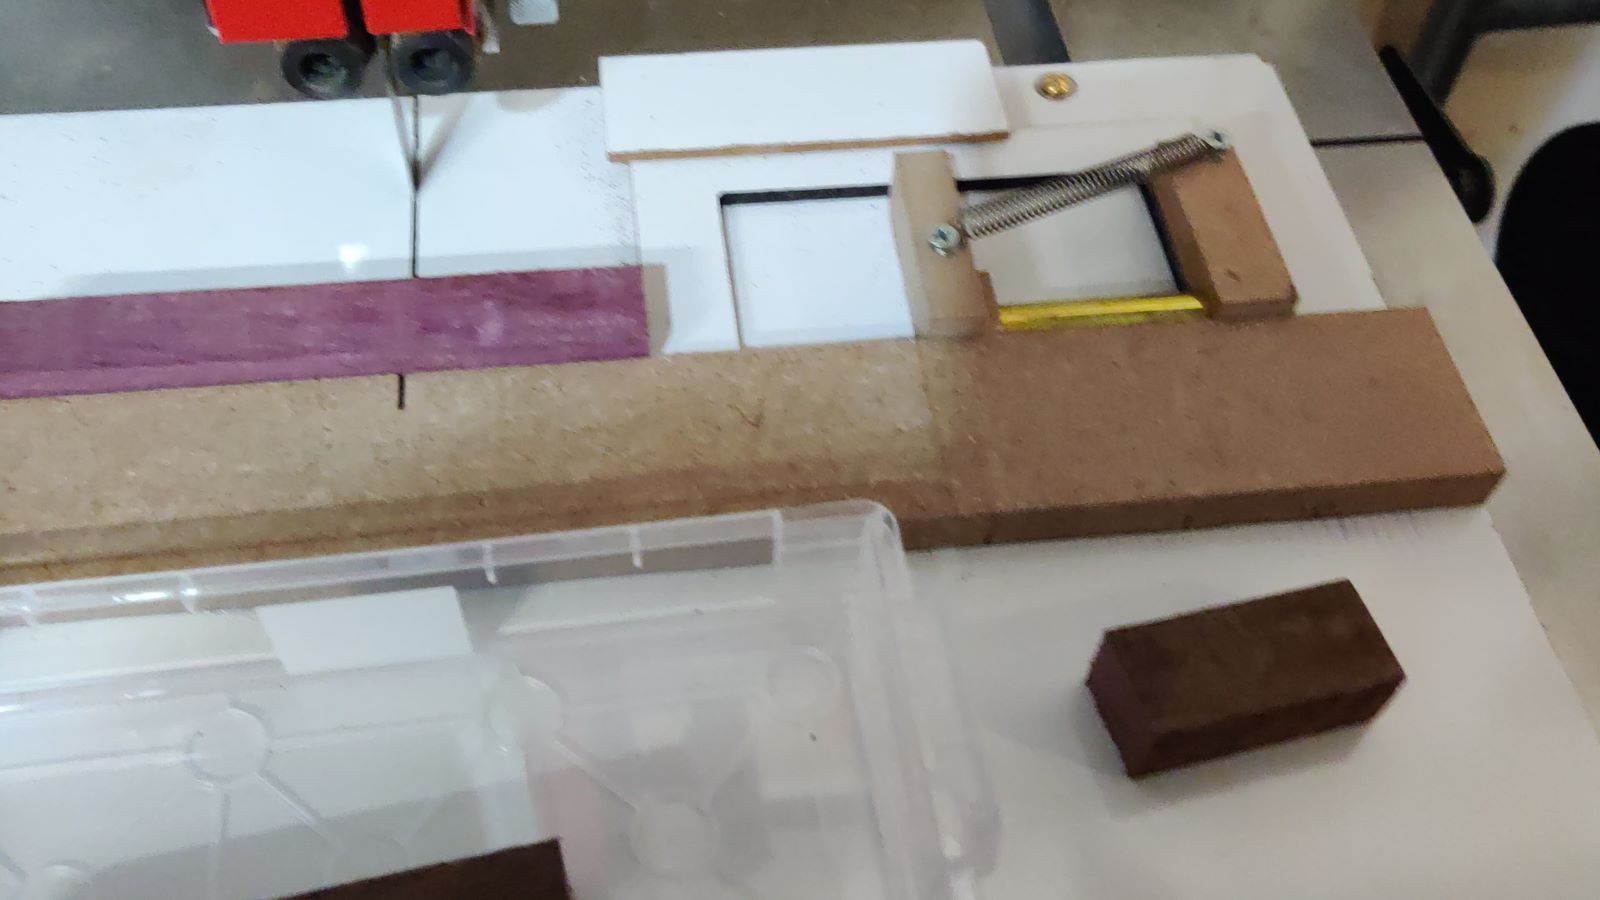
The original design was good as a foundation, but in the long run I ended up deciding to add a spring, so I could put a simple load on the tube allowing me to focus on holding the blank itself in place while cutting. Once I had added the spring, I realized that for longer tubes, the force there tended to want to pull up the C Bracket and snap it back. I ended up adding the final piece of the design that you can see in the photos: a simple clamp made out of a few scraps of the MDF whiteboard/blackboard stuff I'd picked up a while back and had sitting around in strips just about the right size. The C Bracket slipped under the lip of that little clamp once it was glued on, and that held it in place no matter how much stress was put on the spring.

You may notice another small detail in these two photos...a spacer added between the two blocks that the spring attaches to. In this case its about 1/8th inch, or maybe 3/16ths. This is just a simple piece of wood or MDF. You could use a 1/16th inch spacer if you wish. In any case, this allows you to either cut exactly-sized blanks, or add some additional length to account for the splintering that may occur when the drill exits the back side of the blank (sometimes with normal bits, I rarely encounter this when using bradpoints), or to add some extra length (say even 1/4") to support drilling most of the way through, then just trimming off the excess (such as with trustone and similar materials.) For those final cuts...if you use a 1/4" spacer to initially cut the blank, then use say a 1/16" spacer to cut off the excess, you can get very accurate blank sizing after cutting the hole, which minimizes the amount of additional blank squaring you need to do. Added bonus of the design of this jig!

The final result is a simple, small and easy to handle, spring-loaded blank sizing and cutting sled. As you can see in the photos here, in addition to the spring-loaded sizing feature, I added some miter-track rails made out of simple wood finished on johnson's paste wax, with a length across the back of those to act as a sled stop (to prevent cutting all the way through the stop block, or the entire sled), and a couple more pieces of scrap to act as handles for pushing and retracting.


The results of cutting the cap blanks for a set of chrome Barons I am currently working on:

Sized exactly to the tube length plus the spacer! A small video of it in action can be found here:
If you have all the parts, including some wood or other material to use for the miter rails, the build should only take a couple of hours tops (much less if you are more skilled with this stuff than I am!) Exact sizing outside of the C Bracket doesn't matter all that much. Accurately squaring the stop block is important to ensure 90 degree cuts on the blank, as is accurately placing the stop inside the C Bracket for the brass tube to ensure that any offset the tube introduces to the C Bracket is exactly the same as the resulting distance from the blade to the outer edge of the C Bracket, but otherwise you don't have to get too much into the weeds in terms of design details with this one!
I originally was thinking about building a table-top sizing jig or tool that would make it easier to align the blank and the tube, and then add some extra length to the tube to allow for issues during drill exit and the like. All of those little experiments just didn't give me what I was looking for in the end, really...
So, the last few days, I've scrounged up some various scraps of wood from around my shop, and set about designing a very simple but precise and consistent spring-loaded blank sizing and cutting jig and sled. The general idea is very simple: Create a zero-clearance cutting board on some miter track rails, with a strait stop block, that I could align a blank and a tube on for accurate sizing cutting...and repeat cutting! If I'm making several of a given kind of pen is where my prior measuring and marking process got very tedious. I wanted something accurate, consistent and extremely easy. After some doodling on some graph paper, I ended up with this as my first draft of the concept:
The key was finding some way to make sure that the distance from the bandsaw blade to the end of the blank, was the same length as the tube. I eventually settled on the C-shaped "bracket" or spacing apparatus you see in the drawing above. The length of this apparatus could vary, depending on exactly how long of blank segments you needed to cut...in my case, this one can cut up to around 4 1/4" blanks, which I think would be sufficient for all the pen kits I currently have, including the longwood pencil kits (which use the longest blank i know of). If you needed to but longer blanks, such as for kitless/bespoke pens, you could just increase the length of the C Bracket.
The original design was good as a foundation, but in the long run I ended up deciding to add a spring, so I could put a simple load on the tube allowing me to focus on holding the blank itself in place while cutting. Once I had added the spring, I realized that for longer tubes, the force there tended to want to pull up the C Bracket and snap it back. I ended up adding the final piece of the design that you can see in the photos: a simple clamp made out of a few scraps of the MDF whiteboard/blackboard stuff I'd picked up a while back and had sitting around in strips just about the right size. The C Bracket slipped under the lip of that little clamp once it was glued on, and that held it in place no matter how much stress was put on the spring.
You may notice another small detail in these two photos...a spacer added between the two blocks that the spring attaches to. In this case its about 1/8th inch, or maybe 3/16ths. This is just a simple piece of wood or MDF. You could use a 1/16th inch spacer if you wish. In any case, this allows you to either cut exactly-sized blanks, or add some additional length to account for the splintering that may occur when the drill exits the back side of the blank (sometimes with normal bits, I rarely encounter this when using bradpoints), or to add some extra length (say even 1/4") to support drilling most of the way through, then just trimming off the excess (such as with trustone and similar materials.) For those final cuts...if you use a 1/4" spacer to initially cut the blank, then use say a 1/16" spacer to cut off the excess, you can get very accurate blank sizing after cutting the hole, which minimizes the amount of additional blank squaring you need to do. Added bonus of the design of this jig!
The final result is a simple, small and easy to handle, spring-loaded blank sizing and cutting sled. As you can see in the photos here, in addition to the spring-loaded sizing feature, I added some miter-track rails made out of simple wood finished on johnson's paste wax, with a length across the back of those to act as a sled stop (to prevent cutting all the way through the stop block, or the entire sled), and a couple more pieces of scrap to act as handles for pushing and retracting.
The results of cutting the cap blanks for a set of chrome Barons I am currently working on:
Sized exactly to the tube length plus the spacer! A small video of it in action can be found here:
If you have all the parts, including some wood or other material to use for the miter rails, the build should only take a couple of hours tops (much less if you are more skilled with this stuff than I am!) Exact sizing outside of the C Bracket doesn't matter all that much. Accurately squaring the stop block is important to ensure 90 degree cuts on the blank, as is accurately placing the stop inside the C Bracket for the brass tube to ensure that any offset the tube introduces to the C Bracket is exactly the same as the resulting distance from the blade to the outer edge of the C Bracket, but otherwise you don't have to get too much into the weeds in terms of design details with this one!
 I've been using it for around an hour and a half here, and it works really well. Managed to slice up six sets of blanks of three to five pens each. As simple as the design is, and for being imprecisely hacked together from a bunch of scrap, its actually a really good tool! SO much nicer getting all my blanks sized and cut this way. Wish I'd done this a year ago...
")
