A Silmar 41 Application Question

Signed-In Members Don't See This Ad

GMM

Member
Joined
Feb 20, 2013
Messages
16
Hello all

I have been lurking this site for a few weeks now. I am working on a project that is unrelated to penturning. In fact I did not even know this was a hobby, shamefully. If I did not already have so many, this one indeed would pique my creative interests.

But anyway, I decided to post here because in looking for a cheap clear resin, most of my reading was done on this site after I found out about Silmar 41 and this forum.

Now as for my question - and I hope you will entertain a general resin question and not one of penturning - I am wondering if anyone has advice or warnings for someone casting in my situation, which is as follows.

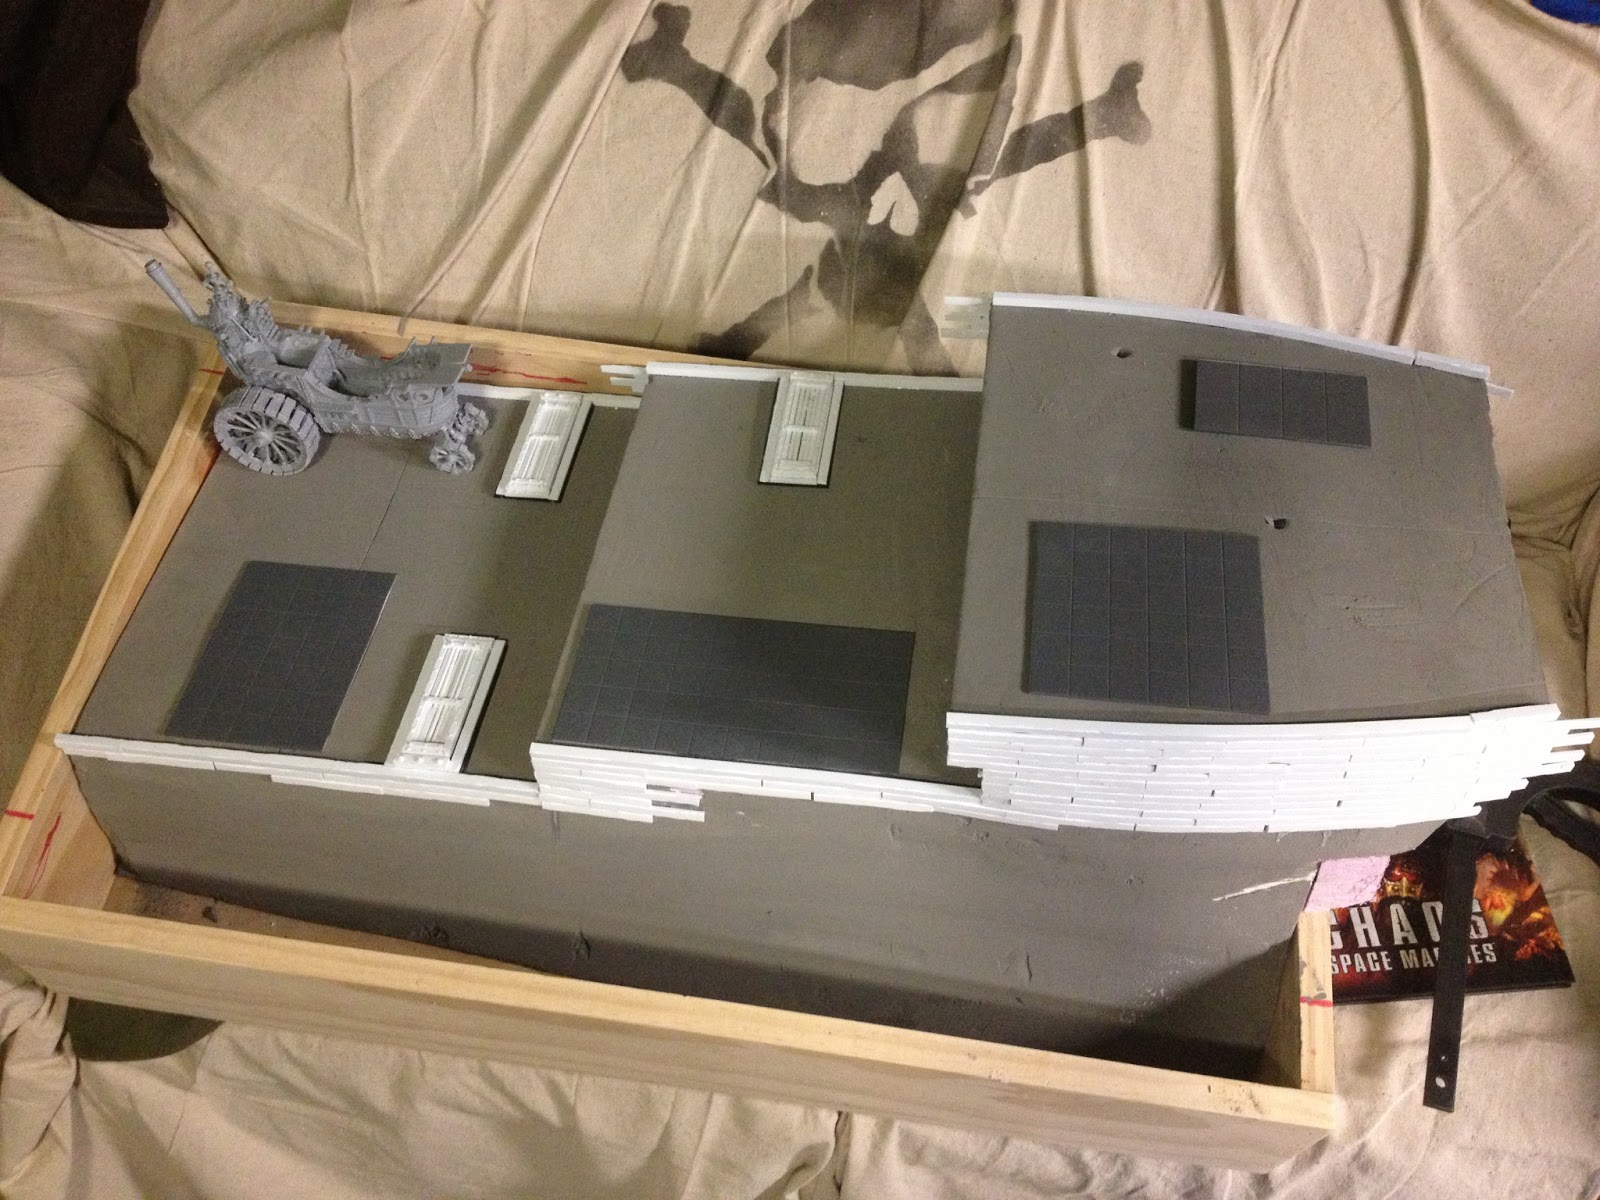
- In the end, this will basically be 2 2"x3"x31" long blocks of resin.
- This is a water effect. The "block" will never move. It will be stuck between the side of a model ship and the box the ship is in. (Basically, think of a section of a model ship dissected, laying in a shoe box with resin "water" poured along both sides. Although this will be much larger and more realistic.
- So therefore there is no need for a mold release. What is more important will be a level surface and even layers.


DSC_5962.JPG


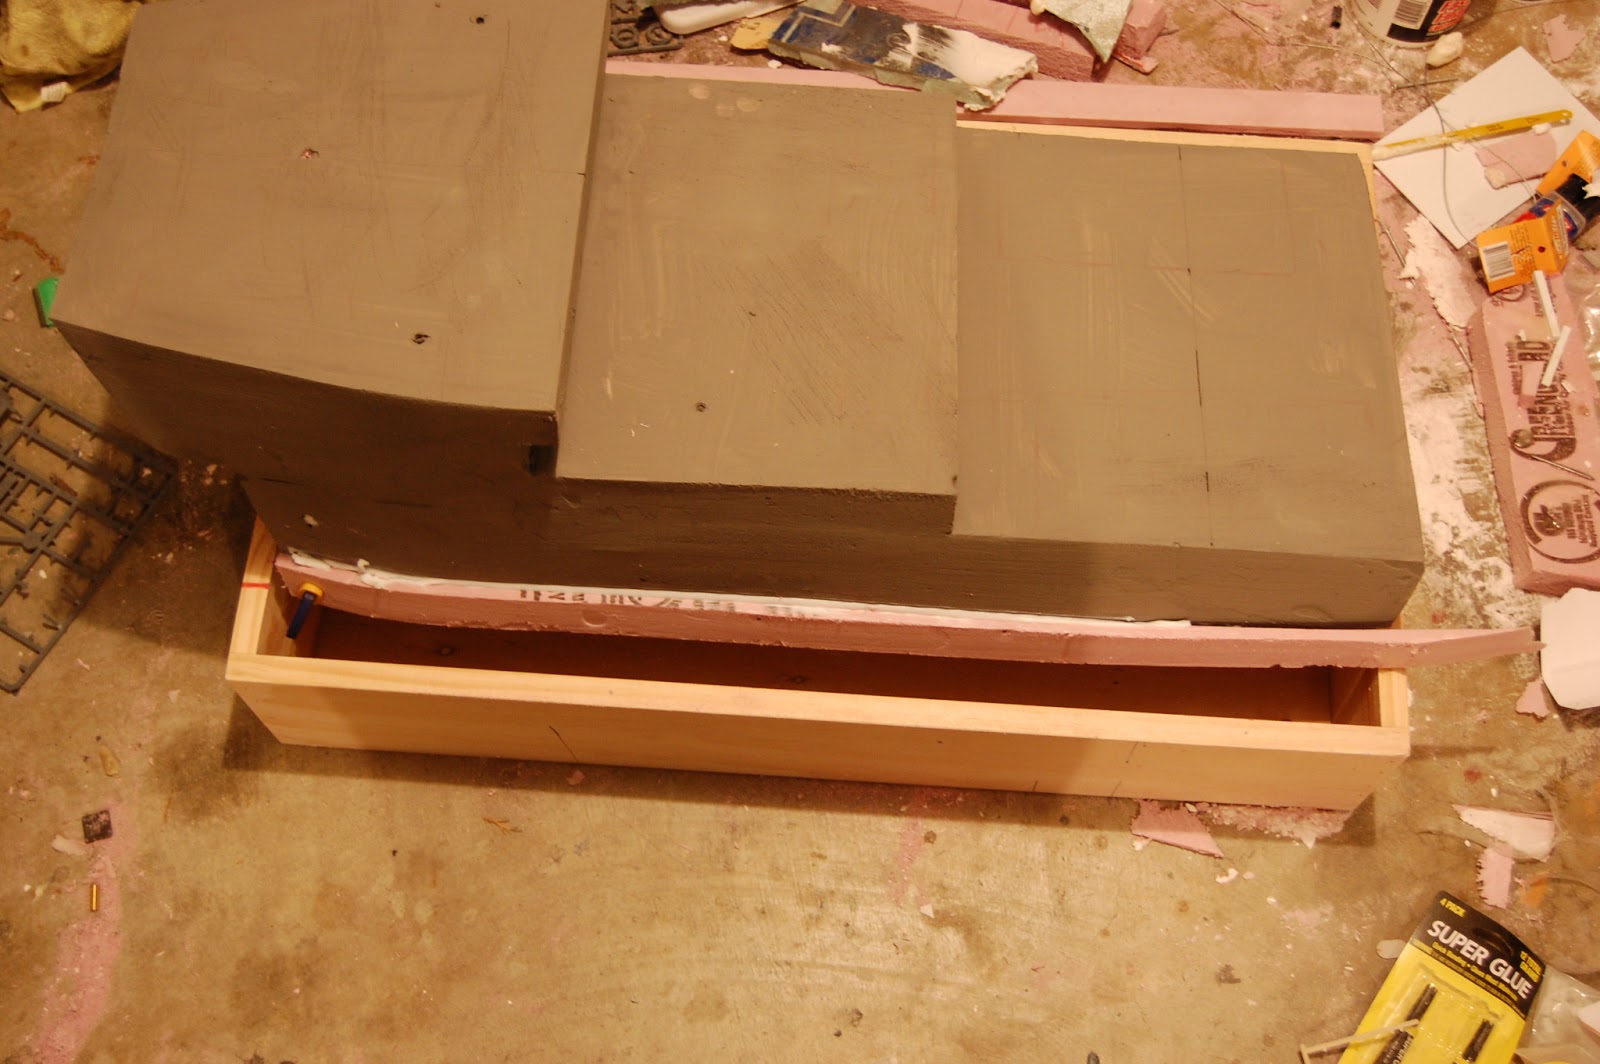
I took an image of what is done so far to help illustrate. Sorry this is horrible looking. It will be a ship with planking and all when I am done. :)

The ship will sit in the box. I will caulk around the ship and then pour resin. Hopefully this makes more sense now.


Now that the basics are described, here are my main questions:
- I am assuming the resin will not react to the (very dry) acrylic paint? I will also be sealing with Krylon matte farnish.

- Any advice on how much pouring at once is too much? Even using a literal cup of resin at once will take some time to pour. Which is fine, but it also needs to completely cover the bottom of the "hole" or I would worry about uneveness due to surface tension not letting it spread.

I think I will leave it at these questions for now.

Thanks for any help!
 
Signed-In Members Don't See This Ad

plantman

Member
Joined
Jan 2, 2012
Messages
3,437
Location
Green Bay, Wi
Sorry, I'm not following you on what you are trying to do. Are you doing something like a ship wreck, or are you doing a model in section view? Jim S
 

RMayoIII

Member
Joined
Feb 14, 2012
Messages
211
Location
Belmont, NH
If the acrylic paint is cured then there will not be a reaction.
I think you'd only be limited on how much you can pour at one time by the amount of hardener used, ambient temp and time constraints. less hardener= longer working/curing time and less shrinkage. colder ambient temps require more hardener to get the same results as less hardener at a higher temp. If you have no restrictions on the amount of time you need it to cure by, the slower the cure the better. A "hot" mix cures fast and tends to crack. As far as the "surface tension not letting it spread" goes.... thats where less hardener/longer working time comes in. Even with the "correct" amount of hardener mixed in there should be plenty of time for it to self level, assuming the box is on a level surface to begin with.
I hope this is somewhat helpful.
 

GMM

Member
Joined
Feb 20, 2013
Messages
16
RMayo - Thanks for that very detailed explanation. I think I understand what you are saying, however I have a couple more questions now.

It seems I will need to keep the temps low. A crack would (I assume) be disastrous unless it would fill in itself with another layer. Also shrinkage would be bad and it would tend towards shrinking what with being such a huge surface area compared to a pen blank.

An error here and there can be ok. I will be doing a final layer of VERY forgiving water effect/waves. Basically the same look except it goes on more like elmers glue and dries clear. One part, acrylic etc.

In other words, this is basically a big block of "canvas"/"filler" that all it really does is be transparent and play the part of the ocean over which I will make the waves.

Plantman - thank you for posting. To help explain it, emphasis on the fact that the boat is not in the box in that image. The boat will go down into the box and there will be a void on each side where the water will go.

The boat in this image is completely unfinished. It will have planks, crates, and overall be a display.

Thanks so much guys!
 

its_virgil

Member
Joined
Jan 1, 2004
Messages
8,102
Location
Wichita Falls, TX, USA.
Polyester resin creates heat when curing. Large casts can create enough heat to cause cracks or fissures. For large blocks cast in thin layers...maybe 1/4 to 1/2 inch thick. Larger casts...more heat...less catalyst or cast in layers.

I think makers of miniature scenes use an epoxy resin to simulate water. One of our members, Darrell Eisner, may can help you with fake water. Find him in the ember list and contact him. He lives in Halifax, Nova Scotia.
Do a good turn daily!
Don
 

GMM

Member
Joined
Feb 20, 2013
Messages
16
Hi Don.

Ive read a lot of your posts getting here, I recognize your signature. :)

Yes, I have used and own the one part epoxy resin used for model scenes. The problems with this resin are

A. To take it to the level of two gallons is going to cost hundreds of dollars (My two gallons of 41 was $70 shipped.)

B. There is no control over the curing. I have a couple things I poured too thick and a few months later they receded from the edges.

It is great for small shallow pools of water, but not for casting a big block in essence.

So this all begs another question - lets say you guys were hypothetically in my shoes. Its 65 degrees outside. You are casting this block, how much resin do you mix in each layer, and how much catalyst per ounce would you use?

From my research on this forum, and from what knowledge I have gathered from it, I would guess some people might say 3 drops per ounce? From what I gather 15-20 is very high while 5 and under is low?

I will probably use this advice to do the first layer and then adjust accordingly based on how it goes.
 
Last edited:

seamus7227

Member
Joined
Mar 18, 2009
Messages
6,220
Location
Wichita Falls, TX
i have never cast on that large of a scale before, but i'm with Don, cast in layers, no more than his recommendation and use between 3 & 5 drops per ounce. But with that I ask, are you going to be warming your resin before the pour? And if so, i would not recommend more than 3 drops of MEKP per ounce of resin.
 

GMM

Member
Joined
Feb 20, 2013
Messages
16
Warming the resin is something I was just starting to read about. I am not yet sure how let alone if I will yet, but I hope to figure that out soon.

I will probably find some answers in the search bar, but would you recommend warming it?

If I had to guess I would say in this case warming it would simply make it cure too hot since it is already going to be hot from such large amounts?
 

seamus7227

Member
Joined
Mar 18, 2009
Messages
6,220
Location
Wichita Falls, TX
Warming the resin is a fairly simple process, the issue is temperature control. You dont want to heat it very much over around 120degrees, because remember, you are still going to be adding catalyst. The purpose of heating it is to help thin it out so when you pour it, it wont be so thick. You really only want the resin to be warm, not hot.

My setup entails an ultrasonic cleaner that has a heat setting and it levels out at around 150degrees. So i pour the amount of resin into a cup and put that into the "bath" so-to-speak, for a cycle of 480 seconds and then add the catalyst and stir thoroughly for around 30-40 seconds. Don Ward(its_virgil) is always hounding me that I worry about being too precise with everything.:biggrin: But my only reason for it is simply because i have had too many failures, and this helps target the areas that need more improvement in the castings. I say you should create a mock-up in a smaller scale and try pouring a few layers and see how it goes, that way you arent out a bunch of money with a couple of gallons being poured.
 
Last edited:

its_virgil

Member
Joined
Jan 1, 2004
Messages
8,102
Location
Wichita Falls, TX, USA.
I have done a lot of reading over the years and mixing in the catalyst at a 1% ratio seems to be the standard and reducing the amount as the cast gets larger(thicker) because of the heat. I have found that 1% is way too much for the casting I (and others) do with clear casting. Most of us now use 3 drops of MEKP per ounce and maybe up to 4 if the ambient temp is cooler. I would cast in layers if I were casting like you want to do.

Have you considered Alumilite? I do not use Alumilite but many here do. Maybe someone will add some info regarding large blocks of Alumilite clear. Good luck.
Do a good turn daily!
Don
 

GMM

Member
Joined
Feb 20, 2013
Messages
16
Thanks guys.

I already bought the Silmar (a habit of mine to prepare first then figure out what I need later :) ) I have used Alumilite once but it wasnt clear and for casting resin bases for miniatures.

Yes I will definitely be casting in layers. If no other reason than I could possibly mix a batch and then spill it all. I would hate to mix a gallon or two of resin and drop it :D.

I will do the first layer at 3 drops and take it from there. This needs to be done by April 18th. Sounds like far away but casting 1/4 per day means a couple weeks, so I am trying to really prepare well in advance. I still have to do the wood planking and paint the boat.

I have other questions as for warming the resin, but I will just read around.

Thanks for the help so far!
 

its_virgil

Member
Joined
Jan 1, 2004
Messages
8,102
Location
Wichita Falls, TX, USA.
Be sure to read the MSDS sheet on polyresin. It has a flash temp of somewhere around 90 degrees. So, no open flames...pilot lights...etc. Most of us heat the resin in a hot water bath. Place the resin in a container; place container in a water bath of hot water. Tap water works and may need to be changed once or twice. You may be able to cast more layers than one per day....cast several hours apart.
Do a good turn daily!
Don
 

seamus7227

Member
Joined
Mar 18, 2009
Messages
6,220
Location
Wichita Falls, TX
i use an ultrasonic cleaner from HF to warm my resin, but make sure you get the one that has the heat function. Fill it with water to the line, and put resin in cups that have a recycle code on the bottom of either 1,2, or 5. You can use a metal pot or glass jar, but i buy graduated mixing cups by the sleeve online and can get several uses out of one cup before i have to pitch em in the garbage and get a new one.
 

GMM

Member
Joined
Feb 20, 2013
Messages
16
Well since you guys are being so helpful I will go ahead and ask.

What is the purpose in my case for heating? If it is to remove bubbles, as I have read in passing, that would actually be ok. This is going to end up turbulent ocean water.

Or is it more a concern for such a large "sheet" curing properly?

I have an electric single stove top (portable) I use for boiling water to bend resin. I could use that (but not with the element going of course)

Also a question I have that I have actually had a hard time finding an answer to: can anyone give me cut and dry advice on a pigment to use with the size of this pouring in mind? I would like to slowly graduate a geenish blue tint, but I am hesitant in making things too complicated and screwing it all up.
 
Last edited:

seamus7227

Member
Joined
Mar 18, 2009
Messages
6,220
Location
Wichita Falls, TX
where color is in question, i am out on that one. All i know is clear casting. However, I can tell you in your case I think bubbles might be acceptable since you are gonna be replicating waves, which would/should have some sort of fine bubbles created from the splashing of waves. In my casting, and others, we warm the resin to thin it, vibrate bubbles out of it faster, and somewhat aide in the casting/catalyzing of it.
 

GMM

Member
Joined
Feb 20, 2013
Messages
16
Yeah thats what I was thinking. It makes a lot of sense for you to. When I first read that I imagined a tool on a lathe hitting an air bubble. :(
 

PTsideshow

Member
Joined
Dec 26, 2011
Messages
1,033
Location
Macomb County Michigan
Here is a site that deals in all kinds of effects castings and movie work, Smooth-On, Inc. - Mold Making & Casting Materials Rubber, Plastic, Lifecasting, and More Whether you use their products or not this is one of the go to sources for info, They may have a local dealer near you that has classes. hobbycast.net: The Leading Hobby Cast Site on the Net Here is another one for great videos and lots of info.
Making fake water - Archives :: Ship Modeling Forum
Tech Tips: Realistic Sea Bases
Here are a couple ship model sites that have a couple of ways to do it.
You also can check the model RR section of hobby stores or sites. As there are a number of water effect pourable materials That are used.

Is there a reason that you want the base so thick with the water effect. Generally even if it is a full profile hull and you need the depth for it. The hole for the hull is cut through a filler material, then a thinner layer of the water effect material is layered on top.

Use only the proper coloring agent for the resin you are using so there isn't a bad reaction and the pour is ruined.

I have only used the type of epoxy type clear resin material sold for the RR modelers years ago. Can't recall the brand, it was poured over a base of plaster river bed that was painted.

Don't forget google or your favorite search engine. Shallow water model ship base effects or model ship water base effects. Brought up over 4 million hits.
Good luck and when finished drop by and show a photo!
:clown:
 

GMM

Member
Joined
Feb 20, 2013
Messages
16
Thanks for the links. I have read every "modelling water" site and forum thread I could find in the past couple months, but the third link with using aluminum foil is new to me. I might give that a try on the final layer instead of using tons of the thick Woodland Scenics stuff.

And I most certainly will have to post some pics!

This is for a convention end of April. Here is what I did last year.

mp1.jpg


mp2.jpg


mp3.jpg


mp4.jpg


mp5.jpg


mp6.jpg


Same premise except we are dealing with a boat in water. Instead of a service cart this year I am using an old trunk from the 30s (the tray you saw slips into it and sits on cleats).
 

seamus7227

Member
Joined
Mar 18, 2009
Messages
6,220
Location
Wichita Falls, TX
That is some incredible work involved in that. Are you hand painting each individual piece? If so, I can even begin to imagine how much time that must take
 

GMM

Member
Joined
Feb 20, 2013
Messages
16
Yes it is for a game called Warhammer. People collect and paint the models and play games with them. The scenery is really just an extra to store/display the models. Most people do not do a display, as for your average player the figures are more utilitarian than art. I paint these figures for a living and most of my customers are busy professionals that want something that looks very good and is also usable in games. Each year I do something unique and off the wall for a convention in Chicago.

To give a sense of scale the last figure is standing on a base about as long but not as wide as a credit card.
 
Last edited:

GMM

Member
Joined
Feb 20, 2013
Messages
16
Hey guys

Well, I am about ready to finally pour the resin, and I have come to a bit of a predicament - it's about 50 degrees if I am lucky here in Indiana and doesnt seem to want to let up any time soon. My deadline for pouring all this is in a couple weeks. So my question is - what do you think of heating up a garage, cracking the door and putting a fan under it, and then shutting off the (electric, no flame) heater to pour the resin?

Are the fumes so foul that an attached garage is a no go? I could potentially use my grandpas detached garage but its across town and would be more of a pain.

Thanks for any help!

Also to double check - I was planning to pour about a couple pints at a time, is that too much you think? I will be using about two gallons total - I have three in case I go over.
 

vanngo5d

Member
Joined
May 16, 2011
Messages
370
Location
Porter,TX
I pour in the garage all the time my wife makes me close the door to the house and I might crack a window. I use a heater in there when it's cold but never shut it off. but I use a sealed oil type.

Don Vann
 

GMM

Member
Joined
Feb 20, 2013
Messages
16
Hey Don

Well thats good news. I will clean out the garage and set it all up unless anyone else chimes in with bad experience.

How rough are the fumes? I ask because when I primer stuff in the garage I can faintly smell the fumes in front of the door to the garage. If they are super toxic I want to make sure I have a fan or two pointed out the door.

But I probably should either way to be safe..
 

Sylvanite

Member
Joined
Jul 18, 2006
Messages
3,090
Location
Hillsborough, North Carolina, USA.
You can pour Silmar 41 (polyester resin) in a garage, but you will need to air it out afterwards. 50 degrees is too cold. Normal working temperature for PR is 65-75 degrees. Silmar 41 shrinks while curing. Actually, the reaction is exothermic and the resin expands as it heats up when gelling. The solid shrinks back when it cools afterwards. The amount of shrinkage is proportional to how hot it gets. Control the temperature (by not warming the resin above 75 degrees, limiting the thickness of the pour and not using too much hardener) and you'll have less shrinkage.

You can make the full cast in multiple pours. When one layer sets up (and cools), the surface will remain tacky. You can then pour another layer. It will form a chemical bond with the previous layer (as long as the surface doesn't harden first). For the last layer, either mix some wax (dissolved in styrene) into the resin, or spray some polyvinylacetate (PVA) on top. The wax will rise and it (or the PVA) will form an air barrier. That will permit the resin to harden on the surface. If you don't want wax or PVA on the casting, you can post-cure it in a warm (not hot) oven to harden the surface instead.

Polyester resins will continue to cure (and offgas) for at least a week after they initially harden.
 

GMM

Member
Joined
Feb 20, 2013
Messages
16
Alright, maybe since I have a better image now of what I am doing I can explain better.

IMG_0123.JPG


This is an old pic in terms of where it is but it gives you an idea of where I am pouring the resin.

It will be basically artificial water, filling the gaps on each side of the boat. That is approximately 30" long, 5" deep and 2" from lip of box to boat.

My questions now:

1. I understand that since this is a lot of resin at once per layer (assuming 1/4-1/2" layers) I need less hardener (3-5 drops per ounce was suggested) however one thing I notice when pouring other resins is that very thin, even in big amounts, is a lot slower to cure. It seems the closer to a cube rather than a sheet of paper the quicker it sets due to heat. With this in mind is 3-5 drops still advisable?

2. With these dimensions in mind is there any other advice? How would you personally tackle this? I received great advice before but now I am questioning if I correctly described the application without a good image.

3. I am not sure I fully understand this paragraph:

"You can make the full cast in multiple pours. When one layer sets up (and cools), the surface will remain tacky. You can then pour another layer. It will form a chemical bond with the previous layer (as long as the surface doesn't harden first). For the last layer, either mix some wax (dissolved in styrene) into the resin, or spray some polyvinylacetate (PVA) on top. The wax will rise and it (or the PVA) will form an air barrier. That will permit the resin to harden on the surface. If you don't want wax or PVA on the casting, you can post-cure it in a warm (not hot) oven to harden the surface instead."

Is this required if the top of the resin is not in a mold but in open air?

Thanks so much for your help guys!
 

Sylvanite

Member
Joined
Jul 18, 2006
Messages
3,090
Location
Hillsborough, North Carolina, USA.
Polyester Resin formulated for fiberglass layup contains a different mix of promoters (such as cobalt naphthenate and dimethylaniline) than resin made for casting. Layup resin will get too hot (and brittle) if a single curing layer is too thick (say, 1/4" or more).

Casting resins such as Silmar 41, on the other hand are meant for thicker pours. They have less promoter mixed in and can handle individual layers an inch thick or more. As you noted, the thicker the layer, the more heat the casting holds, and the less hardener (e.g. methyl-ethyl-ketone-peroxide a.k.a. MEKP) is needed.

In your application, it's not the thickness of the pour that Silmar 41 can handle that you need to worry about, but rather the tendency it may have to pull away from the side of the box or the hull of the ship when it cools. So, you will want to minimize horizontal shrinkage.

I'd recommend scuffing the box and hull with 400g (or coarser) sandpaper before casting. PR needs some "tooth" on the surface in order to make a good mechanical bond. I also suggest painting the box and ship (up to the waterline) with a coat of resin (and letting it set up) before you do the first pour. That will help reduce the tendency to pull away from the edges. Pouring layers thin enough that they can shrink vertically rather than horizontally would be a good idea. 1/4-1/2 inch sounds good to me. If your room (and resin) are around 65 degrees, then about 1% MEKP by volume would be a good amount to add. A graduated eyedropper would be handy for small pours, and more accurate than counting drops.

Exposure to air retards the curing of polyester resin. Therefore, when you pour (or paint on) a layer, it will harden along the mold edges and in the center, but remain tacky on the exposed surface. What you want to do, is time your layers such that the previous layer has cooled, but is still tacky when you do the next one. That way, you avoid the heat problem but still wind up with a chemical bond between layers. For the final layer, you need something to cover the exposed surface from the air for it to harden to the touch (or wait a long time, or post-cure with heat). That's what the wax or PVA is for.

I hope that helps,
Eric
 

GMM

Member
Joined
Feb 20, 2013
Messages
16
Thanks so much, thats a great help!

I bit the bullet and did a test pour on another project that needs resin (albeit only an inch thick) to make sure my plan will work. I heated up the garage to about 75-80 and then completely sealed it off. It should keep that heat long enough for it to cure.

Thanks for the advice in pouring going further. Separation sounds horrible. What I will do is as you suggested scuff the boat and the tentacles (there are Kraken legs too) and then assemble the whole thing and paint it all with resin.

Sealing the top of the water coincidentally was already planned (although only for aesthetics). I will be using a product similar to elmers glue but thicker, that dries clear to represent the final top waves. So the clear resin will at a point be completely encapsulated. I forgot all about that.

Ok, will let you know how it goes!
 

GMM

Member
Joined
Feb 20, 2013
Messages
16
Well the fumes are pretty incredible to say the least. Its like someone is having a 24 hour spray paint party in my garage. It is pretty sealed, but the fumes are so thick they are finding a way into the house.

A timeline of my test:

5 PM - Heat up upstairs (best sealed) garage to about 80 degrees and poured.

9 PM - House reeks and the resin is like hot honey.

11 PM - Same story. Sleep with the door closed and windows open :D

9 AM - Molasses, and still runs if shifted. Its actually sunny out (WOW) so I stick it outside while I prepare the downstairs garage for plan B.

11 AM - The test is hard as a rock. The sun in 2 hours cured it.

3 PM - I have poured and cured the first real layer on the model. Takes about 2 hours to harden in 55 degrees and high sun. I pour another layer.

5 PM - Of course we cant have a FULL day of sun, it is overcast and the resin is doing nothing in 55 degrees and overcast. I haul it all into the garage with the door open.

So we will see how today goes. Its of course raining right now but the sun will hopefully be out later.

I had a thought that I could use my turtles basking lamp on it, if it is outside and the fumes dont collect. I might try that today.

Until next time!
 

GMM

Member
Joined
Feb 20, 2013
Messages
16
Sunlight is making all the difference in the world. 1" layers are curing hard as a rock in just a few hours.

I really didnt want to pour such thick layers but with the spoty weather I dont have much choice. But (knock on wood, cross fingers) the stuff has been pretty forgiving in terms of expanding and contracting. It only perceptibly curves up in the center and then settles when hard.

So while it might not work with a mold, where sunlight wouldnt have much effect, here I am pouring in 45 degrees with mid day sun and doing ok. It must really be baking it, because in the garage with 80 degrees it wasnt doing much of anything.
 
Top Bottom