
jttheclockman
Member
I had shown this pen in the thread about my Birthday and a question came up so thought it would be better to show here and if others maybe interested. Here was the question by Skip.
Time well spent in your shop too. That pen is very very cool. I'm amazed that it stayed together. I would have thought that the round rods would be eager to pop out as you turned. Care to share how you got the equal spacing between the rods?
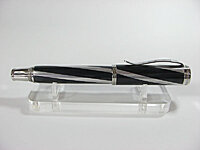
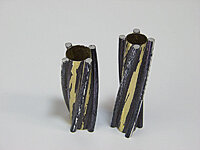
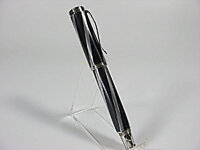
First a little background on the pen. I was in the shop yesterday and finally was able to complete a pen that I tried 2 other times to get done but had failures. I learned from these failures and as they say the third time is a charm. It is an addition to my series of black acrylic and aluminum pen blanks. This is a spiral aluminum rod on a tube and cast in Liquid Diamonds epoxy resin. It then was spun and polished to a high shine. I have included a photo of the tube with the rods glued to it before it was cast in resin that was dyed black.
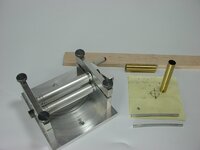
I also now included a photo of the tools minus the carbide cutting tool used to spin it and the polishing MM and glues. But to answer Skips question about the spacing of the rods, I draw these circles on a piece of paper and divide them equally with lines. In this case it is quarters so this makes 4 strips of aluminum needed. I center the tube over the circle and mark the bottom edges of the tube. I now transfer that same mark to the top of the tube using a straight edge (in this case a piece of maple in the background) by laying the tube on its side against the wood with the mark on one edge. Now just draw a line straight down the tube using the wood as a guide. Now I have to curve the rods to the right bend so they lay flat on the tube. Sounds weird right. But what I am doing is setting the bottom part of the rod on one mark and rolling the top of the rod to the next mark over from the bottom. I continue all the way around, setting the rods on those marks and gluing them with med CA. It takes very little time for the CA to grab the two dissimilar metals for a tight bond. But here is where I found one of my mistakes and overcame it. I found CA alone was not strong enough because it is too brittle. So I encase the rods sides with some epoxy glue tinted black. This seemed to hold alot better.
I then trimmed the ends close to the tube using a diamond cutter in a dremel drill. Then I sanded on the lathe as we all do so that the rods are even with the tube. Lot easier to do before casting in case of a blowup. I then cast in LD and set in pot for 24 hours. Take out and let cure for another 24 hours. Then spin it down making sure the blank does not get too hot. I actually did that in 2 steps to avoid the heat. Then polished and assembled. By the way this kit is a Stainless Steel Desire kit.
Hope that answers the question and and if others I will try to answer.
Time well spent in your shop too. That pen is very very cool. I'm amazed that it stayed together. I would have thought that the round rods would be eager to pop out as you turned. Care to share how you got the equal spacing between the rods?
First a little background on the pen. I was in the shop yesterday and finally was able to complete a pen that I tried 2 other times to get done but had failures. I learned from these failures and as they say the third time is a charm. It is an addition to my series of black acrylic and aluminum pen blanks. This is a spiral aluminum rod on a tube and cast in Liquid Diamonds epoxy resin. It then was spun and polished to a high shine. I have included a photo of the tube with the rods glued to it before it was cast in resin that was dyed black.
I also now included a photo of the tools minus the carbide cutting tool used to spin it and the polishing MM and glues. But to answer Skips question about the spacing of the rods, I draw these circles on a piece of paper and divide them equally with lines. In this case it is quarters so this makes 4 strips of aluminum needed. I center the tube over the circle and mark the bottom edges of the tube. I now transfer that same mark to the top of the tube using a straight edge (in this case a piece of maple in the background) by laying the tube on its side against the wood with the mark on one edge. Now just draw a line straight down the tube using the wood as a guide. Now I have to curve the rods to the right bend so they lay flat on the tube. Sounds weird right.
But what I am doing is setting the bottom part of the rod on one mark and rolling the top of the rod to the next mark over from the bottom. I continue all the way around, setting the rods on those marks and gluing them with med CA. It takes very little time for the CA to grab the two dissimilar metals for a tight bond. But here is where I found one of my mistakes and overcame it. I found CA alone was not strong enough because it is too brittle. So I encase the rods sides with some epoxy glue tinted black. This seemed to hold alot better. I then trimmed the ends close to the tube using a diamond cutter in a dremel drill. Then I sanded on the lathe as we all do so that the rods are even with the tube. Lot easier to do before casting in case of a blowup. I then cast in LD and set in pot for 24 hours. Take out and let cure for another 24 hours. Then spin it down making sure the blank does not get too hot. I actually did that in 2 steps to avoid the heat. Then polished and assembled. By the way this kit is a Stainless Steel Desire kit.
Hope that answers the question and and if others I will try to answer.
Attachments
-
 Copy_of_Copy_of_IMGP0402__1552590088_76818.jpg38.5 KB · Views: 739
 -
 Copy_of_Copy_of_IMGP0404__1552590175_97120.jpg45.5 KB · Views: 650
 -
 Copy_of_Copy_of_IMGP0297__1552591821_57033 (1).jpg63.7 KB · Views: 774
 -
 Copy_of_IMGP0409__1552671392_33181.jpg36.6 KB · Views: 698
 -
 Copy_of_IMGP0411__1552671463_81105.jpg47 KB · Views: 757
 When you finally got to make a pen...you made it a beauty. Aluminum and black are a weakness to me.