
Rich L
Member
Continuing one with the "square thing …
Objective: make square blind holes in the upper part of my silver clip design so that mother of pearl squares can be layed in the holes.
_____________
The next thing to do was to make the clip for the square pen-like thing. I've posted some of this process before so I'm starting out with a precut clip blank. The blanks are cut either on a pantograph (youtube video https://www.youtube.com/watch?v=0tiZZr3jowk and please excuse the supid music - just turn your sound off) or a mill.
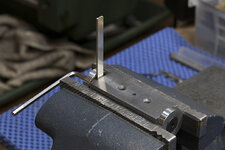
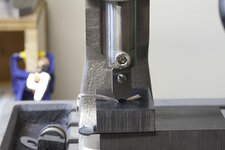
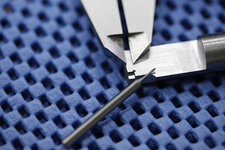
The bending operation has been posted before but here's some of it again. The clip blank is set up in a bending jig I had to make so that I could bend the blank at right angles over a suitable radius. The clip blank is sticking straight up in the air and I just used a wooden block to push it over horizontally. It's being bent over a round polished corner of about 3/32" radius.
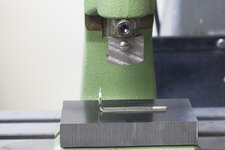
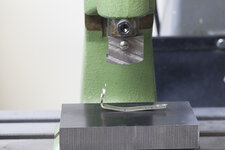
Bend 2 is accomplished with one of these little toggle presses that use radiused dies I had to make (I have to make a lot, if not all, of the custom dies and special jigs to do all this.) The die comes down on the clip and the toggle operation makes the operation identical every time. The black block is 90 durometer polyurethane. That sutff will not mar the silver clip and because of its stiffness it forms the "mold" I need for the bend.
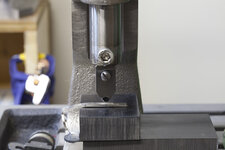
Bend 3 is accomplished yet with another press holding a different die.
So, the clip is formed and now it goes into the heat treating oven for an hour at 580º. That's enough to precipitation harden the Argentium silver to make the clip springy enough for a pen. The heating also gives the surface a goldish patina which polishes off easily later on.
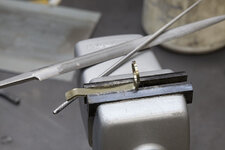
The picture with the files in it is of the finish filing and sanding setup I use. It's just a Panavise with soft jaws. The files I use are all 6 inchers, pillar, half round and grades 0-6. I also use #4 and #6 needle files. Sandpaper (wet-or-dry) runs from 400 grit to 2500. Occasionally I'll use 3µm or 2µm paper. I use WD40 to keep the paper from clogging.
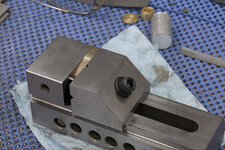
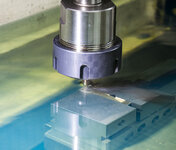
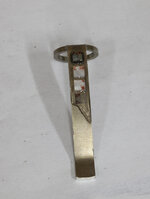
The clip now goes into another vise and I try to put it in there as flat as I can but there is a slight curve to the surface I'll be dealing with next. You can see the curvature of the top part of the clip. This vise is a small standard toolmakes vise that will go into the tank of the EDM machine. (EDM = electrical discharge machining)
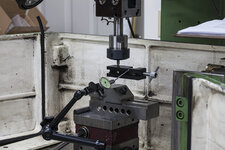
Dialing in the position of everything is critical so the vise is placed on a magnetic chuck which has been previously aligned to the X and Y axis of the table/tank. As in the prior post, I had to make square electrodes to make the square holes so, in the background, I had made a 3mm square electrode and that is what is sticking out of the ER collet holder. What's hiding the electrode is a little tiny tooling vise that has sides ground flat, parallel, and perpendicular to its vise jaws. The little vise is clamped on the square electrode and I'm using one of those ground surfaces on the little vise to dial in squareness with the bigger vise. If that needs more explanation, please ask. Anyway, with the square sides of the electrode now "square" with the big vise, the little one comes off and all that's needed is to position the electrode so that the holes it burns are dead center in the width of the clip. I won't go through that process because it is unique to the machine.
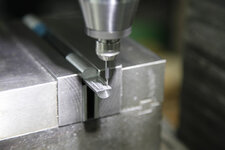
The next pretty blue picture is of the EDM machine burning a blind hole in the clip. The fluid is a special synthetic oil, called a dielectric fluid, and it enables the energized electrode to do its job most effectively. As you can see, the entire vise and clip are submerged in this stuff. To get the blind holes with square bottoms it is necessary to dress the electrode often and burn again. I did a dressing operation after each burn of 4 holes and one must remove the electrode from the machine to do this.
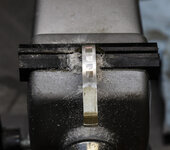
Now there are 4 blind holes in the clip spaced according to the drawing you can partially see in the background.
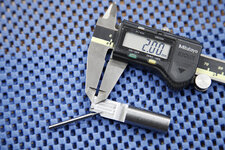
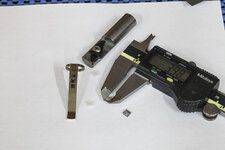
Making little 3mm square MOPs is key to this so I had to make yet some more tooling - a holding jig similar to the one I had to make for the 6mm squares that went into the pen barrel. This time the recess needed to be less than 3mm in the holder so I elected to make a 2mm square recess. I used a 1/32" end mill in a high speed milling spindle to make the square cavity using the same end mill to relieve the back corner. The pictures show the milling setup, a group picture showing size, and then a closeup where you can see the little hole relieving the back corner of the recess. The picture of the sanding wheel is similar to before except the squares are 1/4 the area - tiny. The next picture shows the assembled tool with a hold-down spring, the clip with the four holes, and four rough sanded squares of MOP. Each of these little squares got put in the holding jig and ground to precisely 2.99mm which is just enough to barely fit in the 3mm blind holes. (there should be lots of questions about this!)
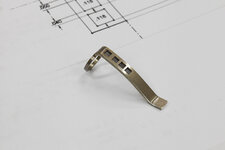
So, the blind holes are there in the clip and I have 4 precisely cut MOP squares for the holes. Glue them in. This was a real PITA because the fit was so close and the pieces were so so tiny that I had the devil of a time getting them in. Any cant of the MOP square and it wouldn't go in.
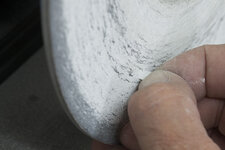
The rest is finishing. I used a coarse #0 file for the high spots, then a #3, and then 800, 1500, 2000 grit paper to get to the point where the buffer becomes king.
A clip is born.
Next in the story will be the cap and I'm finalising the design for that. It will be simple and it will have inlays but they won't be square. I'm tired of squares!")
Cheers,
Rich
Objective: make square blind holes in the upper part of my silver clip design so that mother of pearl squares can be layed in the holes.
_____________
The next thing to do was to make the clip for the square pen-like thing. I've posted some of this process before so I'm starting out with a precut clip blank. The blanks are cut either on a pantograph (youtube video https://www.youtube.com/watch?v=0tiZZr3jowk and please excuse the supid music - just turn your sound off) or a mill.
The bending operation has been posted before but here's some of it again. The clip blank is set up in a bending jig I had to make so that I could bend the blank at right angles over a suitable radius. The clip blank is sticking straight up in the air and I just used a wooden block to push it over horizontally. It's being bent over a round polished corner of about 3/32" radius.
Bend 2 is accomplished with one of these little toggle presses that use radiused dies I had to make (I have to make a lot, if not all, of the custom dies and special jigs to do all this.) The die comes down on the clip and the toggle operation makes the operation identical every time. The black block is 90 durometer polyurethane. That sutff will not mar the silver clip and because of its stiffness it forms the "mold" I need for the bend.
Bend 3 is accomplished yet with another press holding a different die.
So, the clip is formed and now it goes into the heat treating oven for an hour at 580º. That's enough to precipitation harden the Argentium silver to make the clip springy enough for a pen. The heating also gives the surface a goldish patina which polishes off easily later on.
The picture with the files in it is of the finish filing and sanding setup I use. It's just a Panavise with soft jaws. The files I use are all 6 inchers, pillar, half round and grades 0-6. I also use #4 and #6 needle files. Sandpaper (wet-or-dry) runs from 400 grit to 2500. Occasionally I'll use 3µm or 2µm paper. I use WD40 to keep the paper from clogging.
The clip now goes into another vise and I try to put it in there as flat as I can but there is a slight curve to the surface I'll be dealing with next. You can see the curvature of the top part of the clip. This vise is a small standard toolmakes vise that will go into the tank of the EDM machine. (EDM = electrical discharge machining)
Dialing in the position of everything is critical so the vise is placed on a magnetic chuck which has been previously aligned to the X and Y axis of the table/tank. As in the prior post, I had to make square electrodes to make the square holes so, in the background, I had made a 3mm square electrode and that is what is sticking out of the ER collet holder. What's hiding the electrode is a little tiny tooling vise that has sides ground flat, parallel, and perpendicular to its vise jaws. The little vise is clamped on the square electrode and I'm using one of those ground surfaces on the little vise to dial in squareness with the bigger vise. If that needs more explanation, please ask. Anyway, with the square sides of the electrode now "square" with the big vise, the little one comes off and all that's needed is to position the electrode so that the holes it burns are dead center in the width of the clip. I won't go through that process because it is unique to the machine.
The next pretty blue picture is of the EDM machine burning a blind hole in the clip. The fluid is a special synthetic oil, called a dielectric fluid, and it enables the energized electrode to do its job most effectively. As you can see, the entire vise and clip are submerged in this stuff. To get the blind holes with square bottoms it is necessary to dress the electrode often and burn again. I did a dressing operation after each burn of 4 holes and one must remove the electrode from the machine to do this.
Now there are 4 blind holes in the clip spaced according to the drawing you can partially see in the background.
Making little 3mm square MOPs is key to this so I had to make yet some more tooling - a holding jig similar to the one I had to make for the 6mm squares that went into the pen barrel. This time the recess needed to be less than 3mm in the holder so I elected to make a 2mm square recess. I used a 1/32" end mill in a high speed milling spindle to make the square cavity using the same end mill to relieve the back corner. The pictures show the milling setup, a group picture showing size, and then a closeup where you can see the little hole relieving the back corner of the recess. The picture of the sanding wheel is similar to before except the squares are 1/4 the area - tiny. The next picture shows the assembled tool with a hold-down spring, the clip with the four holes, and four rough sanded squares of MOP. Each of these little squares got put in the holding jig and ground to precisely 2.99mm which is just enough to barely fit in the 3mm blind holes. (there should be lots of questions about this!)
So, the blind holes are there in the clip and I have 4 precisely cut MOP squares for the holes. Glue them in. This was a real PITA because the fit was so close and the pieces were so so tiny that I had the devil of a time getting them in. Any cant of the MOP square and it wouldn't go in.
The rest is finishing. I used a coarse #0 file for the high spots, then a #3, and then 800, 1500, 2000 grit paper to get to the point where the buffer becomes king.
A clip is born.
Next in the story will be the cap and I'm finalising the design for that. It will be simple and it will have inlays but they won't be square. I'm tired of squares!
Cheers,
Rich
Attachments
-
 11 1st bend 10by.jpg118.8 KB · Views: 445
 -
 12 2nd bend 1 10by.jpg91 KB · Views: 407
 -
 13 2nd bend 2 10by.jpg86.9 KB · Views: 362
 -
 14 3rd bend 1 10by.jpg94.3 KB · Views: 385
 -
 15 3rd bend 2 10by.jpg96.6 KB · Views: 396
 -
 15.1 finish filing setup 10by.jpg93.1 KB · Views: 418
 -
 16 clip in vise 10by.jpg169.5 KB · Views: 373
 -
 17 dialing in 10by.jpg148.2 KB · Views: 366
 -
 18 burning 10by.jpg132.7 KB · Views: 394
 -
 20 holes in clip 10by.jpg55.3 KB · Views: 408
 -
 20.1 milling 2mm holder 10by.jpg80.7 KB · Views: 355
 -
 20.2 2mm holder size 10by.jpg210.6 KB · Views: 358
 -
 20.3 2mm holder size 2 10by.jpg135.5 KB · Views: 325
 -
 20.4 sanding 10by.jpg90.6 KB · Views: 388
 -
 21 rough squares 10by.jpg103.1 KB · Views: 356
 -
 23 glued 10by.jpg147.6 KB · Views: 375
 -
 24 rough surface 10by.jpg141.3 KB · Views: 334
 -
 25 finished clip 10by.jpg119.3 KB · Views: 475