A bit dirty looking

Signed-In Members Don't See This Ad
See more from Alan Morrison

Alan Morrison

Member
Joined
Jan 15, 2019
Messages
3,089
Location
N Ireland
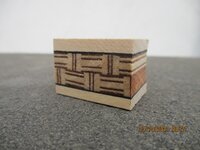
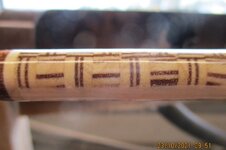
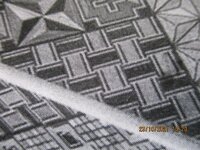
This is my first attempt at basket weave and I'm happy enough with the result except that it looks very dirty. It doesnt look so bad in the hand, but the photograph shows it a lot worse.
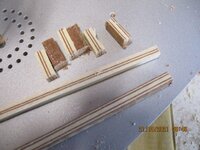
Timber is maple and mahogany and the glue was Gorilla wood glue.
Any suggestions?
Alan
IMG_1539.jpg
 
Signed-In Members Don't See This Ad

KenB259

Member
Joined
Dec 24, 2017
Messages
3,576
Location
Michigan
I see what you mean. Did you sand it? maybe sanding dust from the mahogany causing it. I would like it better if the design wasn't cut off at the nib end and more like the clip end. It looks like a difficult design to attempt. I do know what you mean about photos, sometimes they seem to show things that aren't there. Good job overall though.
 

mark james

IAP Collection, Curator
Joined
Sep 6, 2012
Messages
12,752
Location
Medina, Ohio
Interesting design, I assume a 4-sided appearance? With this criss-cross pattern sanding and minimizing the bleed-out would be a challenge.

Maybe some sanding sealer right after your final cuts, before sanding? I use Mylands, but even a light CA may be helpful.

And I agree with, a slight tweak and the nib end can be paired with the finial end.

In spite of these comments, a very nice design!
 

SteveJ

Member
Joined
Jul 11, 2012
Messages
3,375
Location
Grand Junction, Colorado
Interesting design, can you show the blank before turning or give some idea of how you put it together? When I've gotten that "dirty" look it usually came from having some metal sanding grit contaminate when sanding. I also have it more likely to happen with softer light woods.
 

jttheclockman

Member
Joined
Feb 22, 2005
Messages
19,148
Location
NJ, USA.
I think we all are nit picking because the design has alot of great features and with that many lines it is tough to keep in proper order. This is what happens when hand made. Use a cnc and then things are better controlled. Just my thoughts. Anyway getting the cross hatches lined up in the center vertical hatches is where the tweaking needs to be done. I am sure this is not easy but always comes down to repeatability when cutting pieces exactly the same and then gluing. Nice work though and to me nice idea.

Agreed about photos. The camera picks things up better than the naked eye. I am sure you know my answer when it comes to avoiding bleeding and contamination of woods and that is a skew as the final pass.
 

TDahl

Member
Joined
Dec 11, 2019
Messages
1,894
Location
Brentwood
Very nice. I second Steve's comment about wanting to see the blank before it was turned.

I have also found when I sanded light colored blanks fixed on a mandrel with the metal bushings, the sanding resulted in a similar dirty look.
 

magpens

Member
Joined
Feb 2, 2011
Messages
15,911
Location
Canada
Oh, WOW !!!

That's not "dirty" at all !! . . . It is beautiful, in fact !!!

I find it quite interesting and very attractive !! . . Thanks for showing, Alan !!!
 

Alan Morrison

Member
Joined
Jan 15, 2019
Messages
3,089
Location
N Ireland
I see what you mean. Did you sand it? maybe sanding dust from the mahogany causing it. I would like it better if the design wasn't cut off at the nib end and more like the clip end. It looks like a difficult design to attempt. I do know what you mean about photos, sometimes they seem to show things that aren't there. Good job overall though.
I think that you are right about the mahogany dust. I used dyed black veneer in the past and it was a lot worse.
 

Alan Morrison

Member
Joined
Jan 15, 2019
Messages
3,089
Location
N Ireland
Interesting design, I assume a 4-sided appearance? With this criss-cross pattern sanding and minimizing the bleed-out would be a challenge.

Maybe some sanding sealer right after your final cuts, before sanding? I use Mylands, but even a light CA may be helpful.

And I agree with, a slight tweak and the nib end can be paired with the finial end.

In spite of these comments, a very nice design!
Thanks for the feedback, Mark. I have another one on the lathe which I will try your suggestion on. I will post the result when finished.
Also see photos below.
Take care
Alan
 

Alan Morrison

Member
Joined
Jan 15, 2019
Messages
3,089
Location
N Ireland
Interesting design, can you show the blank before turning or give some idea of how you put it together? When I've gotten that "dirty" look it usually came from having some metal sanding grit contaminate when sanding. I also have it more likely to happen with softer light woods.
No metal anywhere near when sanding. I will try sanding sealer on the next one before I sand. I put a couple of photographs below.
 

Alan Morrison

Member
Joined
Jan 15, 2019
Messages
3,089
Location
N Ireland
Very nice. I second Steve's comment about wanting to see the blank before it was turned.

I have also found when I sanded light colored blanks fixed on a mandrel with the metal bushings, the sanding resulted in a similar dirty look.
No metal, I used plastic bushes. Here are some photographs.
 

Attachments

  • IMG_1540.jpg
    IMG_1540.jpg
    224.6 KB · Views: 111
  • IMG_1528.jpg
    IMG_1528.jpg
    327.7 KB · Views: 111

Alan Morrison

Member
Joined
Jan 15, 2019
Messages
3,089
Location
N Ireland
Maybe some sanding sealer right after your final cuts, before sanding? I use Mylands, but even a light CA may be helpful.
Mark, this is a poor picture of mark 2, using two coats of sanding sealer after burnishing with the shavings and before sanding. I buffed it but did not apply any finish as it's not going onto a kit.
Lesson learned, and I will incorporate this process before sanding segmented blanks.
Also a picture of the idea I was trying for.
Thanks
Alan
 

Attachments

  • IMG_1547.jpg
    IMG_1547.jpg
    189.6 KB · Views: 112
  • IMG_1548.jpg
    IMG_1548.jpg
    522.3 KB · Views: 112

SteveJ

Member
Joined
Jul 11, 2012
Messages
3,375
Location
Grand Junction, Colorado
Thanks for the pictures. I love looking at inlay pictures for ideas for segmenting. I keep trying to figure out how to make one like the upper left in your picture. I think the canvas may be too small. You have inspired me to get back to work on some of my ideas, thanks.
 
Top Bottom