
Some double barrel pen kits lend themselves to being reworked as single barrel; the slimline is one, the Cigar is another.
I like to build single barrel Cigar pens. . There is an article in the IAP Resources which explains the basics of doing this.
That article is based on retaining the brass tube sizings of the original Cigar design (which are 10mm diam.) and adding a 27/64" brass tube as a lower end "shroud" tube.
The tubing that gets glued into the blank consists of the original 10mm upper tube and the 27/64" shroud tube.
The twist mechanism, original 10mm lower tube, refill+spring, and nib portion forms one integrated assembly which slides into the other two glued-in tubes.
This integrated assembly is firmly held in by the original "gripping brass tube" at the finial end. The latter gripping tube has the screwed on finial and holds the clip.
The gripping tube is a friction fit over the twist mechanism, just as in the original Cigar design, and allows the integrated assembly to be slid out if necessary.
Refill replacement is accomplished, in this single barrel design, by unscrewing the actual nib from the nib coupler (also original design).
Part A of this report - Modifying the Cigar design to use smaller diameter brass tubing
I've found the above form of single barrel design to create a possible problem cuz the glued-in 27/64" shroud tube leaves very little meat on the blank at the nib.
This can be especially problematic if you want to use a fragile material for the barrel. The thinness of the barrel at the nib end can result in chipping.
One segmented wood barrel that I wanted to use broke apart when it was turned down to match the diam. of the Cigar nib hardware.
To avoid this, I have reworked the Cigar and replaced the 10mm brass tubes (original Cigar) with 11/32" brass tubes (K&S Hobby actual size tubes)
and I then used a 3/8" (pen maker sizing) shroud tube. , The 11/32" brass tube slides snugly inside the 3/8" brass tube.
Downsizing these brass tubes did require modifications to 3 parts of the pen kit : (1) the "nipple" on the back end of the nib coupler, (2) the "nipple" on the lower end of the center coupler as well as the "flange" on this center coupler, and (3) the diameter of the brass portion of the twist mechanism. . I use the word "nipple" for the brass that presses into the brass tube. Reducing the diameter of the nipple can mean that you have to glue the related pen kit piece into the ends of the lower brass tube.
Please note that the "flange" is reduced in diam. to just under the 11/32" brass tube diam. The "flange" is no longer an externally visible feature of the Cigar.
These modifications to the brass pieces of the Cigar kit were done on a small metal working lathe. . They could be done on a wood turning lathe also, I believe.
Part B of this report - Finishing the single barrel Cigar without using any actual "finish"
The barrel material I used is a piece of wood from Arizona that I got a few years ago from Joe Suckley, a member at the time. This wood was quite "punky" and therefore fragile, but it does have interesting spalt and grain patterns so I wanted to try it. But I don't have the proper stabilizing equipment.
The wood is sound enough to do a rough rounding, end squaring, and drilling with a pilot hole (8.5mm). After that, I soaked the barrel in a MinWax Brand product called, simply, High Performance Wood Hardener. The soaking of the wood blank, in the actual MinWax can, lasted about 6 hours, during which I turned the blank every hour to try get the hardener to penetrate uniformly.
I think that using this wood hardener had an interesting result. Not only was the wood strengthened, the purpose which was the main intent, but also it turned out that no finishing preparation was necessary in order to achieve a quite nice satin, or matte, final finish on the barrel. I just turned the barrel to the desired shape and size, during which there was no chipping of the previously "punky" wood, and followed that with sandpaper grits of 240 up to 2000. The resulting finish has a mildly glossy look which really appeals to me. . I am going to try this same process on other woods (not necessarily punky) and analyze the results. Sometimes a glossy finish, such as you can get with the usual CA finish, is not just exactly what you might want.
So here are some pictures which you may find somewhat interesting in spite of my "bad" photography.
The first picture shows the finished pen alongside an extra piece of the "punky" wood I used (notice some slight chipping from the surface of the extra piece, which has not gone through the MinWax Wood Hardener yet.
I hope you will be able to ascertain from the photos that the final finished surface of the pen is very smooth and semi-glossy. . I like it very much.
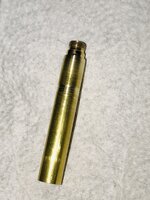
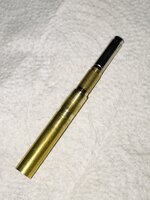
There are additional pictures showing other "sides" of the pen.
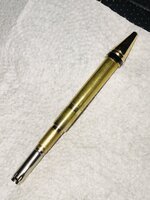
The last picture shows the integrated internal assembly of the single barrel Cigar using the new brass tube size of 11/32" (or 8.7mm). . This assembly slides into the glued-in 11/32" and 3/8" brass shroud tubes (not shown, of course). . The 11/32" shroud tube is an "actual size" brass tube (from K&S Hobby Supplies) while the 3/8" shroud tube is a "pen makers size" brass tube.


I like to build single barrel Cigar pens. . There is an article in the IAP Resources which explains the basics of doing this.
That article is based on retaining the brass tube sizings of the original Cigar design (which are 10mm diam.) and adding a 27/64" brass tube as a lower end "shroud" tube.
The tubing that gets glued into the blank consists of the original 10mm upper tube and the 27/64" shroud tube.
The twist mechanism, original 10mm lower tube, refill+spring, and nib portion forms one integrated assembly which slides into the other two glued-in tubes.
This integrated assembly is firmly held in by the original "gripping brass tube" at the finial end. The latter gripping tube has the screwed on finial and holds the clip.
The gripping tube is a friction fit over the twist mechanism, just as in the original Cigar design, and allows the integrated assembly to be slid out if necessary.
Refill replacement is accomplished, in this single barrel design, by unscrewing the actual nib from the nib coupler (also original design).
Part A of this report - Modifying the Cigar design to use smaller diameter brass tubing
I've found the above form of single barrel design to create a possible problem cuz the glued-in 27/64" shroud tube leaves very little meat on the blank at the nib.
This can be especially problematic if you want to use a fragile material for the barrel. The thinness of the barrel at the nib end can result in chipping.
One segmented wood barrel that I wanted to use broke apart when it was turned down to match the diam. of the Cigar nib hardware.
To avoid this, I have reworked the Cigar and replaced the 10mm brass tubes (original Cigar) with 11/32" brass tubes (K&S Hobby actual size tubes)
and I then used a 3/8" (pen maker sizing) shroud tube. , The 11/32" brass tube slides snugly inside the 3/8" brass tube.
Downsizing these brass tubes did require modifications to 3 parts of the pen kit : (1) the "nipple" on the back end of the nib coupler, (2) the "nipple" on the lower end of the center coupler as well as the "flange" on this center coupler, and (3) the diameter of the brass portion of the twist mechanism. . I use the word "nipple" for the brass that presses into the brass tube. Reducing the diameter of the nipple can mean that you have to glue the related pen kit piece into the ends of the lower brass tube.
Please note that the "flange" is reduced in diam. to just under the 11/32" brass tube diam. The "flange" is no longer an externally visible feature of the Cigar.
These modifications to the brass pieces of the Cigar kit were done on a small metal working lathe. . They could be done on a wood turning lathe also, I believe.
Part B of this report - Finishing the single barrel Cigar without using any actual "finish"
The barrel material I used is a piece of wood from Arizona that I got a few years ago from Joe Suckley, a member at the time. This wood was quite "punky" and therefore fragile, but it does have interesting spalt and grain patterns so I wanted to try it. But I don't have the proper stabilizing equipment.
The wood is sound enough to do a rough rounding, end squaring, and drilling with a pilot hole (8.5mm). After that, I soaked the barrel in a MinWax Brand product called, simply, High Performance Wood Hardener. The soaking of the wood blank, in the actual MinWax can, lasted about 6 hours, during which I turned the blank every hour to try get the hardener to penetrate uniformly.
I think that using this wood hardener had an interesting result. Not only was the wood strengthened, the purpose which was the main intent, but also it turned out that no finishing preparation was necessary in order to achieve a quite nice satin, or matte, final finish on the barrel. I just turned the barrel to the desired shape and size, during which there was no chipping of the previously "punky" wood, and followed that with sandpaper grits of 240 up to 2000. The resulting finish has a mildly glossy look which really appeals to me. . I am going to try this same process on other woods (not necessarily punky) and analyze the results. Sometimes a glossy finish, such as you can get with the usual CA finish, is not just exactly what you might want.
So here are some pictures which you may find somewhat interesting in spite of my "bad" photography.
The first picture shows the finished pen alongside an extra piece of the "punky" wood I used (notice some slight chipping from the surface of the extra piece, which has not gone through the MinWax Wood Hardener yet.
I hope you will be able to ascertain from the photos that the final finished surface of the pen is very smooth and semi-glossy. . I like it very much.
There are additional pictures showing other "sides" of the pen.
The last picture shows the integrated internal assembly of the single barrel Cigar using the new brass tube size of 11/32" (or 8.7mm). . This assembly slides into the glued-in 11/32" and 3/8" brass shroud tubes (not shown, of course). . The 11/32" shroud tube is an "actual size" brass tube (from K&S Hobby Supplies) while the 3/8" shroud tube is a "pen makers size" brass tube.


 ......
 )
)