A 16 day pen

Signed-In Members Don't See This Ad
See more from wolf creek knives

Joined
Dec 22, 2017
Messages
3,053
Location
Wolf Creek Montana
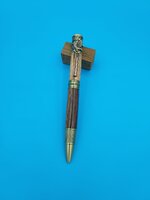
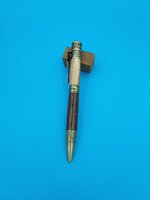
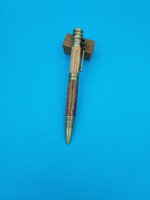
This is an American Patriot pen I finished for a donation to the Rocky Mountain Elk Foundation Veterans drawing for the upcoming banquet. This will accompany the knife I recently posted on this site. The lower barrel is Walnut and the upper barrel is Service-berry (stabilized) I harvested from my cabin up in the Rocky Mountains.
As you're probably all aware, Walnut can be quite riddled with fissures and grooves that normal finishes don't cover. I know many of you use CA or products similar to CA to finish your pens and get some great finishes. Me and CA don't get along and I can't use it so I rely on WOP to do my finishing. When I sanded the blanks down with up to 800 grit sand paper, the surface of the Walnut looked like the surface of the moon. Got me to thinking how I could fill in some of the craters without a lot of expense. I also didn't have time to stabilize the blanks that I'm sure would have filled in some of the voids. Here's my process.

Day 1. Cut the blanks to length, drill the tube holes and glue the tubes in with Epoxy.
Day 2. Square the blanks, remove any Epoxy inside the tube, turn to desired design, sand with up to 800 grit paper and final step was the first application of WOP.
Day 3. On the lathe sand down the blanks with 1500 grit just enough to remove the sheen of the WOP off. Clean with air and apply another coat of WOP.
Day 4-14. Do the same as day 3
Day 15. Same as day 3 but put your final application of WOP on the blanks.
Day 16. Remove the blanks from the bushings, use 800 grit paper to smooth the holes in the blanks and press the pen together.

One note, be sure to remove the bushings from the tubes after each application of WOP. Otherwise they will stick together. This is also the abbreviated version of what I did but it worked and on the photo you'll just see some texture on the Walnut blank.

The pen photo is how it turned out and the finish is just WOP, nothing else. I won't do this again but it was fun watching the craters fill in and at the same time maintain the shine without little pockets of white from sanding off the WOP.

Thanks for looking
 

Attachments

  • 20220221_125030.jpg
    20220221_125030.jpg
    71.4 KB · Views: 228
  • 20220221_125043.jpg
    20220221_125043.jpg
    66.3 KB · Views: 232
  • 20220221_125057.jpg
    20220221_125057.jpg
    65.9 KB · Views: 236
Signed-In Members Don't See This Ad

Dalecamino

Local Chapter Leader
Joined
Jan 2, 2008
Messages
14,572
Location
Indianapolis, In.
An appropriate selection for your donation. The pen is very nice as is the knife. Thanks for the write up on your process. I don't think I'll be trying a 14 day build. WOP was a good choice for a finish. Well done Tom!
 

jrista

Member
Joined
Aug 12, 2021
Messages
2,241
Location
Colorado
Forgive my ignorance, but, what is WOP?

That aside, the pen looks wonderful. Personally, I'm a big fan of preserving the natural wood grain. There are a number of woods like walnut that don't sand to a perfectly smooth surface, and I've always liked that. I use walnut oil and pens plus from Dr's Woodshop, and one of the reasons I like that finish is explicitly because it does not fill in all the grain and make everything a smooth, even plastic surface. (That, and, CA and I don't get along either! :p)
 

magpens

Member
Joined
Feb 2, 2011
Messages
15,912
Location
Canada
@jrista

WOP = Wipe On Poly , a liquid finish you can buy in ( small size ) "paint cans". "Poly" is short for "polyurethane" . . I think !

One common method of applying it to a wood surface is by using small pieces of clean rag ( or blue paper shop towel ) to "wipe" it on and smooth it out.

I am no expert and others may chirp in with other variations of its application.
 

magpens

Member
Joined
Feb 2, 2011
Messages
15,912
Location
Canada
@wolf creek knives

Many thanks, Tom, for showing us this pen and for detailing the complete process for completing it.

I think it is very important and useful to learn about experiments of this nature !

Just one question for now . . . Was there a reason for choosing the 15 day time period in preference to 8 days, say, or 22 days ( just my "random number" selections ) ?
I suppose that the answer may lie in the average thickness that results from each application layer, together with the perceived best final thickness.
And I don't expect that a fully quantitative answer is possible . . . it probably amounts to "gut feeling".
 
Last edited:
Joined
Dec 22, 2017
Messages
3,053
Location
Wolf Creek Montana
Forgive my ignorance, but, what is WOP?

That aside, the pen looks wonderful. Personally, I'm a big fan of preserving the natural wood grain. There are a number of woods like walnut that don't sand to a perfectly smooth surface, and I've always liked that. I use walnut oil and pens plus from Dr's Woodshop, and one of the reasons I like that finish is explicitly because it does not fill in all the grain and make everything a smooth, even plastic surface. (That, and, CA and I don't get along either! :p)

Back in my furniture making days I used a lot of Walnut. I still have quite a bit of it left over from then. On furniture I always left as much grain as possible to give what ever I was making a textured look. It looked great on jewelry boxes and humidors. The problem with a pen is the size of the blank. In my opinion there's just way too much texture and wanted to tone it down a bit.
 
Joined
Dec 22, 2017
Messages
3,053
Location
Wolf Creek Montana
@wolf creek knives

Many thanks, Tom, for showing us this pen and for detailing the complete process for completing it.

I think it is very important and useful to learn about experiments of this nature !

Just one question for now . . . Was there a reason for choosing the 15 day time period in preference to 8 days, say, or 22 days ( just my "random number" selections ) ?
I suppose that the answer may lie in the average thickness that results from each application layer, together with the perceived best final thickness.
And I don't expect that a fully quantitative answer is possible . . . it probably amounts to "gut feeling".

Good question Mal. To be very honest I was getting tired of going into the shop everyday, sanding with 1500 grit and then applying the WOP. Every day I would look at the Walnut blank with a strong light to see the pitting left from the grain of the wood. On the 15th day there was just a bit of texture left so I thought it turned out pretty good. I was hoping for around 3-4 days to get it done but it ended up being 15. Plus I was under a time crunch and 15 days was all I could do. I was recently talking with another member and they suggested using steel wool between coats. That will be my next experiment with WOP and Walnut and I'll post my finding when I'm done with it.

One thing I didn't write about was how I applied the WOP. Using a blue shop towel cut into a small piece. first I went top to bottom on each blank with the WOP. Then I'd turn on the lathe and apply light pressure with the shop towel piece just until I felt resistance as the WOP dried. With the lathe set at around 1000rpm I would apply more WOP until it started to heat up and dry, then apply a bit more WOP. I did that twice. Then I shut down the lathe and applied another coat of WOP, with the lathe off, going from the top to bottom of each blank. Then I let the WOP dry over night. My shop is heated so it was no problem getting it good and dry.
 

jrista

Member
Joined
Aug 12, 2021
Messages
2,241
Location
Colorado
@jrista

WOP = Wipe On Poly , a liquid finish you can buy in ( small size ) "paint cans". "Poly" is short for "polyurethane" . . I think !

One common method of applying it to a wood surface is by using small pieces of clean rag ( or blue paper shop towel ) to "wipe" it on and smooth it out.

I am no expert and others may chirp in with other variations of its application.
Oh, duh, right... I actually have a small can of WOP, actually... Never tried it on a pen! Need to give that a try.
 

tomtedesco

Member
Joined
Jan 7, 2015
Messages
3,284
Location
Centennial, CO
Forgive my ignorance, but, what is WOP?

That aside, the pen looks wonderful. Personally, I'm a big fan of preserving the natural wood grain. There are a number of woods like walnut that don't sand to a perfectly smooth surface, and I've always liked that. I use walnut oil and pens plus from Dr's Woodshop, and one of the reasons I like that finish is explicitly because it does not fill in all the grain and make everything a smooth, even plastic surface. (That, and, CA and I don't get along either! :p)
Glad to hear it was nothing Italian.o_O LOL
 

egnald

Member
Joined
Jun 9, 2017
Messages
3,105
Location
Columbus, Nebraska, USA
Good question Mal. To be very honest I was getting tired of going into the shop everyday, sanding with 1500 grit and then applying the WOP. Every day I would look at the Walnut blank with a strong light to see the pitting left from the grain of the wood. On the 15th day there was just a bit of texture left so I thought it turned out pretty good. I was hoping for around 3-4 days to get it done but it ended up being 15. Plus I was under a time crunch and 15 days was all I could do. I was recently talking with another member and they suggested using steel wool between coats. That will be my next experiment with WOP and Walnut and I'll post my finding when I'm done with it.

One thing I didn't write about was how I applied the WOP. Using a blue shop towel cut into a small piece. first I went top to bottom on each blank with the WOP. Then I'd turn on the lathe and apply light pressure with the shop towel piece just until I felt resistance as the WOP dried. With the lathe set at around 1000rpm I would apply more WOP until it started to heat up and dry, then apply a bit more WOP. I did that twice. Then I shut down the lathe and applied another coat of WOP, with the lathe off, going from the top to bottom of each blank. Then I let the WOP dry over night. My shop is heated so it was no problem getting it good and dry.

Do you use WOP for your knife handles too? I have been using semi-gloss spar uretahne so far, but I think WOP would perhaps be easier to apply. I think I have an old can of it around here somewhere. - I'm also interested in your experience using steel wool. When I have used it in the past it seemed like it was inevetable that I wound up with a stray fiber getting caught up in the finish somewhere before I was all done (probably due to carelessness on my part). - Dave
 

leehljp

Member Liaison
Joined
Feb 6, 2005
Messages
9,326
Location
Tunica, Mississippi,
Back in my furniture making days I used a lot of Walnut. I still have quite a bit of it left over from then. On furniture I always left as much grain as possible to give what ever I was making a textured look. It looked great on jewelry boxes and humidors. The problem with a pen is the size of the blank. In my opinion there's just way too much texture and wanted to tone it down a bit.

Tom, You are bringing to the front a truth that is dance around without mentioning directly: A pen sized blank of wood does not present itself like a slab or board or bowl sized piece of wood. Not directly related but whole pieces of beef taste different than the same meat ground up. In the same manner, when one looks at a piece of wood with grain/capillary texture like most walnut and some other woods, the wrong finish leaves something to be desired, while the same finish might look good on a large piece of walnut. You took care of it with your process. Size often requires a change in finish process from normal.

Thanks!
 
Joined
Dec 22, 2017
Messages
3,053
Location
Wolf Creek Montana
Do you use WOP for your knife handles too? I have been using semi-gloss spar uretahne so far, but I think WOP would perhaps be easier to apply. I think I have an old can of it around here somewhere. - I'm also interested in your experience using steel wool. When I have used it in the past it seemed like it was inevetable that I wound up with a stray fiber getting caught up in the finish somewhere before I was all done (probably due to carelessness on my part). - Dave

First off Dave, ditch the can and probably buy a new can. I store mine in Stop Loss Bags and have had great success. The cans always seem to crystallize over time and that can cause problems. Make sure you have a small funnel if you go the Stop Loss Bags otherwise you'll make a big mess. I've tried Spar Urethane but found that on blond wood it can turn the (i.e. Maple) wood kind of yellow or tan.

After making a lot of knives I've finally settled on WOP. Most handles have 3-5 coats of WOP and most get a final buffing on my Beall Buffing setup. I do use 00 steel wool between each coat of WOP except for the last coat. I usually apply a good amount of WOP on each scale with a small piece of blue shop towel folded and then just keep rubbing it with the blue shop towel until it evens out. Next day I use the steel wool and more WOP until I get the finish I want. As for the steel wool threads sticking to your work. I use a magnet to make sure I have them all taken off. So far so good and this is the method I'll continue to use until I find something else or someone tells me a better/different way.
 

egnald

Member
Joined
Jun 9, 2017
Messages
3,105
Location
Columbus, Nebraska, USA
First off Dave, ditch the can and probably buy a new can. I store mine in Stop Loss Bags and have had great success. The cans always seem to crystallize over time and that can cause problems. Make sure you have a small funnel if you go the Stop Loss Bags otherwise you'll make a big mess. I've tried Spar Urethane but found that on blond wood it can turn the (i.e. Maple) wood kind of yellow or tan.

After making a lot of knives I've finally settled on WOP. Most handles have 3-5 coats of WOP and most get a final buffing on my Beall Buffing setup. I do use 00 steel wool between each coat of WOP except for the last coat. I usually apply a good amount of WOP on each scale with a small piece of blue shop towel folded and then just keep rubbing it with the blue shop towel until it evens out. Next day I use the steel wool and more WOP until I get the finish I want. As for the steel wool threads sticking to your work. I use a magnet to make sure I have them all taken off. So far so good and this is the method I'll continue to use until I find something else or someone tells me a better/different way.

Great! Thanks for the details. I will certainly buy a new can of WOP and give it a go. I've often thought about trying those Stop Loss Bags too, but haven't taken that step yet either. Thanks again - Dave
 
Top Bottom