Someone asked about how I modified the Nevus kit to fit. I figure answering here might be of interest to others as well.
First, the kit isn't very modified at all... only a couple things different than normalwere done to it.
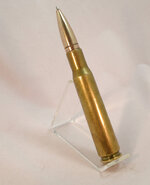
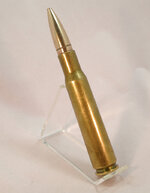
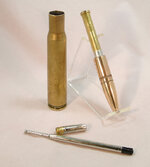
I bought the .50 cal brass and pre-drilled bullets from bruce119 here on IAP. The hole for the refill point has to be drilled out larger as it was drilled for a Cross refill.
The Nevus unscrews at both ends. I didn't want that, plus it's a little long so I pressed the nib in a bit past the split for the 2 brass pieces where it unscrews. Not too much though. It takes a little trial and error to get the length right so the point comes out but also retracts.
You will have to drill the bullet with 2 different bits. One for the refill point - easy enough pic one the point and go through and drill all the way. But you'll probably find the point can't make it out. I found one the shoulders was hitting the drilled out insides of the bullet and needed drilling out further. There are a couple stepped shoulders to the nib end of the kit. I just marked each of them with a Sharpie put the kit all the way into the bullet and twisted. The shoulder that hits will scrape off the Sharpie marking. For me it was the largest of the drilling (tube size bit - the Nevus has 4 drill bits normally).
I did add some aluminum tape to the tube. The pre-drilled hole was a bit bigger than the tube and I wanted to keep it as straight (concentric) as possible as I glued it in. 2 layers was what worked for me. Make sure to not overlap the ends of the layer - so only 2 layers exactly not 3 or 4 on the overlap which would have pushed it off to a side. I then epoxied the bullet to the end of the mechanism. Let it dry and then re-tested fit. At this point you actually have a working pen with a bullet on the nib end.
A few more fittings for how much bullet I wanted showing and how much into the shoulder of the cartridge was next up. I figured that I wanted to go to the 1st crimp line on the bullet. That's totally up to you and what you want. I could see others wanting more of the bullet showing "for effect". This meant I needed to sand down the brass finial end tube a little. I just used a disc sander, it didn't take much to get to where I wanted.
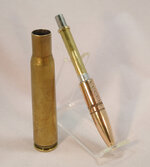
Once I had it to the length I wanted, I backed off finial tube off the transmission as much a possible and still be sure to keep it straight. I did this as I was blind gluing it inside the cartridge and don't want epoxy on the transmission. Before I did though I wrapped 1 layer of aluminum tape (again no overlap) to the bullet to where the bullet would be covered by the cartridge (ie the hidden part of the bullet when assembled). I removed this after the epoxy set. It was basically a spacer so the bullet wouldn't shift to one side, or scrape the brass will working the pen. It actually worked better than I hoped.
When gluing the finial end into the cartridge I put some epoxy (but NOT TOO MUCH) on the outside and inside of the finial brass tube being sure to keep it slightly tilted away from the transmission as I did. Then I inserted all of it straight down vertically into the brass cartridge. Make sure not to touch the sides, and down press the transmission down the tube all the way so you don't get epoxy onto the transmission. Keep it standing up with bullet to the top and let it dry a good long time. I didn't really have a way to clean up after a glue mess up inside the cartridge... so better safe than sorry.
So as far as "modifying" the kit, really only 2 differences from stock.
1) pressed the nib end into the brass tube past the separation of the 2 nib pieces
2) sanded down the finial end to lower the bullet further into the cartridge.
Hope that helps...