4 Seam Rippers

Signed-In Members Don't See This Ad
See more from HeartofaPen

HeartofaPen

Member
Joined
May 16, 2010
Messages
129
Location
Hockley, TX
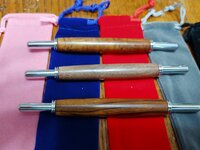
Finished up 4 seam rippers today after some OOR issues. Does anyone else have issue with the thin insert you insert into the tube for the seam ripper or other to go in OK? Also, seems like when I have them inserted, it is hard to get them out. I am not overly thrilled with the thin metal insert piece but got them to work. Single one is Cocobolo. Triple one is Hawaiian Koa, Black Walnut, and Cocobolo. Any assistance for future ones is greatly appreciated.
 

Attachments

  • 20201203_110845.jpg
    20201203_110845.jpg
    157.6 KB · Views: 194
  • 20201215_142755.jpg
    20201215_142755.jpg
    127.4 KB · Views: 199
Signed-In Members Don't See This Ad

Kenny Durrant

Member
Joined
Sep 11, 2012
Messages
2,496
Location
Sachse Tx. 75048
I've had trouble with them but I like them over the others. I've found that sometimes when using a barrel trimmer it will round over a lip inside the tube. I use a round file to make sure it's a smooth clean hole. I'll also wrap it around one of the tips to help keep it from crushing while trying to invert the spring. I've found that watching those two things helped a lot.
 

studioseven

Member
Joined
May 6, 2014
Messages
794
Location
Wisconsin
I have always wondered which end of the spring/holder is supposed to get inserted first. The instruction are not very clear.

Seven
 
Joined
Dec 22, 2017
Messages
3,053
Location
Wolf Creek Montana
The springs can be a pain at times and I have a one in 20 failure rate. Best bet I can give is what Kenny suggest above and use the actual ripper to insert the spring. I would highly suggest that if you need to replace any of the springs you go directly to PSI for replacement. I've used replacements from other vendors, some here on IAP, and they sell junk. It has to be spring steel, not some knock off that doesn't work. Good luck and if you figure something out let me know. I've got close to 10 kits that are missing the spring due to the issues you've seen.
 

mmayo

Member
Joined
Jan 12, 2013
Messages
2,959
Location
Tehachapi, CA
My solution: round the spring insert into a cylinder very carefully. Overlap the ends a bit so it becomes smaller than the tube and insert keeping overlapped the entire time. This has made it fairly routine with few errors or damage.
 

lathe monkey

Member
Joined
Oct 29, 2016
Messages
48
Location
Ottawa Valley Onatrio Canada
very nice work. I know what you mean about the spring, what I do is start the spring gently into the tube, I have seam ripper needle from one of the kits that I screwed up, I use that to push the spring down the tube just till the top of the spring is about 1/8-1/4 inch from going all the way in, then I take the needle out and just push on the side of the spring, you should hear a little "tik " sound, thats the spring crossing its self, then push the spring in the rest of the way using the the need again. I figured this out after 4or 5 kits, now I have sold almost 70 seam rippers.
for whats its worth William Wood write here in Canada has started to sell kits that are threaded on, no more spring.
 

More4dan

Member
Joined
Mar 17, 2016
Messages
2,102
Location
Katy, TX
My solution: round the spring insert into a cylinder very carefully. Overlap the ends a bit so it becomes smaller than the tube and insert keeping overlapped the entire time. This has made it fairly routine with few errors or damage.

I do the same as mmayo to get the spring started. I the use the ripper to finish pushing the spring all the way in. I found a dental pick works well for removing the spring when necessary.

Danny


Sent from my iPhone using Penturners.org mobile app
 
Top Bottom