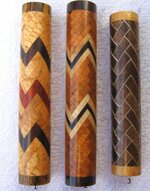
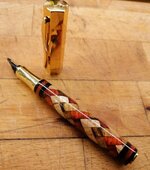
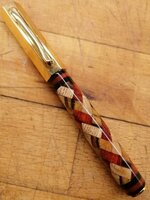
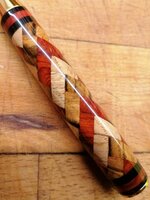
This is my second attempt at a 360 herringbone. Cocobolo, Padauk and Oak. Unfortunately I didn't make enough layers to cover the whole barrel so I capped each end with African Blackwood and Padauk bands. My presentation may not be the best but I'd appreciate any critique.

You are using an out of date browser. It may not display this or other websites correctly.
You should upgrade or use an alternative browser.
You should upgrade or use an alternative browser.
360 herringbone Mk2
- Thread starter Eckspec2
- Start date
Signed-In Members Don't See This Ad
Signed-In Members Don't See This Ad
Thanks CaseyBeautiful!
MRDucks2
Member
First, I am not a segmenter (but I know a couple)  . Congratulations on achieving and your interesting 360 design. The African Blackwood was a nice save and looks good.
I think the choice and complexity of the wood chosen and how it is used together completely distracts from the geometry of the design.
Still a great accomplishment, though.
. Congratulations on achieving and your interesting 360 design. The African Blackwood was a nice save and looks good.I think the choice and complexity of the wood chosen and how it is used together completely distracts from the geometry of the design.
Still a great accomplishment, though.
Dale Parrott
Member
This is a very challenging project and I am speaking from experience. I love your color combinations and the save on the end caps. It's amazing how much waste there is in length and diameter to get down to an actual cylinder. So, Congrats on a beautiful pen and keep up the good work. It's a winner!
mark james
IAP Collection, Curator
Excellent work Eric. The choices of timbers is entirely arbitrary to individual taste. Less variations will possibly enhance the design, but also highlight any possible flaws. I personally like the timbers you choose. A very fussy segmenting project, but you have a wonderful finished pen. I also like the endcaps - a very nice touch and the dimensions look spot on.
Great work - thanks for sharing.
Great work - thanks for sharing.
Thanks Mike, I do agree the complexity of the wood does distract. It was what I had at the time and was thinking more of the colour combination rather than how the grain would appear. You never really know how that will appear until its doneFirst, I am not a segmenter (but I know a couple)
I think the choice and complexity of the wood chosen and how it is used together completely distracts from the geometry of the design.
Still a great accomplishment, though.
Thanks Dale, I think I'm becoming addicted to this design. I completed my first 360 last week and have another 2 assembling at the moment. I'm also acquiring quite a lot of clamps and jigsThis is a very challenging project and I am speaking from experience. I love your color combinations and the save on the end caps. It's amazing how much waste there is in length and diameter to get down to an actual cylinder. So, Congrats on a beautiful pen and keep up the good work. It's a winner!

Thanks Mark, didn't think about the grains when I chose the timbers so that has been a lesson learned.Excellent work Eric. The choices of timbers is entirely arbitrary to individual taste. Less variations will possibly enhance the design, but also highlight any possible flaws. I personally like the timbers you choose. A very fussy segmenting project, but you have a wonderful finished pen. I also like the endcaps - a very nice touch and the dimensions look spot on.
Great work - thanks for sharing.
Thanks KenI like it a lot. The colors you chose look good to me and I also like the end caps. Good job on this extremely difficult design.
Thanks Michael, it's the first time I have used the Hexa kit. The barrel is a bit longer than other kits I use hence the end caps.Great work Eric I like the colours and the pattern. Not sure of the Hexa kit I've used it and can't make up my mind. But very well done on the segmenting.
Jim15
Member
Beautiful work.
Kenny Durrant
Member
There's not much I can say that hasn't already been said. It's a fantastic pen. Well Done.
Thanks JimBeautiful work.
Thanks KennyThere's not much I can say that hasn't already been said. It's a fantastic pen. Well Done.
RichAldrich
Member
Looks great!
Alan Morrison
Member
Job well done, Eric.
The end caps look like they should be there anyway, as they add to the overall look of the pen.
Good save.
Alan
The end caps look like they should be there anyway, as they add to the overall look of the pen.
Good save.
Alan
wood128
Member
Very nice work . I like the color combinations with the different timbers. The end caps are beautiful. I have made well over 100 of these 360 degree herringbone designs ( learning a little each time ) and now use pieces ( 6 per layer ) approximately 1/8 " thick and 3/4 " square . Squareness and the same thickness per layer are VERY IMPORTANT . I would suggest 2 or more layers of the same wood , but the overall design is arbitrary ........design it on paper first . How to use veneer in the joints ? With many trials , I found that covering one long surface of the 3/4 " square with veneer , then cut the 1/8 " thick pieces and finally cover one 3/4 " x 3/4 " surface with veneer . The end result is each piece has one edge and one flat surface covered with veneer . Try different colored veneers !!! Assembly is interesting but not difficult . Have fun . I would be more than happy to help you with any questions. I learned from many others .
sorcerertd
Member
Personally, I really like the contrasting woods. If I really scrutinize the design, there appear to be a couple spots with gaps, but the contrasting woods distract from them. I don't know if you were going for a certain look, but it has an overall old world "feel" about it. The banded "caps" were a great save. Plan Bs work out surprisingly well in many cases and, in my opinion, the bands frame your herringbone design perfectly on this one. As long as the ends are symmetrical, nobody would even know it wasn't planned that way. I suspect we are all our own worst critics, mostly because what we got isn't always what we pictured going into the project.
EXTREMELY B*E*A*U*T*I*F*U*L !!!!! . . 
And I love the end-caps and think they should be emphasized ( ie. not excused ) as an INTENTIONAL FEATURE !!!! . .
Also, I don't perceive any distraction by the nature of the woods used ....... looks a bit like Scottish plaid ! ! ! ! !
And I love the end-caps and think they should be emphasized ( ie. not excused ) as an INTENTIONAL FEATURE !!!! . .
Also, I don't perceive any distraction by the nature of the woods used ....... looks a bit like Scottish plaid ! ! ! ! !
jttheclockman
Member
Very well done. This is not an easy design to even get to look correct and no gaps to begin with. I actually think the end caps give it a better look. The woods are arbitray in my mind. Any combination works. Every time I see this pattern I think of double weave rope. Job well done and the more you do the more you will experiment. Thus the fun of segmenting.
Thanks RichardLooks great!
Thanks AlanJob well done, Eric.
The end caps look like they should be there anyway, as they add to the overall look of the pen.
Good save.
Alan
Thanks Joseph, I've seen a few designs with veneer, it really does make for an awesome pattern. I think I'll definitely be trying that as I develope my techniqueVery nice work . I like the color combinations with the different timbers. The end caps are beautiful. I have made well over 100 of these 360 degree herringbone designs ( learning a little each time ) and now use pieces ( 6 per layer ) approximately 1/8 " thick and 3/4 " square . Squareness and the same thickness per layer are VERY IMPORTANT . I would suggest 2 or more layers of the same wood , but the overall design is arbitrary ........design it on paper first . How to use veneer in the joints ? With many trials , I found that covering one long surface of the 3/4 " square with veneer , then cut the 1/8 " thick pieces and finally cover one 3/4 " x 3/4 " surface with veneer . The end result is each piece has one edge and one flat surface covered with veneer . Try different colored veneers !!! Assembly is interesting but not difficult . Have fun . I would be more than happy to help you with any questions. I learned from many others .
Thanks Tod, I'm developing a technique each time I try and always looking for ways to improvePersonally, I really like the contrasting woods. If I really scrutinize the design, there appear to be a couple spots with gaps, but the contrasting woods distract from them. I don't know if you were going for a certain look, but it has an overall old world "feel" about it. The banded "caps" were a great save. Plan Bs work out surprisingly well in many cases and, in my opinion, the bands frame your herringbone design perfectly on this one. As long as the ends are symmetrical, nobody would even know it wasn't planned that way. I suspect we are all our own worst critics, mostly because what we got isn't always what we pictured going into the project.
Thanks Mal, you've given me an idea with the Scottish plaid. TEXTREMELY B*E*A*U*T*I*F*U*L !!!!! . .
And I love the end-caps and think they should be emphasized ( ie. not excused ) as an INTENTIONAL FEATURE !!!! . .
Also, I don't perceive any distraction by the nature of the woods used ....... looks a bit like Scottish plaid ! ! ! ! !
Thanks Mal, you've given me an idea with the Scottish plaid. Thank you
Thanks JohnVery well done. This is not an easy design to even get to look correct and no gaps to begin with. I actually think the end caps give it a better look. The woods are arbitray in my mind. Any combination works. Every time I see this pattern I think of double weave rope. Job well done and the more you do the more you will experiment. Thus the fun of segmenting.
its_virgil
Member
Very nice and well executed. I have made several of the 360 herringbone blanks (and they are not simple and they are time consuming) and I can't decide if I like one wood or three. l do both. Thanks for sharing and I look forward to seeing more of these. Once again, exceptionally well done.
Do a good turn daily!
Don
Do a good turn daily!
Don
Thanks Don, I try toVery nice and well executed. I have made several of the 360 herringbone blanks (and they are not simple and they are time consuming) and I can't decide if I like one wood or three. l do both. Thanks for sharing and I look forward to seeing more of these. Once again, exceptionally well done.
Do a good turn daily!
Don
Hi Joseph, its been a while since I posted this but I did find this image which I believe is your work. They are absolutely stunning. I'm in the process of attempting a 360 herringbone bone with veneer as you suggested and was struggling to figure out how you did it. Typical me, I'd went straight in to making strips with veneer on one edge before I revisited this post. I now realise that I should have attached veneer on one edge before cutting in to strips to create a "right-angle" of veneer on 2 sides as you advised. A lesson learned the hard wayVery nice work . I like the color combinations with the different timbers. The end caps are beautiful. I have made well over 100 of these 360 degree herringbone designs ( learning a little each time ) and now use pieces ( 6 per layer ) approximately 1/8 " thick and 3/4 " square . Squareness and the same thickness per layer are VERY IMPORTANT . I would suggest 2 or more layers of the same wood , but the overall design is arbitrary ........design it on paper first . How to use veneer in the joints ? With many trials , I found that covering one long surface of the 3/4 " square with veneer , then cut the 1/8 " thick pieces and finally cover one 3/4 " x 3/4 " surface with veneer . The end result is each piece has one edge and one flat surface covered with veneer . Try different colored veneers !!! Assembly is interesting but not difficult . Have fun . I would be more than happy to help you with any questions. I learned from many others .
. I now have quite a few strips of Padauk with veneer on one side that I'll probably stash away for another project and start again Very nice work . I like the color combinations with the different timbers. The end caps are beautiful. I have made well over 100 of these 360 degree herringbone designs ( learning a little each time ) and now use pieces ( 6 per layer ) approximately 1/8 " thick and 3/4 " square . Squareness and the same thickness per layer are VERY IMPORTANT . I would suggest 2 or more layers of the same wood , but the overall design is arbitrary ........design it on paper first . How to use veneer in the joints ? With many trials , I found that covering one long surface of the 3/4 " square with veneer , then cut the 1/8 " thick pieces and finally cover one 3/4 " x 3/4 " surface with veneer . The end result is each piece has one edge and one flat surface covered with veneer . Try different colored veneers !!! Assembly is interesting but not difficult . Have fun . I would be more than happy to help you with any questions. I learned from many others .