As the tap and die topic is doing the rounds again, I thought I would re-share how I do it. I have a metal lathe but at the time had no real idea how to cut three start threads. I got all my answers right here on IAP.
I do think that before anyone goes down the route of either making or buying their own threading tools, they should decide before hand what it is exactly that you want to achieve in the end.
Once I understood what was told to me about cutting external 3 start threads, I decided that the threads I would make would be of no particular size and would not match any existing thread on available pen kits.
My reason was that making threads was a big enough learning curve without having to match them to someone elses as well.
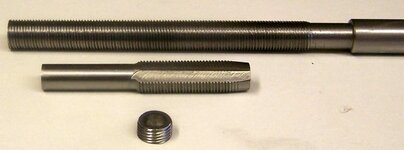
First I took a Stainless Steel shaft and turned it to approx 11mm. The shaft was about 330mm long. I cut the 3 threads on the shaft. For about 3/4 of its length.
Next I cut about 3 inches from the threads and this was going to be a tap. I turned half of the threads off of this piece on one end and slightly tapered the other end. I just eyeballed this taper and I guess it takes up the first 4-5 threads.
Milling the flutes was a bit of a mission. I don't have a milling machine so had to do horizontal milling. I did ensure that I ended up with a slight positive rake.
Of course Stainless Steel is hardly the correct material to make a tap, but I knew I would never be tapping anything harder that plastic or wood, so I'm happy with it. I have a small diamond pocket stone that re-hones the edges when needed.
The remaining thread from the rod is simply cut off as required. I just drill ( and sometimes tap ) a hole down the middle before parting off the piece I want. I will just repeat the whole saga when the rod is used up.
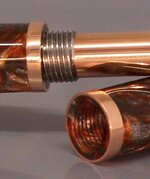
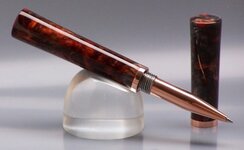
In the pic below you can see the rod, the tap and a piece of thread that was used on the blue pen. The cap on the blue pen is thick enough to support the internal threads. On the other pen, a copper band re-inforces them.
I hope this can help someone")
I do think that before anyone goes down the route of either making or buying their own threading tools, they should decide before hand what it is exactly that you want to achieve in the end.
Once I understood what was told to me about cutting external 3 start threads, I decided that the threads I would make would be of no particular size and would not match any existing thread on available pen kits.
My reason was that making threads was a big enough learning curve without having to match them to someone elses as well.
First I took a Stainless Steel shaft and turned it to approx 11mm. The shaft was about 330mm long. I cut the 3 threads on the shaft. For about 3/4 of its length.
Next I cut about 3 inches from the threads and this was going to be a tap. I turned half of the threads off of this piece on one end and slightly tapered the other end. I just eyeballed this taper and I guess it takes up the first 4-5 threads.
Milling the flutes was a bit of a mission. I don't have a milling machine so had to do horizontal milling. I did ensure that I ended up with a slight positive rake.
Of course Stainless Steel is hardly the correct material to make a tap, but I knew I would never be tapping anything harder that plastic or wood, so I'm happy with it. I have a small diamond pocket stone that re-hones the edges when needed.
The remaining thread from the rod is simply cut off as required. I just drill ( and sometimes tap ) a hole down the middle before parting off the piece I want. I will just repeat the whole saga when the rod is used up.
In the pic below you can see the rod, the tap and a piece of thread that was used on the blue pen. The cap on the blue pen is thick enough to support the internal threads. On the other pen, a copper band re-inforces them.
I hope this can help someone
Attachments

Last edited: