
alxe24
Member
Big learning experience so far.
Well after making this pen I feel like I made 15 other pens. Time and materials got me just about there.
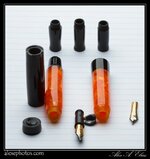
I made 3 Section holders, the 1st one came up beautiful but is was going to fit into a 14mm internal diameter cap that ended up being 12mm. The 2nd one was fine but a bit wider that I needed and decided to go for the 3rd to gain experience. Now I need a 4th one to accommodate for the shorter cap that I need to repair.
I also made 2 body sections. The 1st body was going to have 14mm threads I cut the threads wrong and stripped them. Since I liked the body and I did not wanted to waste it I cleaned those 14mm threads and re threaded a 12mm set on top of the old ones. So far so good. Now I needed to reshape the body a bit because of the reduced size on the front. I graved the Beall chuck inserted a piece of rod in it and tap a 12mm thread to screw the body section in and reshape it like that. (it almost worked out) at the end while reshaping I got a catch and stripped the threads again.
The second body ended up being about half inch shorter that I wanted due to bad threading technique. Twice in the same body. There we go again, darn threads.
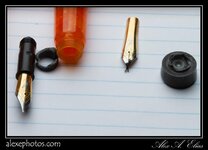
Now it was the final step. The cap. So far the first one made it all the way without any problems, but I dropped it after taking the first picture and I shattered the top thread. Now I need to fix it (may be re do it if I brake it more while trying to repair it) In the interim I managed to brake the nib (go figure and don't ask)
So here it is, or it was. The pen took me 5 or 6 acrylic blanks, 1 feed and 2 nibs. The only thing I'm pretty sure I won't break is the clip.
Thanks for looking and reading this long post.
Regards
Alex.
PS: When it's done again I'll post it.
Well after making this pen I feel like I made 15 other pens. Time and materials got me just about there.
I made 3 Section holders, the 1st one came up beautiful but is was going to fit into a 14mm internal diameter cap that ended up being 12mm. The 2nd one was fine but a bit wider that I needed and decided to go for the 3rd to gain experience. Now I need a 4th one to accommodate for the shorter cap that I need to repair.
I also made 2 body sections. The 1st body was going to have 14mm threads I cut the threads wrong and stripped them. Since I liked the body and I did not wanted to waste it I cleaned those 14mm threads and re threaded a 12mm set on top of the old ones. So far so good. Now I needed to reshape the body a bit because of the reduced size on the front. I graved the Beall chuck inserted a piece of rod in it and tap a 12mm thread to screw the body section in and reshape it like that. (it almost worked out) at the end while reshaping I got a catch and stripped the threads again.
The second body ended up being about half inch shorter that I wanted due to bad threading technique. Twice in the same body. There we go again, darn threads.
Now it was the final step. The cap. So far the first one made it all the way without any problems, but I dropped it after taking the first picture and I shattered the top thread. Now I need to fix it (may be re do it if I brake it more while trying to repair it) In the interim I managed to brake the nib (go figure and don't ask)
So here it is, or it was. The pen took me 5 or 6 acrylic blanks, 1 feed and 2 nibs. The only thing I'm pretty sure I won't break is the clip.
Thanks for looking and reading this long post.
Regards
Alex.
PS: When it's done again I'll post it.
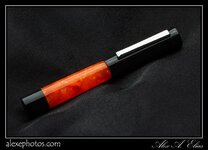
 that's the learning curve we use to perfect our craft. A suggestion only, with the photo of the full pen, it is hard to see on the black background, try using a lighter color to make it stand out.
")