1st dragon test

Signed-In Members Don't See This Ad
See more from workinforwood

workinforwood

Member
Joined
Mar 1, 2007
Messages
8,173
Location
Eaton Rapids, Michigan, USA.
This is my first dragon being cut out, and is still cutting right now. It's 3 hrs in, about 1/2 done I think. Took me about 4 weeks to design and cost me quite a bank roll! :redface: Hey..I never ran one of these before and I had a ton of hickups along the way, mostly with programming. This dragon will be about 1.25x2" and .125 deep.

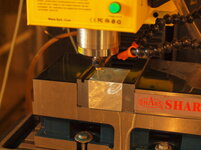
Pic 1 you see the little block of aluminum I got at a garage sale.

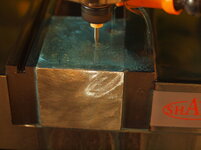
Pic 2, the machine moved to cut position 1

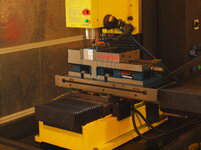
Pic 3, a zoom out of the machine as it floods away. yes..that is one heck of a vise you can sure throw out the back moving it around!

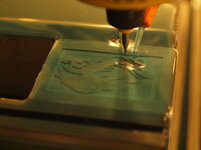
Pic 4, you can see the square pocket and outline of the dragon submerged under a bath of coolant..yes the coolant looks and smells like antifreeze and it's pretty sticky too. Eventually when the outside is all finished the machine will move into the inside of the dragon and cut more pockets.

I thought maybe my camera could do a few minutes of video, but nope, doesn't do that..all I can show is some pics of my fun. I have lots to learn, but at least I feel I made it to the base of the mountain.
 

Attachments

  • mill1.jpg
    mill1.jpg
    79.5 KB · Views: 330
  • mill2.jpg
    mill2.jpg
    65.7 KB · Views: 336
  • mill3.jpg
    mill3.jpg
    74.9 KB · Views: 372
  • mill4.jpg
    mill4.jpg
    53.7 KB · Views: 490
Signed-In Members Don't See This Ad

workinforwood

Member
Joined
Mar 1, 2007
Messages
8,173
Location
Eaton Rapids, Michigan, USA.
This is an 85 pound vise and my machine can handle much more, something like 350Lbs. It's a Syil X5.

It's still cutting now, at 3am, 15hrs in. I should have maybe made the cuts shallower. I have it set to cut 1/8" deep, I'm going for the maximum depth of the cutter to see what happens..this is after all a test to see what the bits can handle, at what speeds, how deep, how it looks, several factors so when I reach the point where I can make pens I know my limitations. The amount of surface material being removed from this block would be comparable to how much material would be removed if making a pen blank. I'm not going to load the 4th axis any time too soon though, I want to practice more walking first, do a few designs like this and some engraving before getting too complicated.
 

workinforwood

Member
Joined
Mar 1, 2007
Messages
8,173
Location
Eaton Rapids, Michigan, USA.
This is the dragon after finished cutting. It's pretty good, would have been even better with an even smaller bit, guess I better get some. Some of the details are lost due to the bit size. It's not perfectly centered because I couldn't decipher where to start the machine. Now I've got that figured out though. I set my design over an invisible block and zero is the lower left corner of that block and the image is in the center or other place should I decide to move it, and I did not enter the true block size as I didn't know what it would be and didn't really think it mattered, but now I know it does. I was worried about the bit clogging up with aluminum, but have also now learned that is not much concern at all with bits this small and the speeds I can run them at is amazing along with fluid cooling there's no chance of the bit clogging, just breaking if I feed it too fast. I filled the dragon with inlace and it's sitting in the shop curing. Hopefully tomorrow I'm going to engrave my wife's name on top of it. I'll have to come up with 3 more different designs to cover the other 3 sides of the block too, that will look neat on her desk at work.
 

Attachments

  • dragonblock1.jpg
    dragonblock1.jpg
    119.5 KB · Views: 251
Joined
Jan 2, 2009
Messages
137
Location
Brandon Twp. MI
When writing a CNC program it is usually faster to start with a larger cutter and rough out most of the stock, then finish with the smaller cutter, the trick is making sure the different cutter lengths are properly compensated for, there is a new business in Ann Arbor that you might want to look in to as a possible source for training.
http://www.maker-works.com/
 

workinforwood

Member
Joined
Mar 1, 2007
Messages
8,173
Location
Eaton Rapids, Michigan, USA.
This is the dragon filled with inlace and my wife's name engraved on top! Setting up the software and cutting the v engraving was much simpler than making a picture! The pic isn't great, kinda dark in the house and flash causes too much reflection. I was going to polish it, but right now it is sanded 220 with orbital and I'm liking the matte finish that gave it and may just leave it like this. Now I need to design some more stuff for the other 3 sides. :biggrin:
 

Attachments

  • dragonblock.jpg
    dragonblock.jpg
    29.2 KB · Views: 176
Top Bottom