Sunday Play

Signed-In Members Don't See This Ad
See more from Hippie3180

Hippie3180

Member
Joined
May 30, 2023
Messages
980
Location
Texas
With limited tools I managed to eek out a closed end pen in walnut. The cap and body do not match as they are two different blanks to make sure I had enough to part off of the body (my blanks are 5".) I consider this a prototype so I wasn't terribly concerned with that. The overall pen body is a bit long perhaps, but I consider it a success as the closed end was achieved.

IMG_1648.jpeg
 
Signed-In Members Don't See This Ad

Hippie3180

Member
Joined
May 30, 2023
Messages
980
Location
Texas
My brain is short circuiting, can post pictures on how it works?
I do have a couple of the process.

So we put a Jacobs chuck in the headstock with (a mandrel)and a turn by center adapter, then the bushing for the kit that corresponded with the (center end of the body) and then used the 60 degree to steady the body while turning. I don't have a pic, but you'll see it's pretty much the same set up for the cap, except for with the cap we installed the mandrel saver on the tail stock.

Here's a pic of the cap, the only difference here is the there is a mandrel and a mandrel saver, for the body we used the 60 degree. I say we here, because this whole Macgyvering scenario took two heads not one.
IMG_1592.jpeg


For sanding the set up is the Jacobs chuck goes into the headstock, a punch a bit smaller than the 27/64 tube went into the Jacobs chuck to make a mandrel, painters tape went onto the punch to help the barrel hold (like a jamb chuck.) We did have a small issue at the beginning trying to sand the body, when we first put the body on the punch it wanted to back off a bit due to the air trapped within the body and the punch, but we put tape to form a crude jamb chuck basically and it held for us to sand.
 

Attachments

  • IMG_0115.jpeg
    IMG_0115.jpeg
    229.7 KB · Views: 45
Last edited:

KenB259

Member
Joined
Dec 24, 2017
Messages
3,595
Location
Michigan
I do have a couple of the process.

So we put a Jacobs chuck in the headstock with and turn by center adapter, then the bushing for the kit that corresponded with the (center end of the body) and then used the 60 degree to steady the body while turning. I don't have a pic, but you'll see it's pretty much the same set up for the cap, except for with the cap we installed the mandrel saver on the tail stock.

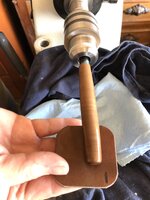
Here's a pic of the cap, the only difference here is the mandrel saver, for the body we used the 60 degree. I say we here, because this whole Macgyvering scenario took two heads not one.


For sanding the set up is the Jacobs chuck goes into the headstock, a corresponding punch (27/64) went into the Jacobs chuck to make a mandrel, painters tape went onto the punch to help the barrel hold (like a jamb chuck.) We did have a small issue at the beginning trying to sand the body, when we first put the body on the punch it wanted to back off a bit due to the air trapped within the body and the punch, but we put tape to form a crude jamb chuck basically and it held for us to sand.
I meant, can you show us how the pen works? Sorry for any confusion.
 

derekdd

Member
Joined
Jan 29, 2023
Messages
1,107
Location
Wisconsin
What a cool idea and finished product.

I agree with the fellas, I can't tell it's two different blanks.

Is your process based on the video Ed posted last week on how to make any kit pen closed ended?
 

Hippie3180

Member
Joined
May 30, 2023
Messages
980
Location
Texas
What a cool idea and finished product.

I agree with the fellas, I can't tell it's two different blanks.

Is your process based on the video Ed posted last week on how to make any kit pen closed ended?
We didn't have the pen chuck Ed used, and we read itsvirgil's pdf..and then used what we had on hand to make it work. Just goes to show if you put some thought into thins you can use what you have.
 

Hippie3180

Member
Joined
May 30, 2023
Messages
980
Location
Texas
I meant, can you show us how the pen works? Sorry for any confusion.
Oh geez! So sorry for all the process explanation then.

The pen is actually a Manager Flountain much like this one only the end is closed. We could have closed the cap/clip end, but it wouldn't have had a clip. The end circled is the closed end on the walnut pen/instead of having the metal cap on the end of the barrel. Learning to turn closed ends is a step towards making kitless pens.

IMG_1533.jpeg
 
Last edited:

KenB259

Member
Joined
Dec 24, 2017
Messages
3,595
Location
Michigan
That makes sense now, I for the life of me thought that was a twist pen of some sort. Thanks for the picture and the pictures of the process were appreciated as well.
 
Top Bottom