
You are using an out of date browser. It may not display this or other websites correctly.
You should upgrade or use an alternative browser.
You should upgrade or use an alternative browser.
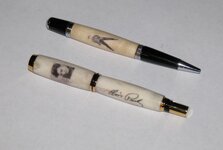
Elvis Lives
- Thread starter reddwil
- Start date
Signed-In Members Don't See This Ad
See more from reddwil


Paul,
I've only been at it for a very short while. The info I used to get started was this thread http://www.penturners.org/forum/showthread.php?t=43032, which also contained this tutorial link http://lumberjocks.com/jocks/Kerux/blog/3811.
Also, I'm not sure where I picked this up (except it was from someone else on IAP), but a good way to print decals on the odd size decal paper (5.5" x 8.5") is to:
1 - Print the image you will use on regular 8-1/2 x 11 paper to get the size right
2 - Cut a small piece of decal paper (about 1" x 1" or whatever size is a little larger than the image)
3 - Tape the decal paper directly over the printed image on the regular paper (I use scotch tape, two pieces, one over the top 1/16" of the decal paper and one over the bottom 1/16" of the decal paper)
4 - Re-insert the paper into the printer and reprint (this time it will print on the decal)
5 - Let the ink dry and spray with bonder per Testors instructions
This works well to avoid using lots of decal paper. I figure if you use squares of about 1" x 1", then each sheet will yield about 40 decals and each pack of six sheet will provide about 240 decals. At about $13.50 for six sheets of decal and a can of bonder, that makes each decal cost only about six cents.
Lastly (again remember I am a novice) it seems that the decal goes on smoother by using Grizz's tutorial but also by slightly dampening the area where the decal will go just before sliding it onto the pen barrel. This seems to allow you to reposition the decal easier after sliding it onto the pen and also seems to aid in smoothing out air bubbles.
Hope this helps.


Signed-In Members Don't See This Ad
papaturner
Member
Very good work.
tim self
Member
I'm betting she'll love them. Nice work
Dalecamino
Local Chapter Leader
Nice set of pens !
ronhampton
Member
very nice!=0]
mostangrypirate
Member
those turned out great. I would really like to know the decal process. I have had a lot of ideas lately. is there a thread somewhere that explains it?(edit)...sorry, I should ask WHICH is the best thread to view. there is close to 80 threads w/keyword decal. I have time, but not that much.
Last edited:
CaptG
Member
Those are a couple of really nice looking pens. That is a lucky lady.
toolcrazy
Member
Very nice work.
stoneman
Member
those turned out great. I would really like to know the decal process. I have had a lot of ideas lately. is there a thread somewhere that explains it?(edit)...sorry, I should ask WHICH is the best thread to view. there is close to 80 threads w/keyword decal. I have time, but not that much.
Paul,
I've only been at it for a very short while. The info I used to get started was this thread http://www.penturners.org/forum/showthread.php?t=43032, which also contained this tutorial link http://lumberjocks.com/jocks/Kerux/blog/3811.
Also, I'm not sure where I picked this up (except it was from someone else on IAP), but a good way to print decals on the odd size decal paper (5.5" x 8.5") is to:
1 - Print the image you will use on regular 8-1/2 x 11 paper to get the size right
2 - Cut a small piece of decal paper (about 1" x 1" or whatever size is a little larger than the image)
3 - Tape the decal paper directly over the printed image on the regular paper (I use scotch tape, two pieces, one over the top 1/16" of the decal paper and one over the bottom 1/16" of the decal paper)
4 - Re-insert the paper into the printer and reprint (this time it will print on the decal)
5 - Let the ink dry and spray with bonder per Testors instructions
This works well to avoid using lots of decal paper. I figure if you use squares of about 1" x 1", then each sheet will yield about 40 decals and each pack of six sheet will provide about 240 decals. At about $13.50 for six sheets of decal and a can of bonder, that makes each decal cost only about six cents.
Lastly (again remember I am a novice) it seems that the decal goes on smoother by using Grizz's tutorial but also by slightly dampening the area where the decal will go just before sliding it onto the pen barrel. This seems to allow you to reposition the decal easier after sliding it onto the pen and also seems to aid in smoothing out air bubbles.
Hope this helps.
reddwil
Member
Paul
What I do also is I usually print a couple of each decal, your bound to mess one up trying to put it on. I use Microsoft word to print my decals. I set the paper size manually to the size of the decal paper. If you only want to print a couple, you can place them on the screen in a manor to, print, cut off, and reuse the paper the next time. Hope thats not confusing
What I do also is I usually print a couple of each decal, your bound to mess one up trying to put it on. I use Microsoft word to print my decals. I set the paper size manually to the size of the decal paper. If you only want to print a couple, you can place them on the screen in a manor to, print, cut off, and reuse the paper the next time. Hope thats not confusing
bitshird
Member
Those are awesome, I like the one from Jail House Rock, Very nice decal work.
Stick Rounder
Member
Cool pens.