Looking for instructions for Wood Write LTD Pen and Pencil Kits

Signed-In Members Don't See This Ad

Ebony1964

Member
Joined
Mar 29, 2026
Messages
4
Location
MT. Vernon Ohio USA
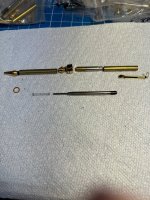
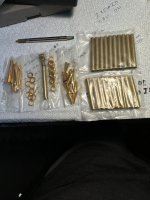
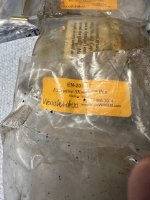
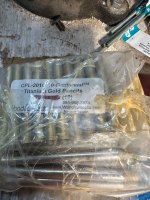
I ran across quite a few Wood Write LTD, Executive slimline pen kit #EN-201-10 and pencil kits #CPL201G -10 Continental Titanium Gold Pencils,
Any information about these would be greatly appreciated. bushing size, instructions, i did find out they were in the US and are not William Wood Write LTD in CA.
 
Signed-In Members Don't See This Ad
Can you supply a picture of the parts you have (preferably laid out)? Most slim lines are very similar and instructions may align with other brands.
 

Attachments

  • IMG_1326.JPG
    IMG_1326.JPG
    393.2 KB · Views: 8
  • IMG_1329.JPG
    IMG_1329.JPG
    284.2 KB · Views: 7
  • IMG_1319.JPG
    IMG_1319.JPG
    311.4 KB · Views: 6
  • IMG_1324.JPG
    IMG_1324.JPG
    394.4 KB · Views: 9
These are some general assembly instructions when I searched for the specific kit number you supplied.
The kit you have has a Parker refill wihich is larger in diameter than the Cross-style refill. Does the Parker-style refill fit into the trasmission you have? If not then you need to get some Cross-style refills.
Also, I do not see an end cap/finial in your parts.

Executive slimline pen kits use a standard 7mm, two-tube mechanism. Assembly requires a pen press (or wood vise) and a Cross-style refill. Press the components slowly and keep them perfectly straight to avoid cracking the finished wood or acrylic barrels. [1, 2, 3, 4]

1. Lower Barrel Assembly
  1. Press the tip: Place the pen tip (nib) into one end of the lower barrel (the shorter tube/blank) and press it in until it fits flush. [1]
  2. Install the twist mechanism: On the opposite end of the lower barrel, press the twist mechanism(brass end first) into the tube.
    • Caution: Press it slowly and stop just short of the indented line on the mechanism. [1, 2, 3]
  3. Test the fit: Thread the refill into the mechanism and twist it to verify the tip extends and retracts properly. It should extend about 3.2 mm. If it does not extend far enough, remove the refill and press the mechanism a fraction deeper. [1, 2]
  4. Attach the center band: Slide the center band over the top of the twist mechanism to cover the gap between the barrels. [1, 2]

2. Upper Barrel Assembly
  1. Assemble the cap/clip: Slide the clip onto the cap (finial).
  2. Press the cap: Press this clip/cap assembly into one end of the upper barrel (the longer tube). [1, 2, 3]

3. Final Assembly
  1. Join the halves: Carefully push the lower barrel assembly (with the exposed twist mechanism) into the bottom of the upper barrel.
  2. Align: Check the alignment of the grain or pattern and push the two halves together by hand until they are snug. [1, 2, 3]
Assembly video

1781448271804.png
 
Pencil Kit Assembly Instructions

The provided search context does not contain specific assembly instructions for the Executive Slimline Pencil Kit #CPL201G-10. However, the standard assembly procedure for 7mm Slimline Pencil Kits (such as those from Penn State Industries or WoodTurningz) involves the following general steps:

Blank Preparation

  • Cut wood or acrylic blanks to approximately 2-1/2 inches long.
  • Drill a centered 7mm hole lengthwise through each blank.
  • Scuff the brass tubes to remove oxidation and plug the ends to prevent glue seepage.
  • Glue the tubes into the blanks and square the ends using a barrel trimmer or sanding block.
Turning and Finishing

  • Mount the blanks on a 7mm mandrel using slimline bushings.
  • Turn the blanks to the desired contour, ensuring the area next to the bushing matches the bushing diameter.
  • Sand progressively from coarse grits up to 12,000 grit (using Micro Mesh) and apply your chosen finish.
Assembly

  • Clip and Cap: Slide the clip onto the clip coupler, then press the coupler onto the upper brass tube. Press the cap through the clip and into the upper tube.
  • Center Band: Press the center band into the top end of the front tube, then press the upper tube into the band.
  • Mechanism: Slide the pencil mechanism into the barrels from the clip coupler end and screw the nib onto the mechanism.
  • Lower Tube: Press the sleeve (recessed end first) into the front barrel. Press the band into the opposite end of the barrel and attach the rear barrel.
  • Finalizing: Press both brass tubes together on the center band. Insert the eraser cap over the mechanism and click the plunger to advance the lead.

1781449368989.png
 
Thanks for the Help, Unfortunately the tubes And twist mechanism are bigger on the pens, maybe 8mm. The Pencil is different all together,
I have come to the conclusion that these kits and instructions are nonexistent. but can be used with some modifications.
I wish to thank everyone for their help,
Happy Turning
Terry
 
Back
Top Bottom