Help me troubleshoot failed bonds?

Signed-In Members Don't See This Ad

BHuij

Member
Joined
Apr 23, 2025
Messages
56
Location
Utah
I've been playing with segmenting lately, using brass shim stock, aluminum drink can material, acrylics, woods, etc.

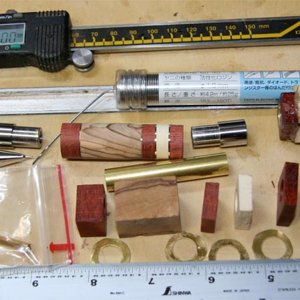
I had a blank I glued up that had several 35° cuts made with my bandsaw. The wood was padauk. For each cut I carefully trued and flattened the face on my disc sander, roughed up all mating surfaces of the metal and the wood, and used a good amount of 5-minute epoxy to glue them together. I did the glue up over several days, going with a single piece at a time. I used my vise, a 90° grip jig, and a clamp to ensure that there was really solid contact being made, things were held square, and nothing was slipping and sliding around. The brass pieces I was using were 0.5mm thick, and ever so slightly smaller in square dimensions than the blank, so I wouldn't have any protrusions.

After glue-up, I made sure the blank had straight sides all square to each other with my disk sander. No gaps, no protrusions. It was as clean I blank as I've ever worked with. The blank sat there at room temp in my shop for several days while I waited for some drill bits to arrive in the mail, so I'm confident the epoxy was fully cured.

When attempting to drill, I used my pen jaws on my Nova chuck to hold the square blank, a Jacobs chuck in my tailstock, and went excruciatingly slowly whenever hitting an interface of wood and brass. I was doing a smaller pilot hole with my HSS brad point 8mm bit that I intended to later open up with the larger 10.5 and 12.5mm bits necessary for the pen I'm making. I was pulling out frequently to avoid heat buildup or packing swarf into the flutes of the bit. I used parrafin wax on the bit to help lubricate a bit.

No matter how carefully I went, the glue joints would fail. Usually it seemed like the edge of the drill bit would catch on the metal and just rip it off of the wood.

There's got to be some way to drill this stuff properly. Do I need to use non-brad-point bits? Step up from a 1/8" bit in tiny increments until I hit my target diameter? Use a different adhesive? Not sure where I went wrong.
 
Signed-In Members Don't See This Ad
Yes when drilling metals or acrylics definitely lose the Brad point bits. A 135 degree angle bit will be less aggressive than a 118 so that would be my choice. The next tip I can give you you is do not just sand the flat surfaces of the metals and woods and acrylics but make various direction scratches in the material so that there is more glue surface for the adhesive to bond to. Also when applying pressure with clamps you do not want to squeeze all the adhesive out so that it starves the joint. Thus the scratches helps there too. Finally I would step up to a longer open epoxy like 30 min. The longer the open time the stronger the epoxy is. Plus let if cure and not just dry. This should be noted on the container. I am a huge fan of System3 T88 epoxy. Others here have had good success with other epoxy too.

Now a method that some here prefer is to reinforce the sides of the blank when you drill and to do that they use various methods but probably the best method is to CA glue thin strips of wood of equal thickness to all 4 sides. Soak in the CA glue and do not worry about it because it gets turned off anyway.
 
One thing that's not mentioned is you say you drill excruciating slow. To me how fast you drill or even saw a board on a table saw is something very hard to teach someone. You just get a feel for it. I think your main problem is the brad points, but if your drilling vey slow, especially in metal, you're introducing a lot more friction, thus more heat. There is such a small contact area on a segmented blank that pretty much any glue we use will fail in a nano second.
 
Last edited:
Andrew,

One thing I didn't see mentioned is how you cleaned up the pieces after sanding and scoring but before gluing. Sorry if I missed that in your post. Padauk is is a pretty oily wood. I usually clean everything I am gluing up with Denatured Alcohol, but for oily woods, I switch to Acetone.

David
 
Great feedback all. With my next attempt, I'll make the following changes:
  • Scuff all surfaces to be glued in various directions to really maximize surface area
  • Clean all surfaces immediately prior to gluing with acetone
  • Switch to a longer cure epoxy, and of course continue allowing time for a full cure
  • Ease up on the clamping pressure to make sure I'm not squeezing all the glue out of the joints (actually I bet this was a huge part of my problem)
  • Reinforce the sides prior to drilling (I've read about the popsicle stick method, seems easy enough)
  • Use a standard drill bit rather than a brad point (this was likely the other biggest contributor to my joint failures)
  • Drill a bit faster to minimize friction and heat build up
Hopefully all of that together constitutes the nuclear option :D
 
Thinking out loud . I tend to overthink or plan waaaay too much. What if when segmenting the wood/acrylic/alumilite blank was drilled with a hole ,smaller than optimal finish size but say big enough to accept a drinking straw, then cut at angles/intersections/color change. a jig/drill guide could drill the metal on an angle/ellipse. After all parts are cut/drilled then epoxy the blank together using the straw like a skewer shish-kabobbing the segmented pieces.
 
Interesting thought process. I like the idea of having an axis for everything to align on. Could even 3D print a thin tube to do the job with the expectation of drilling it out later. An idea to experiment with, for sure.
 
To Join the Thread; Andrew; I would also consider adding "reinforcement" to all 4 sides of the blank.

You may be experiencing the drill bit getting under the metal and pulling it up, breaking the glue bond. There is a whole "science" to drill bit geometry in the machinist world. Very hard metals can snap an ordinary drill because the drill bit "digs in", the force is concentrated in the bit and it snaps. I have modified a drill bit by filing a small "flat" (1/64" or so) on the outer edge of the cutting flute. The flat is parallel to the axis of the bit. The flat makes the bit less aggressive and prevents a "dig-in". Think about the difference between a spade bit and a drill bit.
 
Search for high temperature clear epoxy. that helps some.

For me, when using segmented brass/aluminum or copper, and using them straight across (not angled), I use a different approach. I make home made "washers" drilled to the size of the tube, stack them between wood segments carefully measured to the right length and glued with 30 minute to 1 hour epoxy - to allow open time.

Drilling home made washers are not easy as the thin metal will twist and distort quickly and can be dangerous. I use at least 1/2" thick board of plywood with an inch larger edge than the sheet of brass, aluminum or copper. I carefully lay it out on the plywood and place another sheet of plywood of 1/2" thick on top. Basically sandwiching in the metal sheet. I screw the two sheets of plywood every two inches on the edges. Next, I draw a layout of the area of the metal sheet and draw squares and mark the centers. I drill through the plywoods. The plywood keeps the metal sheet flat while drilling.

Next, take the screws out and use snippers to cut "washer size" washers out of the metal sheet. Yes, it will greatly distort the "washers". But don't worry. When finished, use an anvil or thick metal plate and lay the washers on it, one at a time. With a good hammer with a flat head (if you have one) and flatten the distorted washers.

I do a couple of dozen at a time when I do this. Once flattened, I use smaller snippers and cut the edges more round, and close to size. I may need to hammer a few back to flat.

Once glued to the blank, I turn them fast but use extremely small bites and lots of patience. Below is a picture of the layout I use for my main style of segmenting:


Hope this helps.
 
Search for high temperature clear epoxy. that helps some.

For me, when using segmented brass/aluminum or copper, and using them straight across (not angled), I use a different approach. I make home made "washers" drilled to the size of the tube, stack them between wood segments carefully measured to the right length and glued with 30 minute to 1 hour epoxy - to allow open time.

Drilling home made washers are not easy as the thin metal will twist and distort quickly and can be dangerous. I use at least 1/2" thick board of plywood with an inch larger edge than the sheet of brass, aluminum or copper. I carefully lay it out on the plywood and place another sheet of plywood of 1/2" thick on top. Basically sandwiching in the metal sheet. I screw the two sheets of plywood every two inches on the edges. Next, I draw a layout of the area of the metal sheet and draw squares and mark the centers. I drill through the plywoods. The plywood keeps the metal sheet flat while drilling.
Good advice Hank. I believe I am going to try some segmenting I may just order some aluminum washers via Amazon. Alum Washers . I know I have a Harbor Freight kit of copper washers. The pre-made washers may save a bit of time. I'm also currently saving plastic milk caps, Gatorade caps, protein shake tops in hopes I can try some plastic segmenting.
 
My 2-cents is also on the drill bit. I went through something similar when I started and brad point bits wound up being the culprit for me. I use a "standard" twist drill bit unless I happen to have a 60-degree point angle bit (designed for drilling acrylics and plastics). The sharp point on a 60-degree bit allows for more gradual penetration which reduces friction and minimizes cracking and chipping in plastics.

SInce starting to do this I have since stopped adding reinforcing materials to the sides of the blank before drilling. I do many of the other suggested things though such as using epoxy and letting it fully cure before drilling and not only do I scuff the surfaces to be glued with sandpaper, I also clean them with denatured alcohol before applying the epoxy.

Good luck - I know how disappointing it can be to spend so much time building up a segmented blank only to see it destroyed by drilling.

Dave
 
I glued up a blank over the last couple of days with primarily African Blackwood, but with thin pieces of acrylic layered in and sandwiched between aluminum drink can slices. Everything got scuffed thoroughly and cleaned with acetone before glue up. I used only hand pressure for the first few minutes of gluing to ensure good contact between all surfaces. I think a LOT more epoxy stayed in the joints this time around compared to my last attempt.

Everything is fully cured now. I ran the whole thing against my disc sander to make sure it's properly square and to get a look at the segmenting. Looks like good, clean lines.

High hopes for this one. I'll definitely drill it with a standard bit instead of a brad point when the time comes. I'll be sure to post results :)
 
I should have asked earlier: How sharp are your bits? Going slow is a necessity but the sharpness of the bits are essential - as they also are on the turning tools. Just because it cuts and drills doesn't make it the sharpest. Precision Sharpness does keep greater heat from generating.

I, and many others here use a Drill Doctor for sharpening our bits. I keep mine sharp, but I keep my turning tools razor sharp. When turning segments with brass, aluminum or copper, it is wise to have a sharpening plate nearby and swipe the tools edge a couple of times every 30 seconds or so - similar to honing,

Good advice Hank. I believe I am going to try some segmenting I may just order some aluminum washers via Amazon. Alum Washers . I know I have a Harbor Freight kit of copper washers. The pre-made washers may save a bit of time. I'm also currently saving plastic milk caps, Gatorade caps, protein shake tops in hopes I can try some plastic segmenting.
Be careful with the kind of plastic you use. Milk caps, butter container tops, and some liquid container tops that are flexible and are also anti-stick. Some plastics such as credit cards and plastic sheets at hobby stores can be scratched which allow greater hold in segments. However the type of plastic in milk and other tops are kin to the plastics that are used in molds and therefore quick to release from poured resins - which doesn't work well in segments.

I know when I see certain plastics which are which, but I don't know how to describe which would be better in segments. If someone else can better describe it, please do.
 
I'm very good about keeping my HSS tools sharp. Haven't had any issues with turnings, even ones that are super hard/dense woods (snakewood, ebony, ironwood, etc) and/or segmented blanks with brass or aluminum included. My only failures have been during drilling.

Your advice about keeping bits sharp is excellent. My bits are all brand new, so if they're dull, it's because they came dull (not impossible). I'll bear in mind the importance of keeping them sharp for tricky blanks though.
 
I glued up a blank over the last couple of days with primarily African Blackwood, but with thin pieces of acrylic layered in and sandwiched between aluminum drink can slices. Everything got scuffed thoroughly and cleaned with acetone before glue up. I used only hand pressure for the first few minutes of gluing to ensure good contact between all surfaces. I think a LOT more epoxy stayed in the joints this time around compared to my last attempt.

Everything is fully cured now. I ran the whole thing against my disc sander to make sure it's properly square and to get a look at the segmenting. Looks like good, clean lines.

High hopes for this one. I'll definitely drill it with a standard bit instead of a brad point when the time comes. I'll be sure to post results :)
Be careful about sanding the blank with your disc sander. That can quickly build up a lot of heat in the blank which the aluminum will efficiently transfer and potentially soften your epoxy bond...
 
My "disc sander" is really a couple of pieces of 3/4" plywood glued together, screwed to a faceplate, and turned to 6" round. I run it slow and use 60 grit for this kind of thing, so I haven't had to fight too much with heat yet. But still, a good reminder to pay close attention when I have excellent conductors involved in my segmenting.
 
Back
Top Bottom