High end finish for a high end pen?

Signed-In Members Don't See This Ad

SpiritRider

Member
Joined
Jan 19, 2020
Messages
127
Location
Illinois
The title says it all. I am looking for a finish for a pen that I made from a blank I got from this site. It is a Broadwell Nouveau Sceptre Chrome and Gold Rollerball Pen Kit with Alaskan birch blank.
I would like to find a finish that will make the gorgeous birch. I have used ca and friction polish but not much else for pens.
 
Signed-In Members Don't See This Ad

jrista

Member
Joined
Aug 12, 2021
Messages
2,222
Location
Colorado
Doctor's Woodshop Pens Plus, which is a friction polish with microcrystalline wax. The wax greatly improves the quality of the finish over normal friction polishes, and improves the durability significantly as well.
 

Paul in OKC

Member
Joined
Jul 26, 2004
Messages
3,089
Location
Oklahoma City, OK, USA.
Doctor's Woodshop Pens Plus, which is a friction polish with microcrystalline wax. The wax greatly improves the quality of the finish over normal friction polishes, and improves the durability significantly as well.
I just got a bottle of this yesterday. So far I like it. Only done three pens, but Was easy to apply. I used to do the BLO CA, and probably will still use it, but.....
 

jttheclockman

Member
Joined
Feb 22, 2005
Messages
19,082
Location
NJ, USA.
Now there are many finishes that are easy and do well. If you want protection from abuse then a hardshell finish is a must or you are redoing the finish. Now I have used spray on lacquers at times when I am looking for that wood feel and stain look. I like Deft lacquers. It is not the ideal finish for a hard used pen. More like a nice show off your pen and desk pen. A step up I like to use wipe on poly. Easiest finish you could ever ask for. I like to use the oil brand minwax. One swipe and blank is done. Let it sit over night. Come back next day and use a nonwoven pad ( i use the grey ones) and quick wipe don to give a little tooth for next coat. 3 coats and it is a beautiful either gloss or satin look depending on which oil you use. The third and last is CA but that we all knows takes some talent and time between coats because I hate accelerator. To me it makes the finish too brittle. My opinion only.

But will tell you anyone using a finish that is a poly type finish,( I do not know what all these finish consist off such as Doctor's finish) so I am grouping together, they need to be hit with a pad between coats. Poly does not melt into each coat like lacquer does so it needs abit of tooth. Good luck.
 

dogcatcher

Member
Joined
Jul 4, 2007
Messages
2,359
Location
TX, NM or on the road
Not as durable as CA but an oil finish like Danish or Teak done slowly over a bunch of days is a good classic wood finish. he best description of the process was written by Frank Whiton. I use a similar finish on custom game calls. I have also this method on custom gunstocks. https://www.firearmsforum.com/firearms/article/3037

You can use Watco Teak or Danish oil, or any of the other wipe on oil/varnish finishes. Some people swear by Tru Oil, and it has good properties. You can also do some research and create your own mic of oil, thinner ad varnish. If you are game for that "trip" read Russ Fairfield's Secrets of Oil Finishes. https://www.woodcentral.com/russ/finish7.shtml

After Fairfield's secrets, do some Google research on homemade oil varnish finishes. A quart of BLO, thinner and Helmsman Spar Varish will last you a few dozen experiments. You can also sun bleach some flaxseed oil and make a sun bleached version of linseed oil.

There are a thousand ways to attack this version of a finish. There is no one perfect way to accomplish a good end result. The main rule is always wait at least 24 hours before applying another coat. Some 1200 grit sandpaper used sparingly is also advised.
 

jrista

Member
Joined
Aug 12, 2021
Messages
2,222
Location
Colorado
But will tell you anyone using a finish that is a poly type finish,( I do not know what all these finish consist off such as Doctor's finish)
Pens Plus consists of:

Walnut Oil
Clear Shellac
Denatured Alcohol
Microaggregated Microcrystalline Wax (synthetic, Cosmolloid 80H)

I've found it is quite durable. It is not "hard" like CA, but, it also doesn't scratch like CA. Softer woods can dent, but, even with denting, Pens Plus generally maintains its look (shine, smoothness). I've used my own home made friction polish out of BLO, DNA, and clear shellac. Pens Plus has a FAR milder impact on color than BLO, which has a definite yellowing/warming effect. Pens Plus is nearly neutral in terms of changing color (slight warming).
 

JohnU

Member
Joined
Jan 31, 2008
Messages
4,923
Location
Ottawa, Illinois
I like to use Gluboost CA to finish them. It's a very durable finish. If I don't want it real glossy I dull it down with extra fine steel wool and a light touch.
 

MedWoodWorx

Member
Joined
Nov 23, 2021
Messages
598
Location
Greece
The title says it all. I am looking for a finish for a pen that I made from a blank I got from this site. It is a Broadwell Nouveau Sceptre Chrome and Gold Rollerball Pen Kit with Alaskan birch blank.
I would like to find a finish that will make the gorgeous birch. I have used ca and friction polish but not much else for pens.
so the real question is what you consider as a high end finish. a pen with chrome and gold details like yours, probably asks for a shiny finish and you cannot beat ca glue in shininess IMHO. If you don't intent to use this pen every day and more important, if you want to feel the wood, go for walnut, linseed etc. At last bear in mind that no matter what is the finish the colour of the wood will be affected somehow (you might want to test it before).
Anyway finishing is a large topic and i don't think that there is a right or wrong answer. hope i helped, cheers
 

jrista

Member
Joined
Aug 12, 2021
Messages
2,222
Location
Colorado
You may not be able to beat CA, but, you can match it:

Cambridge Rhodium and Gold with Knotty Olivewood-6.jpg


It takes the right technique, but Pen Plus can get glassy shiny too. ;)
 

MedWoodWorx

Member
Joined
Nov 23, 2021
Messages
598
Location
Greece
You may not be able to beat CA, but, you can match it:

View attachment 324271

It takes the right technique, but Pen Plus can get glassy shiny too. ;)
wow! great work.
i am really curious to try pen plus, i paid a fortune for shipping costs and i am waiting for my parcel to arrive. Hopefully the next few days it will be delivered. Please tell me, you use it with sandpaper/micromesh?
excellent result, bravo
 

jrista

Member
Joined
Aug 12, 2021
Messages
2,222
Location
Colorado
wow! great work.
i am really curious to try pen plus, i paid a fortune for shipping costs and i am waiting for my parcel to arrive. Hopefully the next few days it will be delivered. Please tell me, you use it with sandpaper/micromesh?
excellent result, bravo

Thank you. :)

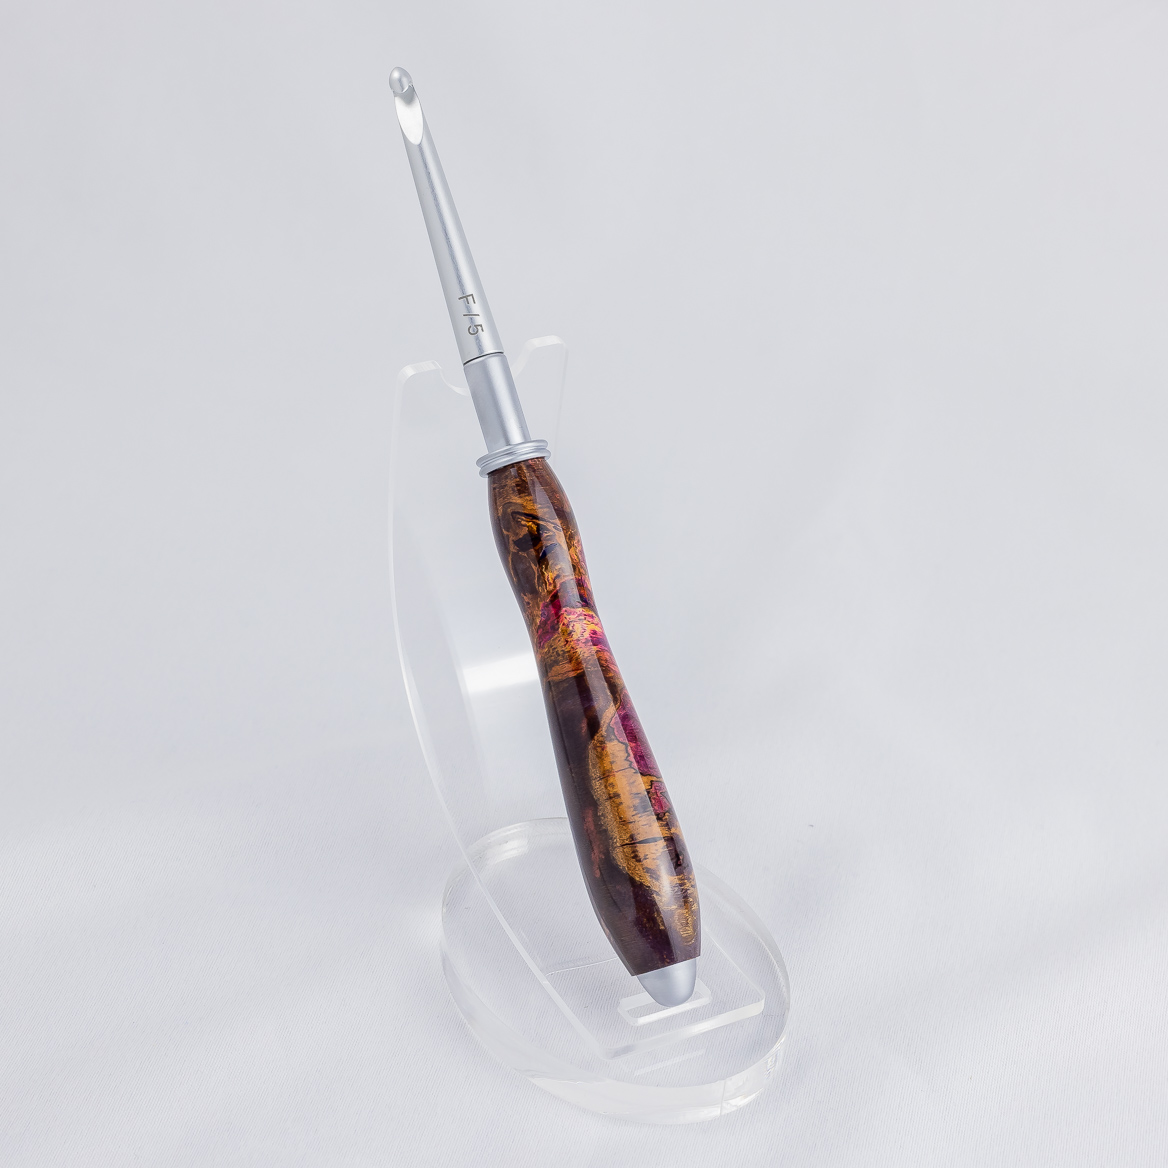
So, my process is to sand to the highest grit I can and still benefit from it. That depends on the wood...some woods only really seem to benefit up to around 800 or so, some I take all the way to 2000. I usually use this basic wet/dry sandpaper from woodcraft. I'm still a relatively new turner, and I've tried a LOT of sandpapers, including abranet (which I like), as well as everything WoodTurnersWonders sells, as well as a few types of papers WoodCraft sells (there are two I use: the blue/gray stuff, forget what its called but its not a woodcraft brand as far as I know, and the black/dark gray wet & dry stuff). I usually use the simple papers from WoodCraft. I find they just cut better for pens, and give me a better surface in the end.

I've tried the Abranet. That stuff is AMAZING for eliminating tearout on normal turned items (bowls, platters, vases, etc.) LOVE it for that. Even on the regular turned items, though, I usually end up using the stuff from WoodCraft for higher grits, and will usually go to 600-800). I don't usually have tearout on my pens, and even if I did, I would generaly try to find a way to cut that clean well before I got down to bushing size. So its just the basic papers. BTW, this is all just for WOOD. Resins are a whole different story...resins usually (but not always, i.e. not with TruStone or similar) are wet sanded with micromesh, although I recently found...whats it called...Zona paper. The Zona paper is really interesting, with grits down to 1 micron. I think that may become my go-to sandpaper for resins, including TruStone and the like.

Anyway. Once sanded to a really smooth finish, my wood pens get at a minimum a couple coats of pure Doctors Woodshop Walnut Oil. This is to saturate those fibers, because wood really likes to guzzle down the Pens Plus otherwise. I have found that with Pens Plus, it is best not to build up the finish too much. Too much, and it just gets sticky and hard to deal with (remember, it has wax in it, unlike your average friction polish....but the wax is essential for a more resilient, longer lasting finish, I'm finding!!) I try not to have too many coats...10 is the absolute max, 6-8 is usually more what I end up with. If I can, I try to get that glassy finish with 5-6 coats if I can. Before you start applying the Pens Plus, make sure the walnut oil has a chance to start polymerizing. I follow Doc's recommendations, and friction polish the pure walnut oil in, to generate that heat and start that polymerization process.

I'll let turned blanks that have a couple coats sit for a while, couple of hours, before I start putting on the pens plus. I take them off the lathe (by that point, I'm usually just directly between two 60 deg centers, no bushings), and I stick em on this little dowel board I set up. I just drop the blanks over these dowels and let em dry.

Once the blanks I'm working have tried a bit, I'll put each one back on the lathe, and put down a few coats of Pens Plus. The first coat, I wipe on with the lathe off, and rub it into the wood a bit. You can't do this too much/too long, as the finish will start to get sticky (worse when its cold, BTW!). Once its rubbed in and stops beading up, I'll turn the lathe on, usually to a pretty high RPM (~3000 or thereabouts), and will friction polish it in. While the lathe remains on, using the same applicator for one coat, then switching every two coats, I add more finish, friction polishing each. The key thing to look for, is where the wood is soaking up the finish. You'll notice little dry spots. Seems to happen with every wood, to one degree or another, and its the challenge with Pens Plus.

Once I feel I've reached the core coating limit for the given blank, I'll carefully remove (without touching it!! I use a screwdriver, or I actually created a few blank removal tools out of dowel, a couple of nuts and a washer) the blanks, and once again put them on my little drying rack. You don't want to touch the finish at this point, it WILL dull, and may pick up fingerprints, etc. I bring my rack inside so that the finish can dry at a reasonable temperature (seems to dull much more easily in the cold...something I've also experienced with normal friction polishes as well...don't know why). I usually leave them to dry for 12 hours (so overnight, usually, as I don't always get back into the shop immediately in the morning the next day, and may not get to it until evening the next day if its the work week).

After they have all dried, I'll check to see if there are dry spots. This is where it can get a little tricky. I don't yet know (just don't have enough experience a cross wood types) if this is wood type related or not, but sometimes you can simply put a dried blank back between centers, and friction polish again without adding any new finish. A little bit of heat (be careful here that you don't use too much pressure or heat) will liquify the finish again, and you can polish out the dry/dull spots. You should end up with a very nice, shiny, glass-like finish within half a minute or so at most if this works.

If you can't quite get this to work, I have also found that buffing will help shine up the finish. Some woods just like to drink up as much non-plastic finish you can put on them (sometimes, this is due to poor turning or sanding...if you leave some of the surface roughed up a bit, either from the tool or from less than ideal sanding, those spots will be where you find the surface dries up, seemingly no matter how much finish you put on them, in my experience...so sand carefully and avoid tearing the fibers at the surface). If you can't get a wood to go glassy just with friction polishing, then buffing might do the trick. Sometimes I just very lightly buff with Carunauba, just to cover up the dull spots. Sometimes if the finish is dry and hard enough (when fully dried, the wax will harden over very well), then I'll buff with white diamond, then maybe carnauba to get the final shine. I don't get quite the perfect glassy look when I buff. I've tried, but, my buffing skills are relatively new as well, and I just have the standard 3-wheel Beall system. I have not tried using pen buffing compounds or anything like that, and perhaps with the right compound you can get a true glass-like finish with this final buffing step. Even without that glassy shine, this stuff will still be very, very shiny.

If you find you cannot simply polish/buff out the dry or dull spots, then I find that a final carefully applied coat of Pens Plus, at a moderate speed, with lighter friction (you really barely want any heat, you want to blend this final coat into the prior coats as lightly as you can, and end up with that glassy finish without streaks or fibers, etc.), will usually do the trick. Take the blank off the lathe and get it to a room temperature area as quick as you can. Let it dry for a day. DO NOT touch the finish. After it dries, you should have a glassy finish.

Now, this all sounds like a lot, but...its actually a pretty strait forward process:

1. Sand smooth and shiny to a very high grit
2. Saturate outer fibers with Doctors Woodshop Walnut Oil to limit "finish drinking" (friction polish to kick off polymerization)
3. After oil dries a bit, finish with Pens Plus and friction polish it in, but don't build it up too much (you don't want it sticky)
4. Let finish dry for half a day or so, in moderately warm (room temperature) area
5. Perform final friction polishing of last coat applied, or buff, or apply a final lighter-friction coat to achieve glassy look
 

TonyL

Member
Joined
Mar 9, 2014
Messages
8,904
Location
Georgia
wow! great work.
i am really curious to try pen plus, i paid a fortune for shipping costs and i am waiting for my parcel to arrive. Hopefully the next few days it will be delivered. Please tell me, you use it with sandpaper/micromesh?
excellent result, bravo
PP is a great product, (as is his high build friction polish - similar to PP but not wax in it). If you weren't in Greece, I would mail you some. If you have a US-based friend that ships to Greece, I will send you some.

PP will not hold-up or shine as well has CA or polyurethane. According the PP's inventor (and I have tried this), you can mix or alternate the application of his HBF polish and CA to produce a near-high gloss and more durable finish. He didn't recommend CA and PP because PP contains wax, and the wax will interfere with the bonding of the CA. I am not saying what can and can't be done; I am just repeating what the inventor (Mike....super nice guy) told/wrote to me and what my experience has been.

Regarding the PP application. some sand to the desired level of smoothness, then apply the PP; others add PP to the sandpaper and the a few coats without. Both PP and his HBF polish need to get very warm in order to polymerize. well. I apply it between a thick pad of paper towels and at 1500 rpms (start with the lathe off so not to sling it everywhere) and I hold it until I can feel the heat through the paper towels. There are dozens of ways to apply it. Enjoy!

BTW just enjoyed some Baklava last night (now I need to walk 10 miles to burn it off).

PP
 

MedWoodWorx

Member
Joined
Nov 23, 2021
Messages
598
Location
Greece
PP is a great product, (as is his high build friction polish - similar to PP but not wax in it). If you weren't in Greece, I would mail you some. If you have a US-based friend that ships to Greece, I will send you some.

PP will not hold-up or shine as well has CA or polyurethane. According the PP's inventor (and I have tried this), you can mix or alternate the application of his HBF polish and CA to produce a near-high gloss and more durable finish. He didn't recommend CA and PP because PP contains wax, and the wax will interfere with the bonding of the CA. I am not saying what can and can't be done; I am just repeating what the inventor (Mike....super nice guy) told/wrote to me and what my experience has been.

Regarding the PP application. some sand to the desired level of smoothness, then apply the PP; others add PP to the sandpaper and the a few coats without. Both PP and his HBF polish need to get very warm in order to polymerize. well. I apply it between a thick pad of paper towels and at 1500 rpms (start with the lathe off so not to sling it everywhere) and I hold it until I can feel the heat through the paper towels. There are dozens of ways to apply it. Enjoy!

BTW just enjoyed some Baklava last night (now I need to walk 10 miles to burn it off).

PP
I dont mind having a less shiny result since i really want to stop working with ca glue. I also expect that pen plus will be less durable compared to ca and my plan is to focus on using hardwoods in combination with pen kits that can easily (be partially disassembled perhaps ?)be rebuffed if needed.

Baklava is not just a sweet, is a medicine no need to feel guilty.
 

jrista

Member
Joined
Aug 12, 2021
Messages
2,222
Location
Colorado
I dont mind having a less shiny result since i really want to stop working with ca glue. I also expect that pen plus will be less durable compared to ca and my plan is to focus on using hardwoods in combination with pen kits that can easily (be partially disassembled perhaps ?)be rebuffed if needed.

Baklava is not just a sweet, is a medicine no need to feel guilty.
I've been trying to dispel the myth in this thread that nothing can be as shiny as CA. IMO, having worked with Pens Plus for months now, it can indeed be as shiny as CA. Both can be used to create a glass-like finish.

While CA may provide a hard finish, its a finish that can scratch, so there is that potential downside. Pens Plus, in my experience, does not scratch (not like any plastic anyway), however depending on the hardness of the wood, the wood itself can get dented or gouged.

But I've shared a number of cases where I've achieved very glass-like results with Pens Plus. For example, this is pens plus:

full
 
Top Bottom