Picture Frame Inlay - #1

Signed-In Members Don't See This Ad
See more from mark james

mark james

IAP Collection, Curator
Joined
Sep 6, 2012
Messages
12,720
Location
Medina, Ohio
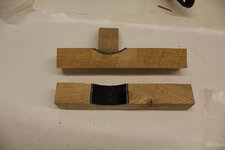
The basic design of the oval and inner element has a long history on IAP, so I take no credit. Searches will find examples from rherrell, Skiprat, ldb2000 and more recently Dale Parrott. They referred to their designs as "Windows", "Ellipses, and Window Style respectively. My design is a variation on all, but takes the most inspiration from Dale's design. I have worked on this on and off for over a year, and it represents my "Coronavirus" bucket list design.

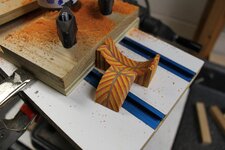
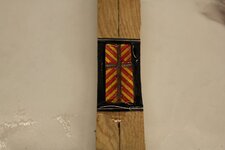
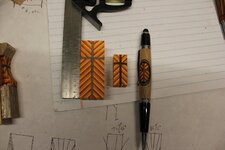
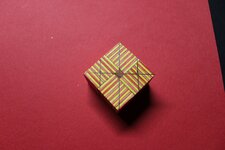
The cross/spectraply inlay I made on a different set of pens last year, and always wanted to figure out how to have it in an oval "window." Inspirational hint: Whenever I have a new idea - I research what others have done; it probably has been done! So the oval concept is not mine, but I did get creative for the inlay.

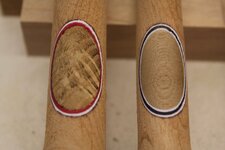
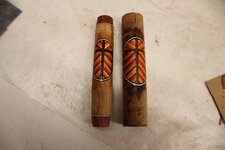
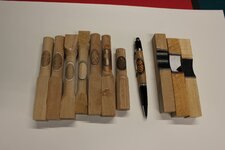
I call this design a "Picture Window" as that is my intent, to use the "Window" as the frame for a variety of future inlays. I have 9 decent picture designs to play with, so far... 🤫

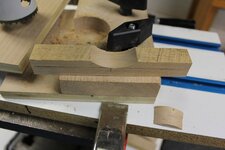
I might add, this had a significant learning cure for me, and a lot of tweaking still needs to be worked on.

Stay healthy folks!

IMG_1791.jpg
IMG_1792.jpg
IMG_1793.jpg
IMG_1794.jpg
IMG_1795.jpg
 
Signed-In Members Don't See This Ad

mark james

IAP Collection, Curator
Joined
Sep 6, 2012
Messages
12,720
Location
Medina, Ohio
Very very cool, Mark. Don't forget the old master......Eagle

I have read a reference alluding to his involvement with this, but I have not been able to find a picture. Maybe someone else can assist with the timeline. But, I did want to give credit to those who I did see their designs.
 

magpens

Member
Joined
Feb 2, 2011
Messages
15,913
Location
Canada
Well, the begged question is "How ?".

But ... pending the answer to that ... the indisputable fact is ...

That is a remarkable achievement, Mark, all other precedents notwithstanding !!!

Congratulations for ... as Mike just said ... taking "things" up yet another level !!!
 

mark james

IAP Collection, Curator
Joined
Sep 6, 2012
Messages
12,720
Location
Medina, Ohio
That's really cool. I like how it wraps around. I'd love to see the blank.

Pickies to follow.

Well, the begged question is "How ?".

But ... pending the answer to that ... the indisputable fact is ...

That is a remarkable achievement, Mark, all other precedents notwithstanding !!!

Congratulations for ... as Mike just said ... taking "things" up yet another level !!!

Here are what photos I took.

Note: The drill press jig is a modified version of what is shown by Gabe Castro on Utube. I made some modifications that allow me to adjust the side guides to use different size blanks, as well as cutting the inserts. I can also change out the top right plate/guide and not have to rebuild the entire jig for different sizes.

The last picture shows some of my initial experiments.
 

Attachments

  • IMG_1750.JPG
    IMG_1750.JPG
    183.8 KB · Views: 215
  • IMG_1751.JPG
    IMG_1751.JPG
    190.8 KB · Views: 221
  • IMG_1753.JPG
    IMG_1753.JPG
    152 KB · Views: 251
  • IMG_1758.JPG
    IMG_1758.JPG
    186 KB · Views: 285
  • IMG_1762.JPG
    IMG_1762.JPG
    188.2 KB · Views: 222
  • IMG_1782.JPG
    IMG_1782.JPG
    128 KB · Views: 232
  • IMG_1783.JPG
    IMG_1783.JPG
    191.1 KB · Views: 218
  • IMG_1790.JPG
    IMG_1790.JPG
    145.4 KB · Views: 261

magpens

Member
Joined
Feb 2, 2011
Messages
15,913
Location
Canada
This will take me some time to absorb and figure out.

One question emerges immediately ... how are the ellipses made ... with three-color border having no visible joins ?
 

mark james

IAP Collection, Curator
Joined
Sep 6, 2012
Messages
12,720
Location
Medina, Ohio
This will take me some time to absorb and figure out.

One question emerges immediately ... how are the ellipses made ... with three-color border having no visible joins ?

That was my thought for about 9 months. I looked at rherrel's method (In IAP library) for sanding a shell casing and using an insert. Butch did the same, but with wood for both sections (inner and outer), Skiprat I suspect used a similar method, but with a metal lathe. Each technique I tried and they gave me fits. (I WILL do the true window with an inner inserted inlay, but the last 4 failures have given me pause).

Basically,

1. Cut a very uniform blank (e.g., 3/4" x 3/4" x 5") with a hole saw (I used 2") about 1/2 way through the blank. This will give you the starting "window shape."
2. Assemble whatever you desire for the insert/picture ("Picture, is my terminology as this will now change for future iterations).
3. Cut that insert on it's side, to the dimension for the curved window.
4. Glue the picture frame material into the curved slot. I used pickguard, 3 ply, but have tried 1 and 2 ply. I also tried styrene, card stock, credit cards, etc... I tried lots!
5. Insure that the insert has a good fit for the curved window.
6. Glue it in and finish the pen.

A drill press, a set of quality hole saws, (I used Lennox), a new jig, lots of failures and tweaks... I made a fancy jig because I will eventually try 1.5", 1", 1/2" window frames for smaller "pictures." My jig allows me to modify the angles and dimensions easily.
 

Attachments

  • IMG_1750.JPG
    IMG_1750.JPG
    183.8 KB · Views: 210
  • IMG_1751.JPG
    IMG_1751.JPG
    190.8 KB · Views: 217
  • IMG_1785.JPG
    IMG_1785.JPG
    186.7 KB · Views: 210
  • IMG_1764.JPG
    IMG_1764.JPG
    200.3 KB · Views: 216
  • IMG_1755.JPG
    IMG_1755.JPG
    182.7 KB · Views: 173
  • IMG_1761.JPG
    IMG_1761.JPG
    192.7 KB · Views: 223

wood128

Member
Joined
Sep 16, 2006
Messages
1,532
Location
Cocoa Beach, Fl, USA.
Great work Mark. Very creative !! I really like the picture frame inlay design. There are many patterns for the insert. There would be TWO different diam. for the cut in the blank and the insert, the insert being larger than the cut, because you added two thicknesses of veneer. Do you have different sized hole saws ? or the cut in the blank could be sanded larger with a drum sander mounted on the drill press. I am working on some segmented designs for pen blanks that would have a 3 D look , like the cutting boards that are being made. I have found two geometric patterns that might work, but requires cutting very small pieces accurately , with contrasting colors of wood. I have one partial prototype constructed so far .......after a few failures . Keep up the good work and stay safe.
 

mark james

IAP Collection, Curator
Joined
Sep 6, 2012
Messages
12,720
Location
Medina, Ohio
Great work Mark. Very creative !! I really like the picture frame inlay design. There are many patterns for the insert. There would be TWO different diam. for the cut in the blank and the insert, the insert being larger than the cut, because you added two thicknesses of veneer. Do you have different sized hole saws ? or the cut in the blank could be sanded larger with a drum sander mounted on the drill press. I am working on some segmented designs for pen blanks that would have a 3 D look , like the cutting boards that are being made. I have found two geometric patterns that might work, but requires cutting very small pieces accurately , with contrasting colors of wood. I have one partial prototype constructed so far .......after a few failures . Keep up the good work and stay safe.

Hi Joe. I have tried several different methods.
1. Using the same size hole saw and sanding the blank with the window to get the appropriate fit. In this example, I glued the veneers to the inlay first, then made the minor adjustments to the window with the drum sander on my lathe.
2. Using the same size hole saw (as above), but gluing in the veneers to the window first, then sanding the insert to fit the window with the inlay.
3. I have also played (with promising success) with the two side guides on my jig - this is why I did not have the fixed sides like others have used, with my guides on the T Tracks, I can swap out the top panel (the one that will get the hole cut and then has a fixed dimension for future uses) and move the saw cutter from 1/4" in, to 3/8" in, to 1/2" in, etc. I have so far made 6 of the top sacrificial panels with the screw hole already cut, so It takes only 1-2 minutes to adjust my hole cut from the dimension for the window to the dimension for the insert.

I have found that if I cut the window at e.g, 3/8" (.375") in from the right side of the blank, I then want the insert to be cut just slightly larger - .4 - .41". In this case, I do use two different top plates and then mark then for future uses.

I have quite a few insert designs to play with, as well as a set of 5 different hole saws, so I suspect this new design will keep me busy the next year as I hope to play with 5-10 different patterns.

I look forward to seeing your new designs as well as any forays with this design - the more the merrier! ;)

Stay healthy my friend.
 

sorcerertd

Member
Joined
Sep 30, 2019
Messages
2,655
Location
North Carolina, USA
Wow, that looks like a lot of work. Worth the effort, though. What kind of glue did you use to hold the pickguard? I've used some nylon pick material with CA, but it's hit or miss. Can't imagine it being "hit" with curving it like that using CA. Might just be my technique needs more work, though.
 

mark james

IAP Collection, Curator
Joined
Sep 6, 2012
Messages
12,720
Location
Medina, Ohio
Wow, that looks like a lot of work. Worth the effort, though. What kind of glue did you use to hold the pickguard? I've used some nylon pick material with CA, but it's hit or miss. Can't imagine it being "hit" with curving it like that using CA. Might just be my technique needs more work, though.

I used 2 part epoxy and let set overnight. I made a half circle insert for the glue-up. Apply the epoxy, press in the pickgard (with difficulty), place a piece of wax paper on top of the pickguard, then press in the insert (not the final one), and clamp. Note: This picture shows the process, but it has a 3 ply wood veneer which I tried initially. I later settled on the pickguard, but this shows the process. With the wax paper the insert comes out easily and is ready for the final gluing of the segmented insert.

Have a go at it!
 

Attachments

  • IMG_1728.JPG
    IMG_1728.JPG
    118.6 KB · Views: 170
  • IMG_1731.JPG
    IMG_1731.JPG
    134.1 KB · Views: 173
  • IMG_1736.JPG
    IMG_1736.JPG
    104.1 KB · Views: 180
Top Bottom