
robutacion
Member
G'day peoples,
I have been waiting for a few weeks to talk to you guys and gals about some discoverings that I have been searching and testing for a long time to resolve issues that I was struggling with, one of the main ones was the difficulty in some repairings on cast blanks where the mix had to dry fast to prevent it from running off the repair area with something that I could mix with the same powder/colour I used on the original pour.
I have used thin, medium, thick CA, I used a variety of epoxy glues mainly the fast curing ones for the reasons I explained above from 5, 10, 15 and even 30 minutes ones but they all gave me a problem and that is, the CA's tend to give me more like a solid colour and not the pearl effect seen of the dry epoxy cast, the epoxy's even the more crystal clear ones (more expensive) all have also a similar result, the faster the cure time the worse the colour will come up this is due to the time that would take for the epoxy glue and mixed powder to settle and clear the transparency/translucency effects of the pearl powders, even the 30 minutes ones the mix gell well and truly before the separation occurs, killing the intended result. The easiest way to explain it is to compare when you prepare a resin pour after you added the powder and stir properly, the mix gets "milky" taking some time for the resin to settle and clear, with most casting resins they give sufficient time for this to happen so when the resin starts gelling, the mix has settled and it slowly cures/hardens maintaining that clarity. Well, that is exactly what happens when trying to make repairs on castings that are crucial to blend in perfectly with the rest of the blank, some colours are worse than others and while I managed to get them fairly close, not close/good enough for me.
So, if you image a repair that requires to go around the blank totally or partially, anything that takes more than a few short seconds to harden will run and the mix dry too fast to allow the settling from your mix.
I get regularly a bunch of knives that I created the blanks/blocks for the handles that after they are machined and put together with the ferrule and blade, they have bits missing from machining, pockets in the wood that didn't allow the resin to penetrate, and lots of Banksia pod seed holes that lose the resin from the inside either totally or partially and other type repairs of various natures so, the need to find a product that I can mix with the powders to do these repairs that settle in a couple of seconds after mixed and that you fill the repair area and hardens immediately as soon as an ultraviolet light is pointed at the repair area, maintaining the exact same characteristics/colouration/clarity as the original epoxy pours.
I got a few types of UV resin, glue, gell on eBay all from China and the results are pretty identical to them all.
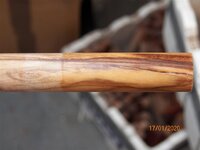
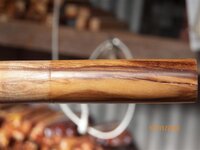
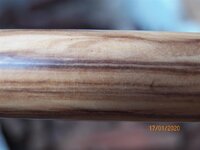
NOW, another discover that has certainly resolved a few problems for me was using this UV resin as one of the coats for pens, knife handles, and many other possible applications. you can spread/apply it on a paper towel, or brush depending what it is you are coating, I decided that one of the tests was going to be on one of the Olive wood rounded blanks that I put aside due to cracks or imperfections or a combination of both, why Olive wood...? well, one of the issues when applying finishes on certain oily woods such as the Olive, many of those finishes will fail, mainly by separating from the wood so, Olive wood was my first target wood to test.
I grabbed one of these faulty blanks, wrapped some masking tape about halfway and sanded it to 400 after that I used a very small soft brush and very generously coated the whole half of the blank with it, its viscosity or the viscosity of that particular brand I was testing is similar to thick CA of about 700 cups so quite thick but spreads very easily, similar to applying the liquid gell also called liquid glass. You keep rotating the blank to allow the thick layer to spread and self-level, giving plenty of time to then grab the ultraviolet torch or lamp and allow the blue light from reaching the covered areas, as soon as the light hits it it will harden immediately, stopping any chances of runnings or other. Now, this product works better with temperatures under 30°C, I'm not yet sure how it works when we get cold up here but and from what I noticed using it at temps about 20°C or less the hardening is quicker.
I put this coated blank aside for a couple of days and today I though in removing the tape and give it my normal wet sand steps, 600, 800, 1000, 1200, 1500, 2000 and 2500, wipe it clean and straight away I noticed that this resin was not going to give a glossy finish but the type of finish some guys are looking as a more natural look but with a protective coat that from what I tested, is extremely hard, fingernail scratching didn't touch it, and I could feel that when using the sanding grits, even the lowest grits weren't taken much at all, taking it to the buffing wheel using some Novus2 compound, the low sheen results prove to be what I was expecting, the sort of finish that I require every so often.
Interestingly, I could feel that that one single application/coat of the UV resin has given a very noticeable increase in the blanks original diameter so, after all done I measured it and the results actually show on the blank from 17.82mm to 18.10mm about 0.28mm or 11.02 thou
I have added a few pics I took from this olive blank for you all to have a look and tell me what you think.
Let me know if you knew about this product type and its various applications in the world of blank making and pen turning.
If you have any questions, please shoot...!")
Cheers
George
I have been waiting for a few weeks to talk to you guys and gals about some discoverings that I have been searching and testing for a long time to resolve issues that I was struggling with, one of the main ones was the difficulty in some repairings on cast blanks where the mix had to dry fast to prevent it from running off the repair area with something that I could mix with the same powder/colour I used on the original pour.
I have used thin, medium, thick CA, I used a variety of epoxy glues mainly the fast curing ones for the reasons I explained above from 5, 10, 15 and even 30 minutes ones but they all gave me a problem and that is, the CA's tend to give me more like a solid colour and not the pearl effect seen of the dry epoxy cast, the epoxy's even the more crystal clear ones (more expensive) all have also a similar result, the faster the cure time the worse the colour will come up this is due to the time that would take for the epoxy glue and mixed powder to settle and clear the transparency/translucency effects of the pearl powders, even the 30 minutes ones the mix gell well and truly before the separation occurs, killing the intended result. The easiest way to explain it is to compare when you prepare a resin pour after you added the powder and stir properly, the mix gets "milky" taking some time for the resin to settle and clear, with most casting resins they give sufficient time for this to happen so when the resin starts gelling, the mix has settled and it slowly cures/hardens maintaining that clarity. Well, that is exactly what happens when trying to make repairs on castings that are crucial to blend in perfectly with the rest of the blank, some colours are worse than others and while I managed to get them fairly close, not close/good enough for me.
So, if you image a repair that requires to go around the blank totally or partially, anything that takes more than a few short seconds to harden will run and the mix dry too fast to allow the settling from your mix.
I get regularly a bunch of knives that I created the blanks/blocks for the handles that after they are machined and put together with the ferrule and blade, they have bits missing from machining, pockets in the wood that didn't allow the resin to penetrate, and lots of Banksia pod seed holes that lose the resin from the inside either totally or partially and other type repairs of various natures so, the need to find a product that I can mix with the powders to do these repairs that settle in a couple of seconds after mixed and that you fill the repair area and hardens immediately as soon as an ultraviolet light is pointed at the repair area, maintaining the exact same characteristics/colouration/clarity as the original epoxy pours.
I got a few types of UV resin, glue, gell on eBay all from China and the results are pretty identical to them all.
NOW, another discover that has certainly resolved a few problems for me was using this UV resin as one of the coats for pens, knife handles, and many other possible applications. you can spread/apply it on a paper towel, or brush depending what it is you are coating, I decided that one of the tests was going to be on one of the Olive wood rounded blanks that I put aside due to cracks or imperfections or a combination of both, why Olive wood...? well, one of the issues when applying finishes on certain oily woods such as the Olive, many of those finishes will fail, mainly by separating from the wood so, Olive wood was my first target wood to test.
I grabbed one of these faulty blanks, wrapped some masking tape about halfway and sanded it to 400 after that I used a very small soft brush and very generously coated the whole half of the blank with it, its viscosity or the viscosity of that particular brand I was testing is similar to thick CA of about 700 cups so quite thick but spreads very easily, similar to applying the liquid gell also called liquid glass. You keep rotating the blank to allow the thick layer to spread and self-level, giving plenty of time to then grab the ultraviolet torch or lamp and allow the blue light from reaching the covered areas, as soon as the light hits it it will harden immediately, stopping any chances of runnings or other. Now, this product works better with temperatures under 30°C, I'm not yet sure how it works when we get cold up here but and from what I noticed using it at temps about 20°C or less the hardening is quicker.
I put this coated blank aside for a couple of days and today I though in removing the tape and give it my normal wet sand steps, 600, 800, 1000, 1200, 1500, 2000 and 2500, wipe it clean and straight away I noticed that this resin was not going to give a glossy finish but the type of finish some guys are looking as a more natural look but with a protective coat that from what I tested, is extremely hard, fingernail scratching didn't touch it, and I could feel that when using the sanding grits, even the lowest grits weren't taken much at all, taking it to the buffing wheel using some Novus2 compound, the low sheen results prove to be what I was expecting, the sort of finish that I require every so often.
Interestingly, I could feel that that one single application/coat of the UV resin has given a very noticeable increase in the blanks original diameter so, after all done I measured it and the results actually show on the blank from 17.82mm to 18.10mm about 0.28mm or 11.02 thou
I have added a few pics I took from this olive blank for you all to have a look and tell me what you think.
Let me know if you knew about this product type and its various applications in the world of blank making and pen turning.
If you have any questions, please shoot...!
Cheers
George


") Maybe Others can share what they learned? I finished the attached will Solarez.
Maybe Others can share what they learned? I finished the attached will Solarez.


.jpg")