deeceedub
Member
So, I'm a rookie learning the 4-H way ("learn by doing"). That also means I'm learning things the hard way. This week has been an expensive attempt at turning my first resin/acrylic blank.
Lesson 1: Resin is hard to drill. Destroyed two blanks trying to drill. Won't be attempting resin again in the near future.
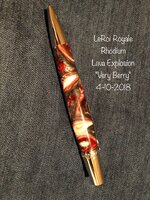
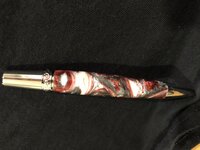
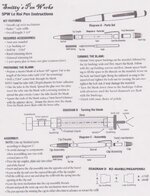
Lesson 2: Always check tube size before drilling. I bought 4 LeRoi Royale kits, which did not come with printed instructions. (You guys don't need 'em, of course, but I still do.) When requested, I was sent the one attached. It says drill 27/64, so I did. Hole is much too big for the tube...third blank wasted. 3/8 hole was the right size, and I finally got an AA blank drilled successfully.
Lesson 3: Carbide tools can catch. I switched from my skew to the Pen Genie as I neared final turning and it caught the edge and did some serious damage. I was able to salvage the blank, but had to alter my original planned shape for the barrel. I thought I was being really careful, but I wasn't careful enough.
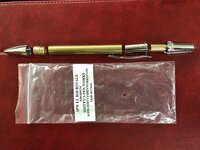
And after all that, now I can't assemble the pen. The instruction sheet seems to be for a different version of the pen, maybe? There is nothing for the top to screw into. The inside of the twist part of the cap is threaded, but there are no corresponding threads in the pen body to screw it on to. I don't know if I assembled it wrong or if there is something missing from my kit. If so, it's missing from all four kits- see pic attached where I've laid out the pieces included in one of my other LeRoi Royale kits.
Ugh. Please help. I probably can't disassemble this pen but I want to be able to at least use the other three kits.
Overall I enjoyed turning the acrylic. Until now I've only turned wood and antler. But I need to have some success out in my shop. This has been a train wreck and I'm getting discouraged. :frown:
Lesson 1: Resin is hard to drill. Destroyed two blanks trying to drill. Won't be attempting resin again in the near future.
Lesson 2: Always check tube size before drilling. I bought 4 LeRoi Royale kits, which did not come with printed instructions. (You guys don't need 'em, of course, but I still do.) When requested, I was sent the one attached. It says drill 27/64, so I did. Hole is much too big for the tube...third blank wasted. 3/8 hole was the right size, and I finally got an AA blank drilled successfully.
Lesson 3: Carbide tools can catch. I switched from my skew to the Pen Genie as I neared final turning and it caught the edge and did some serious damage. I was able to salvage the blank, but had to alter my original planned shape for the barrel. I thought I was being really careful, but I wasn't careful enough.
And after all that, now I can't assemble the pen. The instruction sheet seems to be for a different version of the pen, maybe? There is nothing for the top to screw into. The inside of the twist part of the cap is threaded, but there are no corresponding threads in the pen body to screw it on to. I don't know if I assembled it wrong or if there is something missing from my kit. If so, it's missing from all four kits- see pic attached where I've laid out the pieces included in one of my other LeRoi Royale kits.
Ugh. Please help. I probably can't disassemble this pen but I want to be able to at least use the other three kits.
Overall I enjoyed turning the acrylic. Until now I've only turned wood and antler. But I need to have some success out in my shop. This has been a train wreck and I'm getting discouraged. :frown:
Attachments
Last edited: