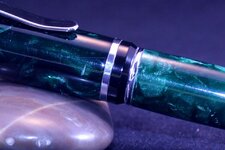
Going all the way back to OP
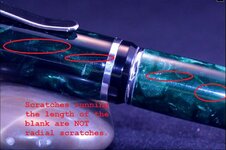
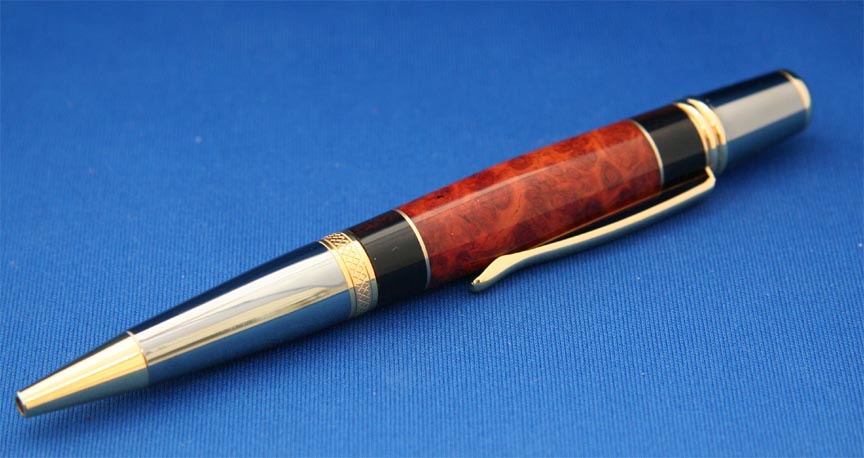
OK ... Everybody pointed out the radial scratches that you can see along the centerline of the pen, highlighted by the light source. I think the OP was also concerned about these deeper scratches that are in the barrels and appear to be going along the grain of the blank.
To properly sand out the radial scratches, you sand along the length of the barrels with the lathe turned off, while rotating the barrels by hand. You have to "cut through" the ridges of the radial lines without cutting down through the valleys, which would make for scratches that may not be removed by the next grit down.
Always clean off the blank (paper towel - a wet one in the case of acrylics) between grit changes to ensure that the previous larger grit doesn't migrate to the new sanding pad or paper and cause large scratches that won't be removed.
When sanding to achieve a smooth and uniform surface, use a piece that is a little long ... around 1.5 - 2 inches. Grip it on either end and change the angle constantly as you hold it against your work ... it doesn't have to be a lot of pressure, just constant light pressure works. Keep moving the paper around and changing the angle, as well as sawing it back and forth to present a cleaner section of the sandpaper to the work for best effect. You"ll do this the longest with the larger grit sizes, to get the final size you are wanting to achieve and remove all tool marks. I would suggest 120 grit abranet or 220 grit paper as a minimum sanding level.
Once all the tool marks are gone and you have achieved the profile you wish to maintain, progress up the stages in grit sizes, cleaning the blank in between with whatever you prefer to use ... (I keep an old toothbrush near the lathe, along with paper towels and a little squirt bottle of water too). Once you have achieved a good level of surface quality (I take woods up to 1200 grit, acrylics I go up through micromesh to 12000 and then polish - there's no need for a CA finish on pure acrylics), examine the surface in detail to make certain that there is nothing you don't want to see in the final product.
Once the examination is completed, clean the blank with acetone or denatured alcohol (DNA) (Of course - don't use acetone on acrylics ... duh!) and progress to your finish stage ... I use BLO + CA for my first coat, but I still like the Minwax Stain'n'Seal + CA as well - it's just harder to keep it from drying out. Then you can apply however many coats you desire for protection before you progress to wet-sanding final finishing stage.
You should start with 1000 grit or so, sanding wet, to level out the CA to a very fine light haze ... there should be NO shiny spots after cleaning the barrels with DNA. If you see a shiny spot, you missed that spot (it"s lower than it's surroundings) ... keep sanding a bit more to make it all uniformly even. Don't forget to sand laterally (along the length of the blank) with the lathe turned off! Also make certain you have no dull spots, where you can't see any glint of the CA on the wood. This means that you've sanded through that spot and you will need to re-finish and start again.
After you have the 1000 grit stage completed, progress quickly up the micromesh stages (at this point, sanding with each grit should take under 15 seconds) using a liberal amount of water ... add a drop or two of dish soap if you like, the suds can help remove debris from the barrels without scratching. Don't forget to sand laterally between grits, here, and also clean the barrel between each grit!
Once you"ve finished with the last micromesh pad, progress to the plastic polish. I use Meguair's Plast-X ... they also make One-Step, and it's pretty much the exact same product. You just happen to get half as much for a 40% higher price, buying the One-Step. I top it off with a coat of Turtle Wax Hard Surface Wax - this helps repel water and oils from the barrel surface, like from fingerprints...
If, after all of that, I still see very fine haze or scratch marks on the surface, I then take it to my buffing wheels, which I have charged with more Plast-X and Turtle Wax.
Now ... to address the main issue I see with the picture at the very top. You applied a CA finish to an Acrylic blank, which was not only not necessary, but quite likely trapped scratches beneath the finish coat which cannot ever be removed. I would go back and remove the CA to finish sand the blank all the way up through micromesh and polish it without the CA finish, but at this point you may be under the bushings .... The only way to fix it from that point would be to apply the CA over the final polished surface to build it back up, and then sand and polish it again.

 j/k
j/k