Lids

Signed-In Members Don't See This Ad
See more from monophoto

monophoto

Member
Joined
Mar 13, 2010
Messages
2,542
Location
Saratoga Springs, NY
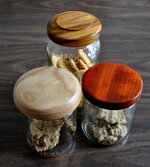
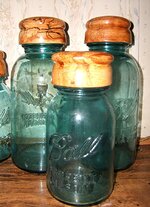
In their latest catalog, PSI is offering kits for making decorative lids for Mason jars.

You don't need to buy a kit - just purchase food items (marinara sauce, etc) that comes in glass jars, and then recycle.

My wife is convinced that all plastic storage containers are toxic, and is replacing a 40+ year collection with recycled glass containers. And being the good husband that I am, I have been making decorative wood lids so that the containers look nice when arrayed on the kitchen counter. She repays my kindness with oatmeal or chocolate chip cookies. That's a good deal!

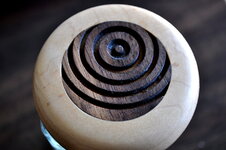
Seriously, I start with a scrap of hardwood that is at least 3/4" thick. I find the centers, mount it on a glue block, face off the underside, and then cut a recess large enough to contain the metal cap that came on the jar. You can measure the lid to determine the size of the recess, but the trial-and-error approach is required to get a good fit. Then, remove the blank from the glue block, flip it around and remount it using double-stick tape in the recess. Turn the top and sides, sand and finish. I've made the sides as thin as 1/16" - that looks attractive, but that's a bit thin and causes me to worry about cracking. The ideal thickness is probably somewhere between 1/8" and 1/4".

After finishing the top, I glue the metal lid that originally came on the jar into the recess using either epoxy or polyurethane glue. I prefer polyurethane because it will expand to fill any gaps between the turned lid and the underlying metal lid, but the downside is that it can foam out around the edges. That can be brimmed away after the glue has cured for 24 hours, but trimming is just an extra step. Also, it is necessary to clamp the metal lid to the wood cap when using polyurethane to prevent the foaming from separating them while the glue cures.
 

Attachments

  • Lids small.JPG
    Lids small.JPG
    724.1 KB · Views: 394
Signed-In Members Don't See This Ad

Curly

Member
Joined
Nov 20, 2010
Messages
4,828
Location
Saskatoon SK., Canada.
Nice jar upgrades. My dad used to do the same so yours brought back memories. If your wife doesn't like plastics then how does she cope with the paints and coatings inside the metal lids? Or should I not ask that? :wink:
 
Joined
Sep 24, 2006
Messages
8,206
Location
Tellico Plains, Tennessee, USA.
Great looking lids... My wife has gone the same route... she's collecting some of the older blue or green mason jars and I've made several lids for her... I use the jar rings that hold the flat lids in place and make my turnings to accommodate them, then just epoxy the rings in place....
 

Attachments

  • 25-886-2.jpg
    25-886-2.jpg
    218.7 KB · Views: 211
  • 25-914.JPG
    25-914.JPG
    29.4 KB · Views: 168
  • 25-887-3.JPG
    25-887-3.JPG
    221.9 KB · Views: 195

monophoto

Member
Joined
Mar 13, 2010
Messages
2,542
Location
Saratoga Springs, NY
UPDATE

A friend who was visiting us last month mentioned that it is possible to buy plastic replacement jar lids in the supermarket. These work just like the one-piece metal lids and require the same diameter recess in the wood when making jar lids - 2 7/8".

Also, the more recent versions of these have been made with the blank attached to a glue chuck for the initial turning using double-stick tape, and with the hole hollowed by successively drilling with forstner bits - usually 1" followed by 1 1/2", and then 2". Drilling with large forstner bits is hard work, but if you start with a small bit and work up in steps, the larger bits only have to cut a fairly narrow portion of the hole and the drilling goes fairly easily After drilling up to 2", I then use a combination of bowl gouge and square carbide cutter to expand the hole to the required 2 7/8" diameter. I tend to cut the hole to fit the liner rather than cut a specific dimension.

When I reverse the piece, I mount it in a chuck in expansion mode using No. 2 jaws - they are large enough to fit inside the 2 7/8" recess and firmly grip the piece. Obviously, be careful to not expand the jaws too much or you can break out the sides of the blank (DAMHIKT). I use a small piece of waste wood as a spacer to separate the blank from the face of the chuck jaws so that it's possible to turn and sand all the way to the bottom of the lid.
 

Edgar

New Member Advocate
Staff member
Joined
Feb 6, 2013
Messages
6,890
Location
Alvin, TX 77511
UPDATE

A friend who was visiting us last month mentioned that it is possible to buy plastic replacement jar lids in the supermarket. These work just like the one-piece metal lids and require the same diameter recess in the wood when making jar lids - 2 7/8".

Also, the more recent versions of these have been made with the blank attached to a glue chuck for the initial turning using double-stick tape, and with the hole hollowed by successively drilling with forstner bits - usually 1" followed by 1 1/2", and then 2". Drilling with large forstner bits is hard work, but if you start with a small bit and work up in steps, the larger bits only have to cut a fairly narrow portion of the hole and the drilling goes fairly easily After drilling up to 2", I then use a combination of bowl gouge and square carbide cutter to expand the hole to the required 2 7/8" diameter. I tend to cut the hole to fit the liner rather than cut a specific dimension.

When I reverse the piece, I mount it in a chuck in expansion mode using No. 2 jaws - they are large enough to fit inside the 2 7/8" recess and firmly grip the piece. Obviously, be careful to not expand the jaws too much or you can break out the sides of the blank (DAMHIKT). I use a small piece of waste wood as a spacer to separate the blank from the face of the chuck jaws so that it's possible to turn and sand all the way to the bottom of the lid.

I was making a lid from a nice piece of Leopardwood this weekend & did that. :mad::mad::mad:
 

monophoto

Member
Joined
Mar 13, 2010
Messages
2,542
Location
Saratoga Springs, NY
Update

Last week, I watched a YouTube video by Bram the Wadesmill Woodturner who demonstrated a technique for making latticework inlay disks for lids. His technique inspired me to try something similar. Here's a link to Bram's video - https://www.youtube.com/watch?v=PAOcAx5N9UA.

My version was made by laminating a scrap of maple with a scrap of walnut, and then using a parting tool to cut circular grooves into the walnut. Then, I shifted the blank about half an inch, and cut out a circular section. The key difference between my method and Bram's is that I just attached the composite blank to a glue block with double-sided tape - I didn't bother to make the jig he uses, and I didn't flip the piece over to cut intersecting grooves onto the maple.

Then, I cut a recess in a maple jar lid that was the exact diameter of the disk, and with a depth that matched the thickness of the sandwich. Then I glued the disk into that recess, and sanded everything smooth, and applied finish.

The next time, I might do this using a beading tool rather than a parting tool. One of the things that is now obvious is that the lighter wood really doesn't show through very well, and in fact, I can anticipate that the grooves will be a great dust trap. Using a beading tool to just cut a pattern in the surface will have the same decorative effect but perhaps without some of the downside.

I can see this technique being used to create decorative inserts for a variety of turning projects.
 

Attachments

  • Latticework.JPG
    Latticework.JPG
    470.7 KB · Views: 143
Top Bottom