robutacion
Member
Hi peoples,
With my recent stash of Peppercorn burl, was only obvious that I would turn a few pieces for myself now but they will endup as gifts such as most my other turnings.
Merissa loves them and we struggle to find places we can put them all but we manage and we certainly enjoy each piece for a while until new ones come along...!:wink::biggrin:
I've got so many blanks/chunks cut that I never know which one I'm going to use but sometimes I see a piece and I automatically consider what I will do with it and so, I put it aside or, put it in the lathe straightaway if I feel like turning.
The first 2 pieces weren't big but I decided to oven dry them and stabilized both, one I had a good idea what I wanted to turn out of it


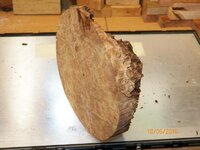
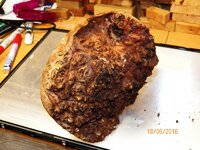
but the other, was a burl cap there is the 2 and a bit inches thick where the burl has the most holes/burl surface. I cut a flat bottom out of it and during all this time (while getting treated) I keep thinking what I could do to enhance this burl structure, and colours but nothing seemed right.
Without having a specific design in my head, I decided to glue some other piece of wood as the base, I also thought that I could glue a third piece as a foot and stain it black to resemble Ebony but, I never endup getting that far.
There was one particular wood that I though well worth the project and that was some of this from post 15 onwards...!
This Colonial Red gum is beautiful and I think goes well with the Peppercorn burl, one of my dilemmas was how to showcase the Peppercorn burl from the inside and not create a 2 wood/colour and spoil the very part I wanted to enhance so, I went as low on the burl as 1mm before the glue-up, giving its a rounded inner walls shape because I wanted as much outer burl cap surface as possible, I think it come out quite well...!


All pics were taking last night as I was going to post them, then but, for whatever the reason IAP site was down for some time so, I decided to do it this morning/afternoon. Of all pics from this piece, was only one that I kept using the camera flash, all other didn't look right so, I kept this one because is the pic I like the most of all them.

Now, for the third and last piece I finished last night, this was one of the blanks I cut from the last load I brought home, was nothing special about it apart from the fact that, after I cut a few bad parts, I endup with a square blank at the bark end but a triangle at the base from 2 sides, if you know what I mean.
I decided to use that blank because of its odd shape, that is the reason it has 2 flat sides, the wood was still a bit wet and the bark was half gone so, I took it for a spin. Again, I wanted to have the natural edge so, I was never going to turn it thin and because it still had some moisture, I was going to leave it as that and finish it another day but, I changed my mind at the last minute.
I turned a little more and then used the heat gun while spinning to remove most of the moisture, it worked but not 100%. The sanding was not smooth from the moisture still on it so, I gave it another run with the heat gun and proceeded by diluting some sanding sealer with acetone 50/50 and spray the whole thing to almost saturation.
Use the heat gun again with the lathe going to accelerate the sealer that was suppose to be fast cure but with the rain and extra moisture in the air, it was drying as fast as I wanted. After a little while, it felt dry enough for another good sanding and this time the surface sanded well.
After sanded and with the sealer turning a little whiteish from the moisture still inside the wood, the wood didn't look well even though was smooth so, I decided to use an old technique I use in the old days, by using a wooden oil (Argonoil, timber oil), my hands/fingers and some fine steel wool.
I love that part when you "rub" the smooth wood with your hands, the lathe was off in this case because of the natural sharp edges but, I normally do it with the lathe on, on slow , nearly as good as sex...!
 :biggrin:


Very generous amount of oil, the rubbing motion allows for oil penetration that in this case, was limited from the sealer I had used but it still went well.
When the oil is almost all rubbed in, the fine steel wood starts the burnishing and removes any excess oil present in the wood, this allows for some heat generated by it and dries the oil a little faster. After that is a matter of using a soft cloth and rubbing a little more.
Because of the nature of the burl, when the soft cloth is rubbed in, the sharp edges of the burl holes/crevasses tend to leave some "fluff" around those sharp edges that is never easy to remove by hand so, the easiest way to get rid-of-it is to use the heat gun, full blast and close to its nozzle, the red flamed heat does burn them in no time.:biggrin:
I wanted to finish the 3 pieces last night so, some of my methods may look odd but, they worked...!


Well, I may make some other pieces, possible some castings but for now, this will do...!
Enjoy.
Cheers
George
With my recent stash of Peppercorn burl, was only obvious that I would turn a few pieces for myself now but they will endup as gifts such as most my other turnings.
Merissa loves them and we struggle to find places we can put them all but we manage and we certainly enjoy each piece for a while until new ones come along...!:wink::biggrin:
I've got so many blanks/chunks cut that I never know which one I'm going to use but sometimes I see a piece and I automatically consider what I will do with it and so, I put it aside or, put it in the lathe straightaway if I feel like turning.
The first 2 pieces weren't big but I decided to oven dry them and stabilized both, one I had a good idea what I wanted to turn out of it
but the other, was a burl cap there is the 2 and a bit inches thick where the burl has the most holes/burl surface. I cut a flat bottom out of it and during all this time (while getting treated) I keep thinking what I could do to enhance this burl structure, and colours but nothing seemed right.
Without having a specific design in my head, I decided to glue some other piece of wood as the base, I also thought that I could glue a third piece as a foot and stain it black to resemble Ebony but, I never endup getting that far.
There was one particular wood that I though well worth the project and that was some of this from post 15 onwards...!
This Colonial Red gum is beautiful and I think goes well with the Peppercorn burl, one of my dilemmas was how to showcase the Peppercorn burl from the inside and not create a 2 wood/colour and spoil the very part I wanted to enhance so, I went as low on the burl as 1mm before the glue-up, giving its a rounded inner walls shape because I wanted as much outer burl cap surface as possible, I think it come out quite well...!
All pics were taking last night as I was going to post them, then but, for whatever the reason IAP site was down for some time so, I decided to do it this morning/afternoon. Of all pics from this piece, was only one that I kept using the camera flash, all other didn't look right so, I kept this one because is the pic I like the most of all them.
Now, for the third and last piece I finished last night, this was one of the blanks I cut from the last load I brought home, was nothing special about it apart from the fact that, after I cut a few bad parts, I endup with a square blank at the bark end but a triangle at the base from 2 sides, if you know what I mean.
I decided to use that blank because of its odd shape, that is the reason it has 2 flat sides, the wood was still a bit wet and the bark was half gone so, I took it for a spin. Again, I wanted to have the natural edge so, I was never going to turn it thin and because it still had some moisture, I was going to leave it as that and finish it another day but, I changed my mind at the last minute.
I turned a little more and then used the heat gun while spinning to remove most of the moisture, it worked but not 100%. The sanding was not smooth from the moisture still on it so, I gave it another run with the heat gun and proceeded by diluting some sanding sealer with acetone 50/50 and spray the whole thing to almost saturation.
Use the heat gun again with the lathe going to accelerate the sealer that was suppose to be fast cure but with the rain and extra moisture in the air, it was drying as fast as I wanted. After a little while, it felt dry enough for another good sanding and this time the surface sanded well.
After sanded and with the sealer turning a little whiteish from the moisture still inside the wood, the wood didn't look well even though was smooth so, I decided to use an old technique I use in the old days, by using a wooden oil (Argonoil, timber oil), my hands/fingers and some fine steel wool.
I love that part when you "rub" the smooth wood with your hands, the lathe was off in this case because of the natural sharp edges but, I normally do it with the lathe on, on slow
, nearly as good as sex...!:biggrin:Very generous amount of oil, the rubbing motion allows for oil penetration that in this case, was limited from the sealer I had used but it still went well.
When the oil is almost all rubbed in, the fine steel wood starts the burnishing and removes any excess oil present in the wood, this allows for some heat generated by it and dries the oil a little faster. After that is a matter of using a soft cloth and rubbing a little more.
Because of the nature of the burl, when the soft cloth is rubbed in, the sharp edges of the burl holes/crevasses tend to leave some "fluff" around those sharp edges that is never easy to remove by hand so, the easiest way to get rid-of-it is to use the heat gun, full blast and close to its nozzle, the red flamed heat does burn them in no time.:biggrin:
I wanted to finish the 3 pieces last night so, some of my methods may look odd but, they worked...!
Well, I may make some other pieces, possible some castings but for now, this will do...!
Enjoy.
Cheers
George
Last edited: