First Post - First Pen - First Problem!

Signed-In Members Don't See This Ad

Sandsini

Member
Joined
May 11, 2014
Messages
437
Location
Lake Arrowhead, California
I have been lurking for a month or so while I accumulated the tools to become a Pen Turner... and today it all came together. I have my cheapie lathe, a cheapie band saw (I should stop saying cheapie, everything I bought is kind of cheapie, I'm working on a budget for now), chisels, blanks, kits... everything to start turning pens.

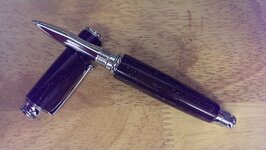
I decided to start with a Navigator Rollerball kit in Wenge. I drilled and turned it (thinking I did a pretty good job turning it for my first time ever on a lathe) and finished it in CA, and then redid the finish, and redid the finish, etc. until I have what you see here :frown:. As you can see there light indentations in the finish which I was never able to get beyond. I would sand it down and re-apply the CA but every time, it came out the same.

I called it a day after several hours and assembled the pen. Of course I pressed it all together without the thread insert that attaches the cap to the body of the pen. Ah well... Mark this one up to practice and onwards and upwards.

Does anyone have a hint on how to avoid the finish problem? I really liked using the CA other than that.

Eric
 

Attachments

  • FirstPen_960.jpg
    FirstPen_960.jpg
    188.5 KB · Views: 430
Signed-In Members Don't See This Ad
Welcome and congrats on your first post. I'm sure others will chime in shortly. Don't forget to check out the library, lots of awesome information there. Once again welcome from Colorado.
 
For your first pen it is a great job Eric. You picked a tough wood to do your first CA finish on. Wenge has a heavy grain like oak does it takes a lit of fill to get it smooth. Keep turning and learn a little more each time.

Mike
 
Mike hit it on the head.

Make a few with maple (curly or burl if you want pretty), walnut or "non-oily" exotics.

Deep grain like wenge, palm, bog woods---wait until you've made a few dozen pens.

GREAT job ---but make the next ones easier on yourself!!
 
Thanks guys, I'll have to check out filling techniques. I had a great time turning the pen and am eager to try another with what I learned on this one.

I have an El Grande RB kit and a nice piece of blue acrylic that should make an attractive combo. I think that'll be tomorrow's project.

Eric
 
Welcome to IAP!!! Dont know a thing about wood, I am the polymer clay artist. I think for a first pen you did good!!! Look forward to seeing #2!!
 
Watch some of Ed's videos before you start the next pen. The acrylic is going to turn and finish completely different that the Wenge did. He has some good info in his videos.

Mike

No need to use a "finish" on acrylic...just a good wet sanding and some type of polish.

You are right Jim I should have said finishing

Mike
 
You really picked a beautiful, but tricky wood and congrats on getting it all done and assembled! The first time I did an open grain wood, I had a similar appearance. It turned out to be fine sanding dust in the open grain. Although I could fill the grain, I couldn't get rid of the light color in the grain. I solved that by re sanding and wiping thoroughly with IPA before putting the finish back on.

You could try turning a blank undrilled cylinder out of the sample wood. Sand just like you did for the pen, then wipe half of it with IPA and leave the other half alone. Lastly apply your finish and compare the two sections side by side. If you turn it oversize, you can easily re-turn it for another pen.

Keep going as you obviously have the talent !
 
Eric, the turning looks good. Personally, I would keep working on this one. You are on a budget and you have an investment in the kit. Wood and tubes, not so much. Tap it apart, put it back on you lathe and sand the spots off using maybe a 240 grit. As you get down to fresh wood, get some fresh 240 paper and running the lathe about 400-700 build up some wenge dust on your paper. Add a drop of medium CA to the dust and sand it into the open grain as a filler. Then work your way back to 600 - clean the blank thoroughly with compressed air if you have it, and toothbrush. If you have DNA (denatured alcohol), wipe it down with that and if you don't see any white spots, begin reapplying your CA.

If the previous white spots are too deep to easily remove, you can turn the wood off the tubes, drill a new piece and start over. That pen will look good when you get it right. Don't worry about reducing the diameter of your wood, you can build CA to about any thickness you need to match your hardware.
 
For an open grain like that Ill turn then use compressed air to blow out the dust from any crevasses. then I fill those holes with thick CA while not on the lathe. Just put dabs in each hole till they fill up. after that dries i can then sand and those pits dont fill with sanding dust anymore
 
Welcome, congratulations on your first pen. It came out quite nice. The Navigator is a favorite kit of mine and I like Wenge a lot. Keep practicing, the pens will love your for it.
 
Nice try for a first pen. I agree with Harry. Tap it apart and keep working, you are getting close to getting the hang of it.

Welcome to the forum, AND you have given an old dog new inspiration! I had tossed the Navigator years ago because of the black enamel threads that looked AWEFUL and worked even worse. It may be time to revisit the Navigator. I haven't been inside a Woodcraft in years. Looks like it is time to pay them a visit.
 
For your first shot at making a pen, I say, nicely done. Most of us started with a single barrel (Sierra-style) or Slimline. Starting with a capped pen takes of good bit of fortitude and conviction. Great job.

BTW, that kit looks more like a Virage than a Navigator. They have the same dimensions, so I guess it's a fancy Navigator.:wink::wink:
 
I think your pen looks fantastic for a first try. Good form and fit, and other than the problem with the grain it looks like you did a pretty good CA finish as well. A lot of people have problems getting the hang of that.

Here's my question: are you sure that pen is a Navigator? I does not look like the Navigator I am familiar with. The attached picture is of the Navigator as I know it.

edit in: I should have read Johns post before asking.:smile:
 

Attachments

  • R11-018_3.jpg
    R11-018_3.jpg
    140 KB · Views: 131
Last edited:
Eric, Your first pen looks good. As other have said Wenge is a hard wood to finish, What plano_harry said is a very good way to fill in the open grain. Lots of good info in the library.
 
Thanks for all the great info everyone! John and MBroberg are correct, I gave the wrong name on the kit. It's a Metro. I've had Navigators on the brain lately, but don't have one of them yet. I am going to try to take the metro apart and redo the barrels, but today I need a success so I am going to try something different.

I want to see how the Acrylic blanks turn, so that's my project for today, well that, assembling a work stool and wiring up some kind of lighting for the lathe.

It's a nice cool morning in Southern California and I have David Johansson's radio show broadcasting on the computer in the garage, so I am really going to have a great morning. Hope you all do as well!

Eric
 
I think your pen looks fantastic for a first try. Good form and fit, and other than the problem with the grain it looks like you did a pretty good CA finish as well. A lot of people have problems getting the hang of that.

Here's my question: are you sure that pen is a Navigator? I does not look like the Navigator I am familiar with. The attached picture is of the Navigator as I know it.

edit in: I should have read Johns post before asking.:smile:

Is that pock marks/pits/unfilled air bubbles(?) on the lower blank that I see in the photo?
 
Great job Eric. I am pretty much in the same boat as far as buying "Cheapie" get started tools. Now, I do have to say that the folks in this organization are some of the finest people that I have ever been associated with. Friendly, knowledgeable, and always willing to help a novice out. We are lucky to be part of such an awesome organization and community of people. Good job my friend.
 
Eric, the turning looks good. Personally, I would keep working on this one. You are on a budget and you have an investment in the kit. Wood and tubes, not so much. Tap it apart, put it back on you lathe and sand the spots off using maybe a 240 grit. As you get down to fresh wood, get some fresh 240 paper and running the lathe about 400-700 build up some wenge dust on your paper. Add a drop of medium CA to the dust and sand it into the open grain as a filler. Then work your way back to 600 - clean the blank thoroughly with compressed air if you have it, and toothbrush. If you have DNA (denatured alcohol), wipe it down with that and if you don't see any white spots, begin reapplying your CA.

If the previous white spots are too deep to easily remove, you can turn the wood off the tubes, drill a new piece and start over. That pen will look good when you get it right. Don't worry about reducing the diameter of your wood, you can build CA to about any thickness you need to match your hardware.

You nailed it, Harry.:smile:
 
You really picked a beautiful, but tricky wood and congrats on getting it all done and assembled! The first time I did an open grain wood, I had a similar appearance. It turned out to be fine sanding dust in the open grain. Although I could fill the grain, I couldn't get rid of the light color in the grain. I solved that by re sanding and wiping thoroughly with IPA before putting the finish back on.

You could try turning a blank undrilled cylinder out of the sample wood. Sand just like you did for the pen, then wipe half of it with IPA and leave the other half alone. Lastly apply your finish and compare the two sections side by side. If you turn it oversize, you can easily re-turn it for another pen.

Keep going as you obviously have the talent !

My father in law (who taught me to turn) started me out on cheap pine 2x4's cut into squares. He told me if I could turn and finish pine to a smooth rich finish then most other species would be easy. I don't know if this is true or not, but I practiced on pine until I felt comfortable working and the more exotic (expensive species.)

Most of the time when I have finished with the shaping I can start off with 400 or even 600 grit sand paper.

Just my .02 cents worth. Go to Lowes/Home Depot/lumber yard and pick up an 8' 2x4 for 3 bucks, cut it into 3/4 x 3/4 x 5 blocks on your band saw and turn them down until you are satisfied. I have even made some cheap slim lines out of pine and dyed them up before polishing. They look very nice.
 
Back
Top Bottom