steamshovel
Member
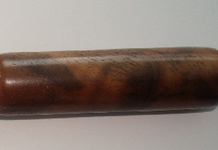
I just finished a pen and I think it looks fine but I have a question. I have magnified the picture for better viewing.
But first let me tell what I have done so far. I put two coats of sanding sealer and sanded up to 2,000 grit after coating. So far it looked good to me so I put on several coats of Mylands polish.
My question is should I have used a stain the color of the wood to cover up the pores first. It looks fine to me but!
Am I just worrying about nothing?
Thank in advance
Preston