Finally! First Kitless!!

Signed-In Members Don't See This Ad
See more from glycerine

glycerine

Member
Joined
Aug 7, 2009
Messages
3,462
Location
Fayetteville, NC
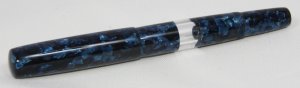
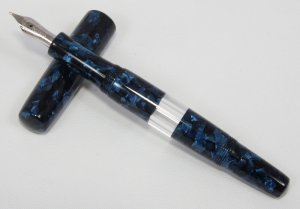
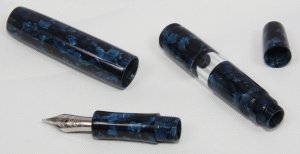
I finally finished my first kitless tonight. It's clipless, but it's postable and has an ink window. I have part of a cap that was going to have a clip, but I made a few mistakes and ran out of material, so maybe when I get some more, I'll try to work in a clip.
Anyway, I believe the material was from Woodcraft, 5mm polished steel Bock nib. The ink window was from a rod and not a tube, so I actually drilled, sanded and polished the inside. In hindsight, I believe next time I will try to fire polish it before threading and see how that goes.
I'm happy with it and hope to get faster and better as I go.


Signed-In Members Don't See This Ad
Hard to add to what has already been said, but I'll try. For a first attempt you've surpassed beginner and gone right to pro, not only making an ink window but making it postable then to top it off the shape and size looks spot on. Thanks for raising the bar for us who have yet to make a component-less pen, you've made it hard to beat:wink:
 
Hard to add to what has already been said, but I'll try. For a first attempt you've surpassed beginner and gone right to pro, not only making an ink window but making it postable then to top it off the shape and size looks spot on. Thanks for raising the bar for us who have yet to make a component-less pen, you've made it hard to beat:wink:

What he said! Congrats Jeremy! Did you make it an eyedropper or is there a converter that you use?

Yes, it's en eyedropper... funny story about that.:biggrin: I don't know as much about fountain pens as I thought. Last night after I posted pics, I went to fill it for the first time. I took off the "tail piece" and proceeded to fill it with ink using a syringe. I thought the hole through the feed was small enough that the ink would stay in there until you put the nib to paper... WRONG!! I noticed that the ink level seemed to be dropping and sure enough, the cap was filled with ink.:eek: So I poured the ink back into the bottle, put the tail section back on, removed the front section and then filled it again. Works like a charm!:cool: I didn't realize that it was the "vacuum" that kept the ink in there. But at least I'm learning!
 
Jeremy, Just to add to what's already been said....... IT'S ABOUT TIME!!! :tongue:

Personally, I think it would look nicer if it had a rubber bulb on the end! :wink:
 
Hard to add to what has already been said, but I'll try. For a first attempt you've surpassed beginner and gone right to pro, not only making an ink window but making it postable then to top it off the shape and size looks spot on. Thanks for raising the bar for us who have yet to make a component-less pen, you've made it hard to beat:wink:

What he said! Congrats Jeremy! Did you make it an eyedropper or is there a converter that you use?

Yes, it's en eyedropper... funny story about that.:biggrin: I don't know as much about fountain pens as I thought. Last night after I posted pics, I went to fill it for the first time. I took off the "tail piece" and proceeded to fill it with ink using a syringe. I thought the hole through the feed was small enough that the ink would stay in there until you put the nib to paper... WRONG!! I noticed that the ink level seemed to be dropping and sure enough, the cap was filled with ink.:eek: So I poured the ink back into the bottle, put the tail section back on, removed the front section and then filled it again. Works like a charm!:cool: I didn't realize that it was the "vacuum" that kept the ink in there. But at least I'm learning!

LoL! DoH!!!! Yep, you cant fill it from the tail piece, there has to be hat vacuum for that ink to stay in there. I almost found that out the hard way as well, luckily i came across the information before i made the pen that way. Chalk this one up to learning:biggrin: Great concept though and a great pen!!
 
Beautiful pen, Jeremy. Amazing first effort. Your threads are nice and sharp. The joints are practically invisible. The shape of the section is very nice, looks comfortable to hold. Plus you included an ink window and a removable lower finial. Very impressive.

I have some similar material that I got from Bear Tooth Woods. Nice stuff!
 
Hard to add to what has already been said, but I'll try. For a first attempt you've surpassed beginner and gone right to pro, not only making an ink window but making it postable then to top it off the shape and size looks spot on. Thanks for raising the bar for us who have yet to make a component-less pen, you've made it hard to beat:wink:

What he said! Congrats Jeremy! Did you make it an eyedropper or is there a converter that you use?

Yes, it's en eyedropper... funny story about that.:biggrin: I don't know as much about fountain pens as I thought. Last night after I posted pics, I went to fill it for the first time. I took off the "tail piece" and proceeded to fill it with ink using a syringe. I thought the hole through the feed was small enough that the ink would stay in there until you put the nib to paper... WRONG!! I noticed that the ink level seemed to be dropping and sure enough, the cap was filled with ink.:eek: So I poured the ink back into the bottle, put the tail section back on, removed the front section and then filled it again. Works like a charm!:cool: I didn't realize that it was the "vacuum" that kept the ink in there. But at least I'm learning!

LoL! DoH!!!! Yep, you cant fill it from the tail piece, there has to be hat vacuum for that ink to stay in there. I almost found that out the hard way as well, luckily i came across the information before i made the pen that way. Chalk this one up to learning:biggrin: Great concept though and a great pen!!

You know, I was thinking about this a little more and watched a few videos. One said put the ink in, then only screw the section in half way, THEN turn it around so that the ink flows into the feed, THEN screw on the section the rest of the way and that will force the ink through the feed and prime the pen... well, with a removable back end, I could just fill, screw in the section all the way, then turn it around and lossen the end to let a little air in and let gravity prime it, tighten back up and you're ready to go! :biggrin: Plus, it will probably be easier to clean this way.
 
By far, your first kitless pen is MUCH nicer than the last 30 I've seen bumped up to the top, and plastered all over the forums. INCLUDING mine. Love the window. Being clipless is forgiving. These pens (IMO) require either, a 7" blank, or two regular length blanks, so there is enough material. Sorry, you probably already knew that. Forgive my rambling. Pretty pen!
 
Outstanding kitless debut! One thing I've always wondered about the windows. Are they just segmented sections, drilled through and then you just trust the glue to hold, or are they inset somewhat at each end for a stronger joint?
 
Outstanding kitless debut! One thing I've always wondered about the windows. Are they just segmented sections, drilled through and then you just trust the glue to hold, or are they inset somewhat at each end for a stronger joint?

On mine, I threaded each end, and used two part epoxy, so it's threaded AND glued into the blue sections. I believe that George (Texatdurango) said he does his this way, so I figured I'd go with something that has been proven already. It may work just fine to glue the segments, or even just use the tenon instead of threading, but I just wanted to make sure the joints were strong...
 
By far, your first kitless pen is MUCH nicer than the last 30 I've seen bumped up to the top, and plastered all over the forums. INCLUDING mine. Love the window. Being clipless is forgiving. These pens (IMO) require either, a 7" blank, or two regular length blanks, so there is enough material. Sorry, you probably already knew that. Forgive my rambling. Pretty pen!

Thanks, but don't be so modest... your black and white swatches left me in awe!
 
On mine, I threaded each end, and used two part epoxy, so it's threaded AND glued into the blue sections. I believe that George (Texatdurango) said he does his this way, so I figured I'd go with something that has been proven already. It may work just fine to glue the segments, or even just use the tenon instead of threading, but I just wanted to make sure the joints were strong...

Thanks. I took a closer look at the picture and it's clear you inset it somehow. Threaded and glued sounds like the way to go. Doing it as a segment and trusting the glue to hold would be too great a risk, I suspect.
 
When I see a "First" kitless this nice I have to ask....how many kitless pens did you make to get you're first? LOL
 
When I see a "First" kitless this nice I have to ask....how many kitless pens did you make to get you're first? LOL

Thanks! None really. I practiced drilling and tapping a few sections from ebonite to make sure I fit the feed housing correctly. I was actually going to use black ebonite on this one, but decided to go with a matching section. I also practiced cutting threads on some clear acrylic, but this is my first kitless pen. I did alot of research and looking at others' pics and posts and then followed suit. We've got a ton of great teachers here on the IAP!!

Curve Buster!!

:biggrin:
 
Back
Top Bottom