Texatdurango
Member
At this time there is a buy going on for some taps and dies and because of the size of the threads involved the die is offered in either a 1" or 1 1/2" size. The 1" die will have some very thin walls around the chip clearance holes and while I'll be cutting mainly plastic and ebonite, there might be a chance I'll use the die to make threads in harder materials so decided to opt for the larger diamer diameter die. So......... I made an adapter for the die holder I currently have.
This might give some others some ideas so here goes.......
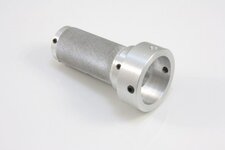
This photo shows the die holder as purchased from the Little Machine Shop http://littlemachineshop.com/products/product_view.php?ProductID=2314&category= , it holds 1" diameter dies.

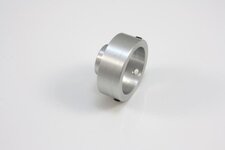
This shot shows the adapter I made from aluminum which is a tight slip fit over the existing holder. It is attached using three set screws and the nice thing is that I don't have to remove the smaller tap to use the adapter.

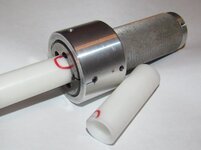
Here it is attached. I don't have the 1 1/2" die yet so can't drill and tap the set screw holes which will hold the larger die in place.

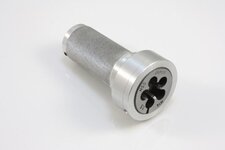
Here are some shots showing different angles of the adapter. Upper left shows the tight, no-slop fit. Upper right shows the smaller tap still inside. Lower left shows the set screws and how they fit into the main holder. I used three set screws from the lower end of the stock die holder and they are m4.7 so I drilled a .128" hole for tapping. Notice the small tip at the end, it is .097" diameter. I drilled an .098" hole in the main holder so when the set screw is screwed in, it will drive the tip into the body of the holder giving the adapter a very firm mount.

This might give some others some ideas so here goes.......
This photo shows the die holder as purchased from the Little Machine Shop http://littlemachineshop.com/products/product_view.php?ProductID=2314&category= , it holds 1" diameter dies.
This shot shows the adapter I made from aluminum which is a tight slip fit over the existing holder. It is attached using three set screws and the nice thing is that I don't have to remove the smaller tap to use the adapter.
Here it is attached. I don't have the 1 1/2" die yet so can't drill and tap the set screw holes which will hold the larger die in place.
Here are some shots showing different angles of the adapter. Upper left shows the tight, no-slop fit. Upper right shows the smaller tap still inside. Lower left shows the set screws and how they fit into the main holder. I used three set screws from the lower end of the stock die holder and they are m4.7 so I drilled a .128" hole for tapping. Notice the small tip at the end, it is .097" diameter. I drilled an .098" hole in the main holder so when the set screw is screwed in, it will drive the tip into the body of the holder giving the adapter a very firm mount.


 :devil: