Too simple to post here?

Signed-In Members Don't See This Ad

PenMan1

Member
Joined
Jul 8, 2009
Messages
6,380
Location
Eatonton, Georgia
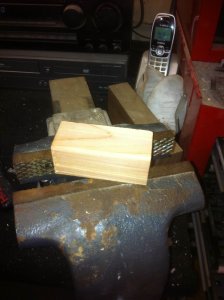
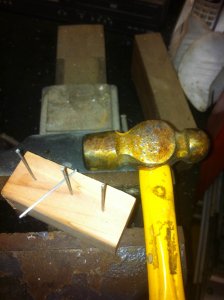
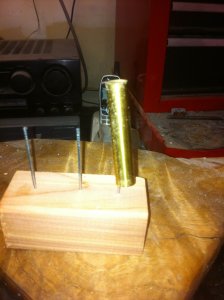
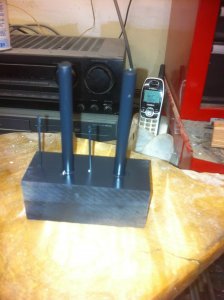
I got several PMs asking for explination as to how I "quickly" paint pen tubes. It actually took longer to take these five snapshots of the jig than it took to make the jig. The plumber's putty stays in the tube until after the tubes have been glued into the blanks and the glue has dried.

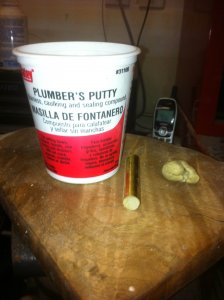
It was easier to post photos than to describe this 10 second jig. The Jig works equally well with brush or spray paint.


http://www.penturners.org/photos/index.php?n=17628
 
Signed-In Members Don't See This Ad
Interesting... I didn't realize that people use a jig to paint the tubes. I just put my tube on the end of an insertion tool, spray, and close the handle of the tool in one of drawers of my tool cabinet for about 5 minutes until dry... repeat with the other tube.
 
Interesting... I didn't realize that people use a jig to paint the tubes. I just put my tube on the end of an insertion tool, spray, and close the handle of the tool in one of drawers of my tool cabinet for about 5 minutes until dry... repeat with the other tube.


YOU ACTUALLY PAID $10 for an INSERTION TOOL? Somebody revoke his Cheapskate Penmaker's License:biggrin::biggrin::biggrin:

LOL! I bought it before I knew any better! Also I think it's part of my OCD nature! :biggrin:


LOL:biggrin::biggrin::biggrin:
You can tell from the pix that I have OCD also. Overtly Clutter Disorganization:biggrin:

Seriously, with this jig you can paint as many tubes as you have nails at one time. With the insertion "tool" ...Paint one tube...wait 30 minutes...etc. Us overly cluttered disorganizers...may lose the second tube before the first one dries.
 
Last edited:
Insertion tools. We have to remember we are turners here. Not just pen makers or pen installers. You can make tons of insertion tools for very little money and in this case for painting tubes. Go to home center and buy yourself some lengths of dowels you feel will encapsulate all your tube sizes. Take them home and now the tricky part, turn them down to the same taper as the insertion tool. Take all of 5 minutes apiece. If you want to get fancy drill an appripriate hole on the fat end where you can now screw it onto a waiting screw that protrudes from a board set up with many of these screws.
 
Wait...Wait...Pen tube insertion tool? I thought you were SUPPOSED to have CA on your fingers ALL the time!!!! I haven't had finger prints in almost two years now! I tried epoxy but I had to clean that off with acetone cause it was too sticky...I just felt wrong with my fingers clean!!
 
Wait...Wait...Pen tube insertion tool? I thought you were SUPPOSED to have CA on your fingers ALL the time!!!! I haven't had finger prints in almost two years now! I tried epoxy but I had to clean that off with acetone cause it was too sticky...I just felt wrong with my fingers clean!!

+1 on the CA'ed fingers. People see me gnawing my fingers and think I'm biting my nails.....

Little do they know I'm trying to remove a layer of CA.
 
one more

I put several tubes on a wood dowel and enough painters tape at the end of the "stack" to hold 'em in place. I then can sand all of them at once, like waxing a pool que, and then paint them with spray Rustoleum. Clamp the whole shebang in a vise till dry and your good to go. No need to plug the ends this way.
WB
 
OK, semi-newbie here with a question........ What exactly is an insertion tool and what is it's function? I've made a few hundred pens but never used one, what am I missing?
 
I use an old center punch as an insertion tool and to hold the tube to paint it. I have a pegboard 'shelf with small dowels to put the tubes onto. Shelf is divided into jr./ sierra/ etc. so I don't get confused at to what's what.
 
Man, you guys go all out...My insertion tool is a small dowell with masking tape rolled up it til it gets thick enough to keep from going any futher into the tube. When it gets too hard from too much CA, I cut the tape off and start all over. Thats cheap.
 
Andy, nice job painting the block and all without getting any on that slab of wood that it's setting on! :biggrin::biggrin::wink::smile:

I have that same phone, too.

Now to go make an insertion tool (insertion tool: tool used to press out plumbers putty as your trying to glue tubes into pen blanks) :eek::biggrin:
 
OK, semi-newbie here with a question........ What exactly is an insertion tool and what is it's function? I've made a few hundred pens but never used one, what am I missing?

It's a long, thin tubular unit that gets glued to the inside of the tube so you can't take it out.

I may be real bad with CA.
 
How much bigger do you drill the hole in the blank?If i paint the tube and the inside of the blank i cant get the tube in.It just scrapes it off.
 
Insertion tools. We have to remember we are turners here. Not just pen makers or pen installers. You can make tons of insertion tools for very little money and in this case for painting tubes. Go to home center and buy yourself some lengths of dowels you feel will encapsulate all your tube sizes. Take them home and now the tricky part, turn them down to the same taper as the insertion tool. Take all of 5 minutes apiece. If you want to get fancy drill an appripriate hole on the fat end where you can now screw it onto a waiting screw that protrudes from a board set up with many of these screws.


JT gets to keep his license!!! :biggrin:
 
OK, semi-newbie here with a question........ What exactly is an insertion tool and what is it's function? I've made a few hundred pens but never used one, what am I missing?

Another way for the pen-companies to make money off our backs?

I suppose there is a place for it - perhaps those that have some difficulties with Arthritic hands and find it hard to get those pesky tubes in the blanks quick enough before the CA starts to set on them (or are just slow - no I'm not talking personally here :rolleyes:) would benefit from something like this - but honestly if you want something to hold the tube while you shove it in the blank you really can make something like JT described.

Linda
 
How much bigger do you drill the hole in the blank?If i paint the tube and the inside of the blank i cant get the tube in.It just scrapes it off.


It's really only thousandths. I would use sandpaper wrapped around a sturdy dowel (or alternatively a pencil or chopstick.)
 
OK, semi-newbie here with a question........ What exactly is an insertion tool and what is it's function? I've made a few hundred pens but never used one, what am I missing?

Another way for the pen-companies to make money off our backs?

I suppose there is a place for it - perhaps those that have some difficulties with Arthritic hands and find it hard to get those pesky tubes in the blanks quick enough before the CA starts to set on them (or are just slow - no I'm not talking personally here :rolleyes:) would benefit from something like this - but honestly if you want something to hold the tube while you shove it in the blank you really can make something like JT described.

Linda
Maybe that's why I never used the tool, I just didn't need it. Boy, pen turners are the tool buyingest bunch I have ever run across. :smile:
 
OK, semi-newbie here with a question........ What exactly is an insertion tool and what is it's function? I've made a few hundred pens but never used one, what am I missing?

Since my last dr. visit, I refuse to have anything to do with insertion tools.:eek:
I could have done without that thought in my head. :eek:
 
Insertion tools. We have to remember we are turners here. Not just pen makers or pen installers. You can make tons of insertion tools for very little money and in this case for painting tubes. Go to home center and buy yourself some lengths of dowels you feel will encapsulate all your tube sizes. Take them home and now the tricky part, turn them down to the same taper as the insertion tool. Take all of 5 minutes apiece. If you want to get fancy drill an appripriate hole on the fat end where you can now screw it onto a waiting screw that protrudes from a board set up with many of these screws.

What is wrong with buying an insertion tool? If you want to get down to basics get rid of the lathe and just whittle a pen from a stick.


Absolutely nothing is wrong with it. Go for it. By the way there are those that actually whittle pens and some are fantastic. I always wished I could carve.:smile:

OK Mike and Linda, the new name looks weird. I have to stop and think who is answering:biggrin:
 
OK, semi-newbie here with a question........ What exactly is an insertion tool and what is it's function? I've made a few hundred pens but never used one, what am I missing?

Hey, Newbie:biggrin:. A pen insertion tool is a device either purchased or shop made that serves the purpose of providing practice of removing CA glue from a cylindrical rod that has been solidly attached to a brass pen tube:biggrin:

I hope this clears it up for you.
 
I put several tubes on a wood dowel and enough painters tape at the end of the "stack" to hold 'em in place. I then can sand all of them at once, like waxing a pool que, and then paint them with spray Rustoleum. Clamp the whole shebang in a vise till dry and your good to go. No need to plug the ends this way.
WB


Bill, The reason I use the plumber's putty is because it also serves to keep the glue out of the inside of the tube when gluing it to the blank. After the glue is dry, I simply push out the putty with a transfer punch(and put the putty back in the container and reuse it) . This eliminates the need to clean glue or chamfer pen tubes, and "kills two birds with one stone" by allowing me to pait the edges of the pen tube (top and bottom).

I do keep a shotgun bore brush near by to make the inside of the tube sparkly clean.
 
Last edited:
Andy, I'm going to go out on a limb here and take an opposite stance from most who have replied ................ I like your idea, it's simple, any scrap of wood will work and is efficient. THANK YOU for taking the time from your day to take the photos then starting the thread to SHARE your idea with us.

When I see threads like this with someone SHARING an idea, then the majority of members chiming in with.... "Yeah but I have a better way" or making the original poster defend his or her method, it makes me wonder why didn't these members with all the answers didn't just start their own thread SHARING what they know?

I've done some exhaustive tests and the best I can calculate it takes just as long to click on the "NEW THREAD" button as it does to click the "ADD REPLY" button in an existing thread! I wonder why more people don't share their ideas, perhaps it's more fun to compare than share!:eek:

Oh, I almost forgot, I'm not a newbie, I'm a semi-newbie!:biggrin:

Well George I am going to have to disagree with part of what you said. Mainly about chiming in with other ideas. I don't think you would get 4 pages and counting if all you had was a photo of his method. Yes that is great and is his method and he did take the time to shoot the photos and "explain" not "defend" his method. I think it opens up a conversation and provides more than one method of doing this. Sometimes things take a turn for left field and a post gets so-called hijacked and that becomes a misfortune. Sometimes people may come across as if their method is the best but I don't read that at all here. I read good discussion on this topic. Sure we all have our methods but how many times has something get started and someone chimes in with their expeirence and someone walks away with a fresh idea to try. This would be hard to calculate but I bet it happens lots of times. I know it has for me on occassion.

To start a ton of new topics on basically the same subject, is not something I want to see. Just a point of view and I am sure there are those that will also disagree with me but it is an opinion.:smile:
 
Hey,Andy. If you get a patent on that thing, let me know. I'll have to hide mine should you visit my shop. I have the V-12 model (12 finishing nails). Good idea using plumbers putty. I've been using Play-Doh, which I had to make a special trip to WalMart to purchase and feel foolish holding it in the checkout line, unless I have the Grandkids in tow. Wouldn't get that feeling with a can of plumbers putty. I bet if I looked I'd find 4 or 5 cans of that stuff stashed somewhere in my garage. You use it once and can never find it next time you have a need, so it just accumulates. Good tip. Hope you get my tongue-in-cheek humor.:biggrin::biggrin::biggrin::biggrin:
 
Hey,Andy. If you get a patent on that thing, let me know. I'll have to hide mine should you visit my shop. I have the V-12 model (12 finishing nails). Good idea using plumbers putty. I've been using Play-Doh, which I had to make a special trip to WalMart to purchase and feel foolish holding it in the checkout line, unless I have the Grandkids in tow. Wouldn't get that feeling with a can of plumbers putty. I bet if I looked I'd find 4 or 5 cans of that stuff stashed somewhere in my garage. You use it once and can never find it next time you have a need, so it just accumulates. Good tip. Hope you get my tongue-in-cheek humor.:biggrin::biggrin::biggrin::biggrin:


Too funny, Bob! You mentioned one of the reasons (feeling foolish buying it) that I use plumber's putty instead of play-doh. Also, it's cheaper here and is more easily reusable.

I like this method because it allows the paint to "self-level" by dripping off of the bottom of the tube, thus eliminating the "blob" of paint on the bottom of that flecks off when poking the tube into the blank.

I LIKE hearing all the other ideas. I simply posted this because several PMs asked how I kept the paint from flaking off...This is it. the putty also keeps me from having to scrape paint and glue from the inside of the tube.

I always thought there was only ONE way to make a pen until Texatdurango posted his article "another way to make a pen". While this little post is in NO WAY similar to that post, I thought it might present another perspective.

George's post caused a paridgm shift in my world. I now make more pens "another way" than the traditional way.

I simply had several requests for this information and it seemed quicker to post than answer them all.

When someone else here comes up with an efficient 5 second jig.....That's what I'll be using.

Respectfully submitted.
 
Last edited:
I painted my first tubes this week
I hit a couple of screw ups along the way
I used a tapered dowel to hold the tubes and then transferred them to sit down and around a screw that was in a board to dry. The end was touching the wood so I understanding why you want them suspended.

I like the wire idea - I bought some of the PSI lacquer dip finish (NOT AGAIN)
The wires are about the only good thing that came from that kit!
I could use the wires and hang them.

Is the putty in the tube there to suspend on the nail / screw - you are only putting enough to keep it stable on the nail?

I ran into another problem any suggestions on how to fix would be great.

I have these great looking clear cast with metallic swirled colors – the first was a clear with metallic Gold - I painted my tubes metallic emerald green - It looked really cool! BUT I had a couple of spots that clouded up white and ruined the entire look!
Is this because of the CA, the rough texture and coloring from drilling the blank - or a combo of both?
On the next try I painted the tubes and inside the blanks - No whitening this time but it could still be better - the paint had a scaly look to it, it was not the smooth solid color I would have rather had - I am using Testers Spray paint is this the correct paint to be using?

I will be trying the Clear Epoxy instead of CA for the next try
Any other suggestions?
Thanks
Kevin
 
Signed-In Members Don't See This Ad
I like the wire idea - I bought some of the PSI lacquer dip finish (NOT AGAIN)
The wires are about the only good thing that came from that kit!
I could use the wires and hang them.

Is the putty in the tube there to suspend on the nail / screw - you are only putting enough to keep it stable on the nail?

I ran into another problem any suggestions on how to fix would be great.

I have these great looking clear cast with metallic swirled colors – the first was a clear with metallic Gold - I painted my tubes metallic emerald green - It looked really cool! BUT I had a couple of spots that clouded up white and ruined the entire look!

I will be trying the Clear Epoxy instead of CA for the next try
Any other suggestions?
Thanks
Kevin

Kevin:
I use the putty for two purposes:
To suspend the bottom of the tube so that overspray or "over applied" brush paint drips off the bottom

The second reason is to keep the inside of the tube from getting cluttered with overspay and glue when inserting the tube. I let the putty stay in until the blank has completely dried and then simply push out the putty with a transfer punch.

As far as your last question. IMHO, reverse blank painting cures most of the "dreaded glue pocket" problems.

I much perfer ceramcote acrylic paint to Testors and all of the others that I have tried. It seems to cover better with one coat and doesn't fleck off as much as the others.

MesquiteMan turned me on to that paint and it is the only one I have found that does an adequate job on the inside of clear cactus blanks. I'm not saying it is the best.....simply what has been working for me.

Respectfully submitted.
 
Back
Top Bottom