studioso
Member
I've built so far around 25 pens. when it came to assembling the pen I have used one handed clamps, hand vises and my drill press. every method had a downside, and I was reluctant to spend the 60+ dollars to buy a commercial product.
So after picking up clues here and there I came up with the following:
Round dowel assembly jig:

it's quite a simple and self-explanatory jig. but for those who like details, here they go:


I left about a foot space between the block and the clamp (when it's retracted). more than what you need for a pen.
I intentionally left the base and dowel long for stability and control.
I tried this jig a few times and it was a pleasure to use! if there is one thing I have to work on is the spot were the handle meets the dowel. right now its digging in the dowel, which is not ideal, but it works. this would be easier to fix had I built the jig with a square dowel.
Oh, right: the square dowel:
Square dowel assembly jig:

I haven't built this jig, but I don't see why it wouldn't work just as well. I think that this way alignment would be a bit easier, plus you don't have to drill the long 1/2" hole.
here is a detail:
I hope this tutorial will help someone!
perhaps it can be added to the articles? I would have to polish the text, but if someone tells me how that works it woulds be great to be able to give something back (after taking sooo much!:wink")
So after picking up clues here and there I came up with the following:
Round dowel assembly jig:
it's quite a simple and self-explanatory jig. but for those who like details, here they go:
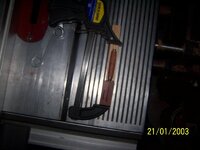
- The clamp is a destaco 615 which I had in the shop. with this model you push the level away to clamp. other models like the 605 clamp shut when you push the level up, towards the workpiece. either way it would work . as you will notice I replaced the red handle with a longer pipe which I had laying around. this gives you considerably more leverage. (eventually I should make a more elegant wooden handle...).
- on the other side I drilled a 1/2" hole through a piece of wood, through which you can slide the 1/2" dowel. make sure that this hole is straight: it has to be perfectly in line with the clamp. the farther you place this block away from the clamp, the more precise it should be (and the bigger the tool's "throat" will be).
- if you don't have a mean to drill a straight hole (which could be a drill press or a lathe) look later in the post for the square dowel solution.
- You do have a little more tolerance with the side by side alignment, as you can twist the wood piece when you secure it to the base. but the up and down alignment should be accurate.
- remember that the height of the hole should be the same height as the plunger in the clamp (both the 605 and 615 have the plunger's center at .97")
- Next I drilled a 1/2" hole on top for a 5/16 threaded insert. again most shops carry these in the jig section. glue the insert in place, making sure that it doesn't protrude through the horizontal hole (the one for the dowel).
- buy the straightest dowel you can find. before securing the wood block, extend the dowel until the clamp, make sure everything is straight, than clamp it down with a c-clamp or whatever clamp you got, then go ahead and screw it in place.
- the handle -you guessed it- can be found online as well as at your local hardware store. this one is a 5/16 thread.
I left about a foot space between the block and the clamp (when it's retracted). more than what you need for a pen.
I intentionally left the base and dowel long for stability and control.
I tried this jig a few times and it was a pleasure to use! if there is one thing I have to work on is the spot were the handle meets the dowel. right now its digging in the dowel, which is not ideal, but it works. this would be easier to fix had I built the jig with a square dowel.
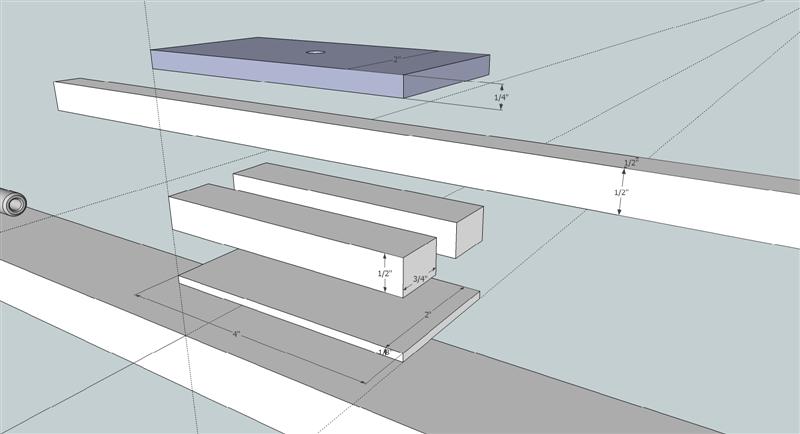
Oh, right: the square dowel:
Square dowel assembly jig:
I haven't built this jig, but I don't see why it wouldn't work just as well. I think that this way alignment would be a bit easier, plus you don't have to drill the long 1/2" hole.
here is a detail:
I hope this tutorial will help someone!
perhaps it can be added to the articles? I would have to polish the text, but if someone tells me how that works it woulds be great to be able to give something back (after taking sooo much!:wink
Attachments

Last edited by a moderator: