I'm so mad right now!!

Signed-In Members Don't See This Ad

tbfoto

Member
Joined
Dec 16, 2009
Messages
322
Location
Lafayette, Indiana
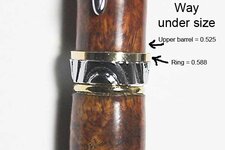
Got a new Woodcraft catalog this past week and saw the Ultra Cigar pens in it and wanted to give them a try. I really like the classy look of that pen. Drove 1 1/2 hours to the Woodcraft store and bought three kits and bushing set. Downloaded the instructions when I got home and picked out a Amboyna burl blank that I had been saving for just the right pen. Drilled and mounted the blanks, turned slowly to make sure everything was just right. Finished the pen with 4 coats of CA. Went to assemble the pen and discovered that one of the bushings was not even close to what is needed and therefore have ruined my kit and blank and have a useless set of bushings. I figure between the cost of kit, bushings and blank....I'm out about $25.00.

Now I know........ that you cannot count on the bushings being correct but this was not even close. I will contact them to see if they will at least replace that tube and bushings.
 

Attachments

  • Ultra Cigar 1.jpg
    Ultra Cigar 1.jpg
    37.7 KB · Views: 313
  • Cigar 2.jpg
    Cigar 2.jpg
    51.8 KB · Views: 386
Last edited:
Signed-In Members Don't See This Ad
without a doubt woodcraft will make good on the blank and bushings. however the cost of the fuel and your time can be chalked up to learning in the "school of hardknocks". my closest woodcraft is an hour away/45 miles. i get 30 mpg so at $3.00 per gallon it cost me about $10.00 min. your costs will probably be more.
 
Looks like MAYBE, you had the bushings reversed for the lower and upper barrels against the CB. Just my opinion based on the pics.


By the way, did you go to Ft. Wayne?
 
Last edited:
Sorry to see this. the bushing for the upper, at centerband, is typically about .575.
the lower, at centerband, is typically around .525.
there are 4 different sizes on a cigar, you might check through all the bushings and
see if you have a .575 in there anywhere.
looking at your pen, is there a chance you got the bushings for the upper and lower
barrels reversed? (just a thought, since I know a guy who did that...:smile:)
 
I know you don't want to hear this but a nice digital caliper is your friend. It should become a part of your practice before you start any pen. One other tidbit I have done is when I get a new kit I take the instructions and I put next to the photo of the parts the measurements and also the same with the bushings. I then use this set of instructions all the time when doing this kit. But to reinforce the idea that all kits are not the same you still need to measure but at least you have an idea what the measurements should be. In this case that would have stood out like a sore thumb. Lesson learned as they say.
 
OK...I feel like a doof now. You are all correct. I had the two center bushings reversed. Live and learn. This is completely my fault. Although I will say that it would have been nice for the instructions to have listed the busing sizes instead of saying...."Now use the next to the smallest bushing"......ect.
The other thing that messed me up is the instructions show a diagram of how the bushings are mounted on the mandrel and a diagram of the pen assembly....but they are reversed of each other. Still my fault for not noticing it.

So now I guess I will need to get a new set of tubes and new blank...if this snow storm ever stops.

Thank you all!
 
Last edited:
+1 for digital caliper.
Like John, with every new kit, I check bushings with kits parts. On a record card (10 x 15 cm hardback) I roughly draw every kit (barrels) with true dimensions (barrels length + diameters at the ends of each barrel) + remarks. So, with every kit I'm working, I always check the dimensions card.
 
For cigar pen bushings I actually took a small engraver and marked them #1(largest), #2, #3 and #4(smallest.) Then you know 1 and 3 go together, and 2 and 4 go together by a quick glance.
 
Looks like everyone does something similar. I have a 8x10 notepad. At the top, I make a rough drawing of the kit pieces laid out as if for assembly and label each piece with the diameter I measure for it. Back when I was using bushings, I'd also write down the measurement of each bushing under where it went on the blank.

I'd use the bottom half of the paper to mix the epoxy for the tubes.
 
So what would you all do now if you were me.

option #1....disassemble the pen and try to "salvage the parts and buy new tubes

option #2....disassemble the pen and cut the wood off the tubes and reuse the tubes as well.
 
So what would you all do now if you were me.

option #1....disassemble the pen and try to "salvage the parts and buy new tubes

option #2....disassemble the pen and cut the wood off the tubes and reuse the tubes as well.


I'd go for option #1. tubes are cheap, and if you trim the length a second time
you could have issues with the lower, in regard to how far the refill sticks out.

good luck on your save!

John
 
Sorry to hear of this! BUT, it could be the best thing that ever happened to you as a pen maker! The next time you decide to make a pen (any pen), you will measure each part, pull out all of the calipers that you own, and DRY FIT THE PIECES before you ever power on the equipment. You will no longer trust the "recommended" drill bit sizes and bushing become a mere reference point.

This problem is worthy of an Olympic calibre skew throw, BUT it the long run, this episode WILL MAKE YOU A BETTER PEN MAKER. Simply because you will no longer "trust" kit directions, but will instead, make sure that everything fits precisely, right after you turn on the shop lights......Best thing that could have eer happened.

Respectfully submitted.
 
You can salvage everything and still have a nice pen. I've saved things just like this. It might not be much faster than starting over, but saving it will be educational, and I hate to see amboyna lost.

Step 1: disassemble the pen.

Step 2: Put the tubes back on the lathe (TBC is best but a mandrel should work too)

Step 3: Apply CA .... lots of CA. Use medium. Lay it on thick and use accellerator after every coat. Think you are done? Apply some more. Dont worry if it gets really uneven - you are just building up plastic to get it thicker than your fittings.

Step 4: use a round nose scraper or preferably a carbide tool (like woodchuck pen pro) to remove the "ugly" ca to get back down to a nice even surface with no shiney spots. Mic the size - if you are too small go back to step3.

Step 5: Cut through the CA at the ends so you can remove the blank without damaging it.

Step 6: Clean up the CA off your centers.

Step 7: You now essentially have a plastic blank that is a little bit bigger than your fittings, and you can now turn/finish it like any other plastic blank to get a perfect fit.

Hope this helps!
 
Tom I have done the same thing a few times. The picture and instructions are in reverse so I made my own instructions. Now no trouble and now I do use calipers. It is so easy to mix those up. I saved mine by building up the low end with CA until it matched the correct bushing. I always say it is never a mistake if you can save it. It is quite something how few mistakes are made. Have fun.
 
I had the two center bushings reversed. Live and learn.

Tom; I have marked the bushings I use with grooves. Use a triangle file to put a groove on the largest part of the bushing. Like 1 groove - nib; 2 grooves - CB; 3 grooves - CB cap; 4 grooves - finial cap.

I also have a loose leaf notebook with all my instruction sheets. When I see something that I need to remember, I write it on the instruction sheet.

I have found that Cigar pen diameters vary all over the place, so you WANT TO CHECK THE SIZES WITH CALIPERS!!!! Don't depend on the bushings or on any printed information.
 
Marking the bushings would be a great idea. I "accidentally" left my two center bushings, CA'd together. Opps, my bad. Marking them is a very good idea.
 
I have a pen just like yours and I put it on my "historical display" wall. It's almost an entire wall of various mistakes I have made while turning this, that, or the other! You don't know anyone who hasn't made the same mistake or something very close. Chalk it up and start over!:wink:
 
You can save this. Use your Harbor Freight transfer punch set ($10) to disassemble the pen. Turn the lower barrel to correct size and refinish. Turn the upper barrel just enough to remove the finish. Start applying lots of coats of Thick CA. Build the barrel back up beyond where you need it. Quick turn just to get it round again. Sand and finish. No one but you (and us) will ever know you had made the mistake. Anyway, that is what I would do.

If that doesn't float your boat, simply disassemble and turn the wood off the tubes. Now you are just out the cost of the blank.
 
Sorry to see this. the bushing for the upper, at centerband, is typically about .575.
the lower, at centerband, is typically around .525.
there are 4 different sizes on a cigar, you might check through all the bushings and
see if you have a .575 in there anywhere.
looking at your pen, is there a chance you got the bushings for the upper and lower
barrels reversed? (just a thought, since I know a guy who did that...:smile:)

Yup! If that's the case you can at least take comfort in knowing you are not alone.:redface: Been there, done that!
 
Back
Top Bottom