Mini Review Creative Dimensions (3D Blanks)

Signed-In Members Don't See This Ad

Phunky_2003

Member
Joined
May 18, 2009
Messages
1,470
Location
Bonham Texas
Recently I purchased a blank from Creative Dimensions, which is a dual coolaboration between two members here on IAP, Charlie (NewLondon88) and Alton (GreenMtnGuy). I purchased my blank from www.exoticblanks.com. After completing that blank I was given the opportunity to do another one and write a review on it, here is that review.

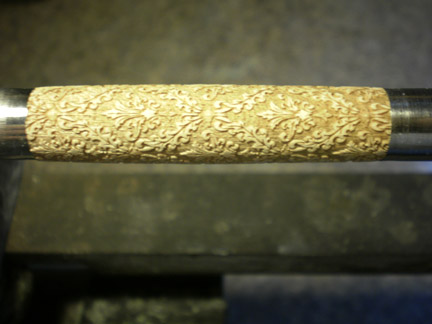
Here is what I started with: Renaissance Blank
1_P4020008.jpg


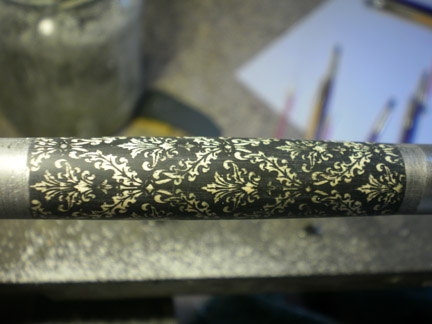
I decided I wanted something to bring out the details of the blank so I figured a black paint was a place to start.

1_P4020013.jpg


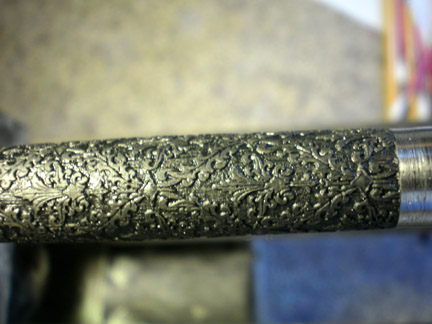
I brushed this on and then wiped away most of it and let it dry for about an hour.

1_P4020017.jpg


After letting dry, I lightly sanded back to the wood on the raised parts of the blank. Here is where I thouroughly checked the detailed part of the blank to make sure I was happy with the painting.

1_P4020019.jpg


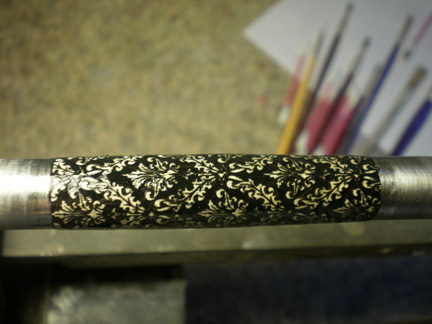
Then I applied CA to the entire blank. I believe it was 3 coats of Med CA until the blank was smooth and all the low spots were filled in.

1_P4020020.jpg


Next I sanded the blank back down again to show the wood on the raised areas. I thought the blank was good before, but I wanted to show how I would go about adding another color. It was a way that was mentioned in one of the other threads so I figured it was what I would try to see how it worked.
1_P4020021.jpg


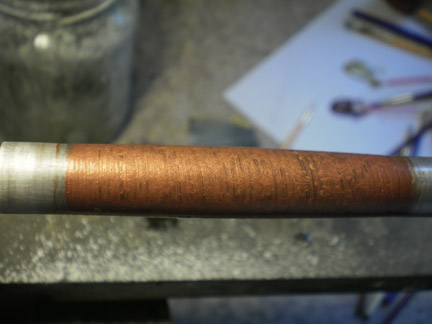
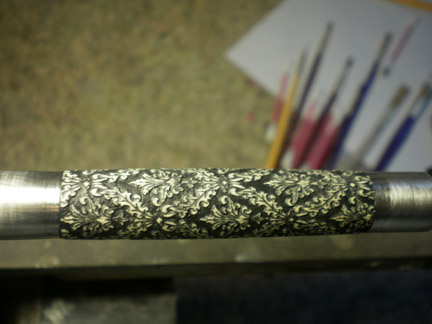
I applied a copper color and repainted the entire blank. I let this dry for about 30 minutes or so. I then used warm water to clean the excess paint off.
1_P4020023.jpg


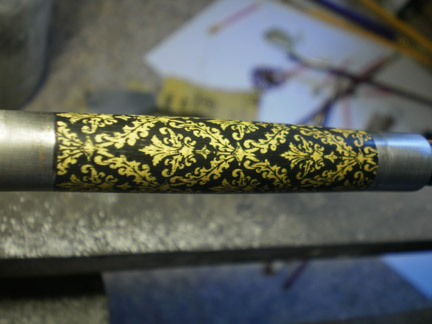
The copper color turned more of a yellowish/gold color but overall I was happy with the results. I finished the pen by adding 6 coats of thin CA. Then MM to 12000 and plastic polished.

1_P4020027.jpg


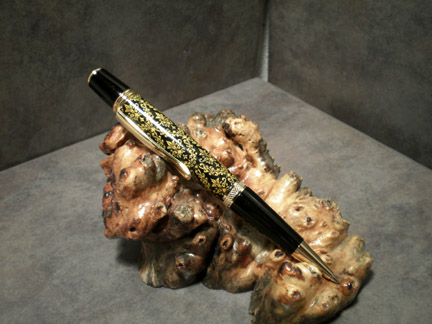
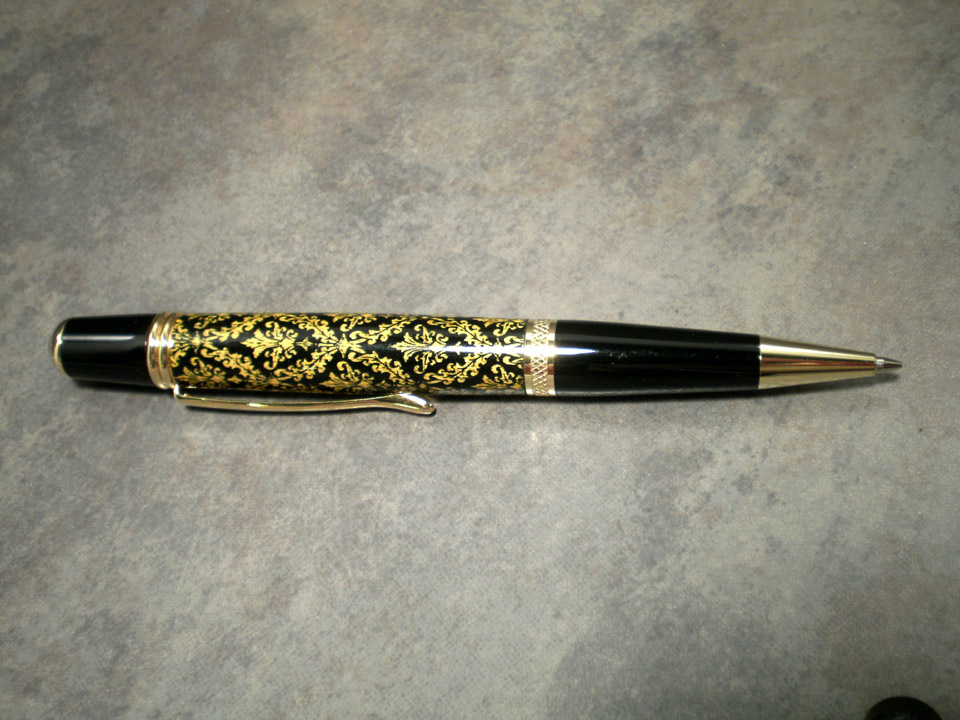
Heres the finished pen and a final thought.

I think these blanks open the door for many possibilites and different techniqes to be applied. I will be doing more in the future and attempting different techniques. I believe Charlie and Alton have came up with quite a unique blank that is only limited by your imagination. I would definately purchase and deal with Charlie and Alton again.
 
Last edited:
Signed-In Members Don't See This Ad

thewishman

Member
Joined
Mar 9, 2006
Messages
8,181
Location
Reynoldsburg, Ohio, USA.
Beautiful! Amazing how layering colors makes such a difference in the richness of the pen. Thanks for the step-by-step pictures.:)

Do you have a photo of the finished pen on a plain background? The burl is pretty, but has a bit too much figure that overshadows the pen.
 

Kaspar

Member
Joined
Aug 1, 2006
Messages
1,363
Location
Ahead of the curve. Waaay ahead.
Excellent! The colors might not have worked as well as one might hope for, but you definitely got that pattern to "pop."

I like the idea of these blanks. Intricate patterns are a gold standard of appearance, but I have not yet been really impressed with the results others have posted.

I, too, have been thinking about how to approach these blanks. The laser cuts a deep, sharp pattern and taking advantage of the difference in the raised area is obviously the key. But how?
 

greenmtnguy

Local Chapter Leader
Joined
Nov 18, 2007
Messages
1,689
Location
Chester, Vermont, USA.
James,
I think there is a perception that these blanks are somewhat difficult to produce. What is your level of pen turning ability and how would you rate the level of difficulty of these blanks? Looking for an objective view of the ability of the average pen turner to produce these blanks.
 

David Keller

Member
Joined
Nov 30, 2009
Messages
1,618
Location
Enid,OK
it looks very nice, but I think you probably sealed the wood when you added the CA thus preventing the copper from penetrating or adhering to the raised areas.

I've been thinking about ordering one of these to try out an idea, but I'm not sure the idea is fully formed.

I really appreciate the photo mini-tutorial.
 

Phunky_2003

Member
Joined
May 18, 2009
Messages
1,470
Location
Bonham Texas
James,
I think there is a perception that these blanks are somewhat difficult to produce. What is your level of pen turning ability and how would you rate the level of difficulty of these blanks? Looking for an objective view of the ability of the average pen turner to produce these blanks.

I'd say my level as a pen turner is beginner to intermediate. I have been turning for almost a year. I am still learning with every pen and finish. At painting and finishing I am an amateur at best.

It is difficult to put an exact difficulty level on these. They can vary from very easy to difficult, depending on what each person wants to do with the blanks. You can simply stain and finish which would be very easy most anybody could make an outstanding blank with normal finishing techniques. I started with just a CA finish so it could be seen that most could order a blank and not have to invest in a bunch of other supplies to finish one. You could also be very tedious and hand paint each section making it much more difficult. I think the difficulty level will be determined by the person completing the blank. Doing what I did, I would say that was a beginner level.
 

Phunky_2003

Member
Joined
May 18, 2009
Messages
1,470
Location
Bonham Texas
Beautiful! Amazing how layering colors makes such a difference in the richness of the pen. Thanks for the step-by-step pictures.:)

Do you have a photo of the finished pen on a plain background? The burl is pretty, but has a bit too much figure that overshadows the pen.

I wrote this up and added some basic pictures to it. I will be taking some pictures with a phototent probably tomorrow I will add one then. Thanks for the opinion on the picture.
 

Phunky_2003

Member
Joined
May 18, 2009
Messages
1,470
Location
Bonham Texas
it looks very nice, but I think you probably sealed the wood when you added the CA thus preventing the copper from penetrating or adhering to the raised areas.

I've been thinking about ordering one of these to try out an idea, but I'm not sure the idea is fully formed.

I really appreciate the photo mini-tutorial.

I thought the same thing about the CA preventing a good penetration or adhering to the raised areas. I also tried that brand of paint on another piece of wood, and wiping it away did the same without ca. So I am not sure if the paint was a good choice. I have seen some gold/copper/silver paint pens that may have worked better for this that I will try out soon.
They may make it easier to do other techniques with also.
 

NewLondon88

Local Chapter Leader
Joined
May 15, 2008
Messages
5,077
Location
Claremont NH
Wow! Lookin good!

I'm with you .. you can make them very easy or you can make them very difficult.. or
anything in between. Really depends on what you want to do and how much time you
have to play.

I never thought sanding back a CA finish to use as a mask.
That's pretty clever!
 

Kaspar

Member
Joined
Aug 1, 2006
Messages
1,363
Location
Ahead of the curve. Waaay ahead.
James,
I think there is a perception that these blanks are somewhat difficult to produce. What is your level of pen turning ability and how would you rate the level of difficulty of these blanks? Looking for an objective view of the ability of the average pen turner to produce these blanks.

... I've been thinking about ordering one of these to try out an idea, but I'm not sure the idea is fully formed.

Since it's come up:

I definitely see some potential here. I have three of them (one a Jr Gent set) and I certainly intend to give them a good go. It's nice to see someone really getting the most out of a laser engraver. I look forward to trying them out. I really appreciate all these wonderful new things that people are coming up with.

That said, I have a few questions / suggestions about the overall approach to making this very cool product:

First of all, why wood? Wood, being very porous is the worst thing the world for delicate, small scale painting jobs where you need to the colors to go only so far and absolutely no farther. Is it easier for the laser to cut wood? Why not cut these patterns into plastic?

Which brings up another point. The inset areas are not very smooth in certain places. The grain of the wood has asserted itself a bit. Wood has variegated density even within a single piece. (Plastic's density is uniform.) The only reason I bring it up is that I want to have control over the colors for both the insets and raised areas, and I had originally intended to tackle this in the following way:

Paint the whole thing, then pool thinned out paint to pool in the insets. I will probably take a few, maybe more, coats because I intend to thin it down as much as necessary to make sure the inset color gets into the tiniest areas of detail. (The areas where the grain in asserting itself may complicate this.) I'm not sure yet. I want really want that pattern to pop, with all the excellent definition the laser has given it, and I'll be totally sold on these. Might take some patience, but the "brush stuff on the raised areas" method seems a tiny bit sloppy to me.

Also, I am a B2B, or at least straight cylinder, kind of guy. The top barrel on the JR Gent set seems to bulge slightly in the middle (The bottom barrel tapers, of course.) If so, it might complicate finishing and sanding and I've never liked that look. Can they be done straight?

Another thing, isn't it possible to scale the pattern (the Fleur-de-lis is what I'm thinking here) so that it terminates in a better place on the barrels? On a two barrel set like the Jr Gent I understand the break in the middle for the CB might be off, but if it could terminate in the same place at both ends that would, I think, be a slight improvement.
 

NewLondon88

Local Chapter Leader
Joined
May 15, 2008
Messages
5,077
Location
Claremont NH
First of all, why wood? Wood, being very porous is the worst thing the world for delicate, small scale painting jobs where you need to the colors to go only so far and absolutely no farther. Is it easier for the laser to cut wood? Why not cut these patterns into plastic?

It is something we've considered, but plastics have their own issues.
1) cost would go up significantly, which might derail the whole thing.
2) types of plastic make a difference. Some are toxic when lasered.
We haven't had any time to investigate yet.
3) we're not a business, we're hobbyists. Every bit of free time we can
get together, we do. And it's still not enough time. And the shop isn't
close to either of us, so there's some driving for either of us to get there.
4) once you go to plastic, it just doesn't make any sense to laser them
when they could be molded/cast instead much easier. Would that be
a desirable product anymore? I'm not sure.
5) The first comments we got were that the blanks were too close to
finished already. What would you do with a completed plastic blank
besides assemble the kit? Maybe I'm just not seeing what you're looking for.

Which brings up another point. The inset areas are not very smooth in certain places. The grain of the wood has asserted itself a bit. Wood has variegated density even within a single piece. (Plastic's density is uniform.) The only reason I bring it up is that I want to have control over the colors for both the insets and raised areas, and I had originally intended to tackle this in the following way:

Paint the whole thing, then pool thinned out paint to pool in the insets. I will probably take a few, maybe more, coats because I intend to thin it down as much as necessary to make sure the inset color gets into the tiniest areas of detail. (The areas where the grain in asserting itself may complicate this.) I'm not sure yet. I want really want that pattern to pop, with all the excellent definition the laser has given it, and I'll be totally sold on these. Might take some patience, but the "brush stuff on the raised areas" method seems a tiny bit sloppy to me.

I guess it depends on what look you're going for.. and frankly, we haven't
been doing them long enough to figure it all out ourselves. We've only
completed a couple of pens so far (keep knocking the pens apart to
put on the next blank for photos!) But you're right .. if you try to treat
wood like a piece of plastic, it won't work.

It also might depend on what kind of paint you use. Thinning the paint
might make it wick into other areas. You may or may not want that. We've
been trying acrylic craft paints lately, and so far I know you don't want to
thin those if you plan on sanding back the highlights. Unthinned, it will
cover but not wick. Thinned, it goes right through the wood. If that
happens, you have to 'brush stuff on the raised areas' if you want a
contrasting color. And it may sound sloppy, but it can look pretty cool.

Also, I am a B2B, or at least straight cylinder, kind of guy. The top barrel on the JR Gent set seems to bulge slightly in the middle (The bottom barrel tapers, of course.) If so, it might complicate finishing and sanding and I've never liked that look. Can they be done straight?

LOL .. our first official 'complaint' was that they were straight. So we
vary them. Some have more shape than others, some have none. But
trying to cover all of the bases isn't something we could really do without
opening a retail location where people could handle each piece in person
before they chose one.[/quote]

Another thing, isn't it possible to scale the pattern (the Fleur-de-lis is what I'm thinking here) so that it terminates in a better place on the barrels? On a two barrel set like the Jr Gent I understand the break in the middle for the CB might be off, but if it could terminate in the same place at both ends that would, I think, be a slight improvement.

Should be do-able. I'll have to look at the file though. Might have to
redo it,since every time we change tube size, all the parameters go out
the window. When we made the Jr's, we were just happy if we could get
1 out of 4 to complete the 360 without leaving a white line or double
burning where it overlapped. :eek:
 

JerrySambrook

Member
Joined
Dec 4, 2006
Messages
1,312
Location
Southwick, MA, USA.
Kaspar,
If you are really that displeased with these blanks, then I would be happy to take them off your hands. I think the guys are doing a great job coming up with these ideas.

Jerry
 

Kaspar

Member
Joined
Aug 1, 2006
Messages
1,363
Location
Ahead of the curve. Waaay ahead.
Kaspar,
If you are really that displeased with these blanks, then I would be happy to take them off your hands. I think the guys are doing a great job coming up with these ideas.

Jerry

Excuse me? Where did I say I was "that displeased?" I hope it's understood I am bringing this stuff up in a constructive way.

I love all the new stuff that people are coming up with. But I think people, ultimately, are going to want control over the color of both the raised and recessed parts. Otherwise, if we have to work at them a little so much the better. I've bought three of them and I intend to try one this week.
 
Last edited:

Kaspar

Member
Joined
Aug 1, 2006
Messages
1,363
Location
Ahead of the curve. Waaay ahead.
It is something we've considered, but plastics have their own issues.

Thanks for your answers. Mainly I was wondering if it had been considered. I think these blanks do constitute a challenge. But that's okay, too.

I guess it depends on what look you're going for.. and frankly, we haven't
been doing them long enough to figure it all out ourselves. We've only
completed a couple of pens so far (keep knocking the pens apart to
put on the next blank for photos!) But you're right .. if you try to treat
wood like a piece of plastic, it won't work.
As I said before, it's great that you guys are trying this.

It also might depend on what kind of paint you use. Thinning the paint
might make it wick into other areas. You may or may not want that. We've
been trying acrylic craft paints lately, and so far I know you don't want to
thin those if you plan on sanding back the highlights. Unthinned, it will
cover but not wick. Thinned, it goes right through the wood. If that
happens, you have to 'brush stuff on the raised areas' if you want a
contrasting color.
I'm still going to think about a way around that.

And it may sound sloppy, but it can look pretty cool.
I like how they look now, but I'm wondering if we can get another few percentage points of definition. That pattern is great, and I think most people will agree: the more definition the better. I hope I can help contribute to a 'method' for getting that extra pop.

(What about an accompanying mask also cut by the laser, where you paint the whole thing then apply the mask and paint again? Some of the lines are probably too fine for that, eh?)

Should be do-able. I'll have to look at the file though. Might have to
redo it,since every time we change tube size, all the parameters go out
the window. When we made the Jr's, we were just happy if we could get
1 out of 4 to complete the 360 without leaving a white line or double
burning where it overlapped. :eek:
Ah, I can see your problem. You'd have to adjust it in all dimensions, not just one.
 

NewLondon88

Local Chapter Leader
Joined
May 15, 2008
Messages
5,077
Location
Claremont NH
(What about an accompanying mask also cut by the laser, where you paint the whole thing then apply the mask and paint again? Some of the lines are probably too fine for that, eh?)

Someone else had mentioned a frisket for masking. I still don't have
my head around the idea.. not sure how it would be done, how it would
be applied, removed etc. I could see it on a flat surface but not sure how
it would work on something like this. I liked Phunky's idea about applying
the CA and sanding through the top of it and using that as a mask. I
might go play with that one later in the week.
 

PaulSF

Member
Joined
Oct 9, 2009
Messages
286
Location
San Francisco
Hey, that's a beautiful pen, and you've given me some ideas. So I have to ask a really basic question about these laser-engraved blanks -- are they already turned to size?
 

Phunky_2003

Member
Joined
May 18, 2009
Messages
1,470
Location
Bonham Texas
Hey, that's a beautiful pen, and you've given me some ideas. So I have to ask a really basic question about these laser-engraved blanks -- are they already turned to size?

Thank you.

They are pretty close to size, there is no need to take tools to them. I got to the finished size with light sanding.
 

Phunky_2003

Member
Joined
May 18, 2009
Messages
1,470
Location
Bonham Texas
Beautiful! Amazing how layering colors makes such a difference in the richness of the pen. Thanks for the step-by-step pictures.:)

Do you have a photo of the finished pen on a plain background? The burl is pretty, but has a bit too much figure that overshadows the pen.

Here are 2 photos with fairly plain backgrounds. I dont have a photo tent so these are the best I can come up with. I am hoping to complete a photo tent this week.
1_112.jpg


1_111.jpg
 
Top Bottom