Worm holes in Ash Lamp

Signed-In Members Don't See This Ad
See more from thefunkyP

thefunkyP

Member
Joined
Mar 15, 2007
Messages
97
Location
Overland Park, KS, USA.
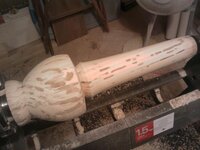
Well, I've started branching out from pens and have been turning a few lamps. This is a rough shaped Ash lamp that as you can tell has multiple worm/beetle holes. I love the character they give but am curious about finishes.

What steps would I need to take to get a nice glossy shine on this piece?

In my own research I'm thinking a varnish type finish, after prepping and filling the holes with most likely epoxy.

Has anyone here, come across a similar situation? What method do you recommend? Am I missing anything in my method above?

I'm fairly new to finishes, I"ve dabbled in CA finishes on pens, but felt something else might be in order for larger items.
 

Attachments

  • Wheeler Lamp 01.jpg
    Wheeler Lamp 01.jpg
    50.8 KB · Views: 349
Signed-In Members Don't See This Ad

mickr

Member
Joined
Apr 22, 2009
Messages
1,181
Location
wilderness
that would be a lot of filling..ash is open pored...I'd hate to try a heavy film finish on it..would look pocky...I personally would not do it...but it's your lamp...shellac & wax would be my choice ..doubt a lamp would be used roughly
 

alamocdc

Member
Joined
Apr 26, 2005
Messages
7,970
Location
San Antonio, Texas, USA.
Ben,

I work with wormy woods as often as possible because I like the look. Here are my recommendations:

First I would use CA to "stabilize" the runs filled with excrement to prevent more loss.

Secondly, I use epoxy (usually marine) and mix it with fine sawdust from a contrasting wood. This may take some time because you will have to do it in no less than 4 steps. About the best you can do w/o the epoxy running out of the void is one of four sides at a time. Blue painters tape sometimes works well as a dam to hold the mixture in place on light slopes.

Lastly, once all the fills have cured, just turn it back down. Then sand and finish as you normally would. Oh, make sure you use a sanding sealer on it prior to applying finish. This will prevent (or at least lessen) any tendency for blotchiness.

You have the start of a fine looking lamp there and I can't wait to see it finished.
 

thefunkyP

Member
Joined
Mar 15, 2007
Messages
97
Location
Overland Park, KS, USA.
Thanks for the help, but of course this brings more questions to mind.

1. Is it better to scrape the excrement out or leave it in?
2. How does the epoxy affect the finish?


I really appreciate the advice on this as it is my first wormy wood piece, but I really enjoy the look of it, and want to do it the best way.
 

alamocdc

Member
Joined
Apr 26, 2005
Messages
7,970
Location
San Antonio, Texas, USA.
1) I actually go a number of ways depending on my mood and what I "envision" the finished product to look like. If I want the product to have no voids, I leave the excrement in, CA it and fill any voids. Sometimes I'll remove the excrement and fill everything with my epoxy mixture. Other times I remove it all and fill nothing. It really depends on how much filling you want to do.

2) Again, this will depend on the finish. Using lacquer, or most any building finish other than oils, the finish will cover the epoxy just like it does the wood. If you choose a BLO or Tung oil finish, there can be a sheen difference between the wood and epoxy filling. I usually spray lacquer for lamps to avoid the appearance of "blemishes".

It all really depends on the look I want. I have some wormy Chestnut that I will leave the excrement in, and fill any voids. I have some reclaimed wormy pine with very large voids. These I just leave as voids. I have a piece of mesquite that was inhabited by carpenter ants. These voids I fill with colored resin or dyed marine epoxy. I use the same colorant for this that I use in resins.

In short, it just depends on my mood at the time.
 

thefunkyP

Member
Joined
Mar 15, 2007
Messages
97
Location
Overland Park, KS, USA.
Thanks for all the advise. I think I'm going to try filling the holes with epoxy, and using a spray watco varnish (recommended by my local Woodcraft store). I will hopefully be finishing in the next week or two and I will be sure to post the results.
 
Top Bottom