
You are using an out of date browser. It may not display this or other websites correctly.
You should upgrade or use an alternative browser.
You should upgrade or use an alternative browser.
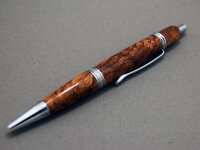
Wooden Sierra Click
- Thread starter gwilki
- Start date
Signed-In Members Don't See This Ad
See more from gwilki


Ditto. Thanks for referring back to this post in a recent thread.
Martin
Signed-In Members Don't See This Ad
Whaler
Member
Great idea, I like it.
Constant Laubscher
Member
That is cool!
ldb2000
Member
Great job Grant , awesome mod of that pen . Good choice of wood .
gwilki
Member
Thanks guys. This is my first one, and I wrecked the click mechanism on one kit figuring out how it came apart. If you're going to try it, if you hold a refill in the top against the click mechanism, the button unscrews. Then, some of the mechanism simply falls out. There is still some in the "finial" that I never did figure out how to get out, but you don't need to. With the button gone, you can simply grip the chrome piece on the top with a pair of pliers and it will pull off. It's just a press fit. Then, the black piece comes off.
WoodNutOntario
Member
Great idea for sprucing up a regular looking pen!!
I am sure we will be seeing some more of these soon!!
Love the wood!!
Andrew
I am sure we will be seeing some more of these soon!!
Love the wood!!
Andrew
dl351
Member
That looks great! Would you care to elaborate on how you accomplished this? I've been thinking of trying this with a regular twist Wall Street.
boxerman
Member
Wow that is very cool. Going have to try it but first look the kit over and try and figure it out how to take it apart.
LarryDNJR
Member
Now that looks great!
LeeR
Member
Nice mod to a Wall Street II/Sierra. I'm new to pen turning, and my 3rd pen was a Wall Street II, which is a nice kit. The changeout of the black pieces is a great idea. Nice wood, BTW.
WoodWorkinthe530
Member
That looks great!
I just had a twist Wall Street II come apart on me and was thinking of doing just what you did.
I just had a twist Wall Street II come apart on me and was thinking of doing just what you did.
OKLAHOMAN
Member
Grant, thats the best looking Sierra I've ever seen here. Bravo!!!
Jim15
Member
Awesome work.
greggas
Member
Grant;
Nice looking pen...great choice on the wood.
Was it duficult taking the grip/tip section off?
Nice looking pen...great choice on the wood.
Was it duficult taking the grip/tip section off?
So far, that is the only Sierra pen I've liked!!!! Beautifully done!!:good::good::good:
hewunch
Member
The nib section is what baffles me on the regular sierras. Could you tell us how you got it apart and if you used a tube to put it back together.
gwilki
Member
These comments are sure a great way to start the day. Thanks to you all.
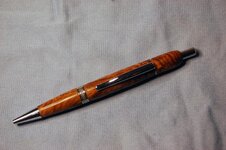
In terms of taking it apart, the nib section is simple. I have the ubiquitous set of transfer punches to take pens apart. Insert the biggest one that you can from the upper (non-nib) end and punch out the nib. Then, insert the biggest one that you can through the nib end and punch out the threaded centre band section. That's it. The black piece is now history. I didn't use a tube of any kind. I did cheat a little, though. The plastic piece is something like a millimetre thick. I put the centre band into a collet chuck and turned down the shoulder that the black piece fit over. That gave me a bit more thickness for the new wood piece. I didn't do the same on the nib end, since I couldn't figure out how to hold it. There is no room for error since the piece is so thin.
I did the same thing for the finial end. Once I had the black piece off, I chucked up the band/clip piece and turned off the shoulder that the black piece fit over. The piece is still thin and a bit of a bugger to hold on to for turning, but it's not too bad. I took an old sierra bushing and turned down the end that would ordinarily go into the tube so that it fit snugly into the hole that I had already drilled into a short piece of blank. The hole was 11/32", I think. I put the bushing into a collet chuck and brought the tailstock up to the other end of the blank to hold it in place. Light cuts and it was turned easily.
Today, I want to try getting rid of the double ring chrome bit between the top of the clip and the finial. Since I wrecked a top piece from another kit anyway, I have nothing to lose. I think it would look better without all that chrome real estate on the top.
Thanks again.
gwilki
Member
ctubbs
Member
Really good work on the pens and thank you for the information on how you did the work. Very thoughtful and generous. I believe you are correct with the last mod. Beautiful wood and finished pen. Congratulations.
Charles
Charles
broitblat
Member
Great looking pen!
I started trying to replace the parts on a Sierra twist, once, but never got very far. Looking at this, I may have to go back and try again")
-Barry
I started trying to replace the parts on a Sierra twist, once, but never got very far. Looking at this, I may have to go back and try again
-Barry
gwilki
Member
Thank you, Charles and Barry
Barry: I've done quite a few Sierra twists. They are much easier because the top comes apart without the problems caused by the click mechanism. Have another go at it. I'm sure that you will like the results.
Barry: I've done quite a few Sierra twists. They are much easier because the top comes apart without the problems caused by the click mechanism. Have another go at it. I'm sure that you will like the results.
MartinPens
Member
broitblat said:Great looking pen!
I started trying to replace the parts on a Sierra twist, once, but never got very far. Looking at this, I may have to go back and try again
-Barry
Ditto. Thanks for referring back to this post in a recent thread.
Martin