turning Eucalyptus gum vein burl

Signed-In Members Don't See This Ad

mdwilliams999

Member
Joined
Apr 18, 2011
Messages
73
Location
Glenville, NY
I just got an order for a pen using Eucalyptus gum vein burl. I just received the blank today and I'm afraid to turn it. It has major veins in it and I'm afrain it will start ripping apart when I try to turn it.

I do have the woodchuck, but thought I would ask for some advice. Should I do anything before I drill the center out? Should I still turn it on high speed? Should I fill all the vein gaps with CA thin or medium before I start?

Mike
 
Signed-In Members Don't See This Ad

seamus7227

Member
Joined
Mar 18, 2009
Messages
6,220
Location
Wichita Falls, TX
I would stabilize it first with thin CA. And rather than use the woodchuck, why not go with a sharp skew, and dont rush it! Once you get it round, re-saturate the blank with thin CA just for added protection, It should make it easier to turn also!
 

robutacion

Member
Joined
Aug 6, 2009
Messages
6,514
Location
Australia - SA Adelaide Hills
I just got an order for a pen using Eucalyptus gum vein burl. I just received the blank today and I'm afraid to turn it. It has major veins in it and I'm afrain it will start ripping apart when I try to turn it.

I do have the woodchuck, but thought I would ask for some advice. Should I do anything before I drill the center out? Should I still turn it on high speed? Should I fill all the vein gaps with CA thin or medium before I start?

Mike

Hi Williams,

I work with a lot of gums/Eucalyptus that are full of resin/gum/pockets, some are liquid (like honey) others are solid/crystallized.

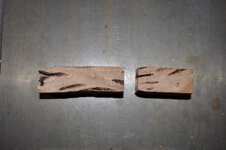
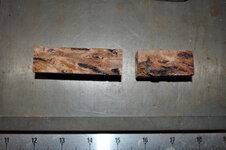
I would expect the blanks you received has solid resin and if so, (a pic would be nice, here...!) its fragility will depend of where and how big those resin vein(s) are...!

Anticipating that they are not totally across the blank, they may require a little soaking with CA at the joint of the wood and the resin, as the adhesion of those crystallized veins are "normally" not to good...!

The first thing I would do is to proceed with the thin CA soaking and then rap the blank tight with some masking tape, even when the glue is still not dry, making sure it has a few layers of tape rapped tight...! This is always the most efficient way to keep fragile blanks together, just in case.

Mark and cut to length, then proceed to see if the faces of your cuts require any CA, if not then, drill the blank(s) to size.
Mounting then in a mandrel on in TBC, wouldn't make much difference for the turning care required. Very sharp tools and light touch are a must, stopping and checking for any areas that become exposed that will require some CA.

This is one of the situations where I would certainly suggest the use of the "Flap" disc system, with 40grit being my preference for the most cutting and shaping, followed by 80 or 100 grits to remove most of the deep scratches/marks.

After that, your normal hand sanding stages would follow, right to the surface coating and polishing...!

I don't know which specie of Gums/Eucalyptus you've got, as there are many types but, there are 2 main types of resin, the one that grows in pockets and normally is very bright red (blood type) and the ones that grown in layers in between the wood grain, this time the colour is dark brown and these are mostly solid...!

Both types make exceptional features within the piece (pen or other) so, I hope that your blank turns out OK (pics would be appreciated...!)

Good luck...!

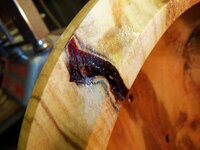
PS: I'm adding a pic of a recent bowl that I rough turned, where I'm trying to preserve the crystallized resin/gum as a feature. Will see what it happens when the wood is dry enough for me to finish it...!

Cheers
George
 

Attachments

  • 100_2673_(1).jpg
    100_2673_(1).jpg
    277.5 KB · Views: 936
Last edited:

patmurris

Member
Joined
Feb 25, 2011
Messages
357
Location
Nice, French Riviera
...on top of what has been said, run thin CA inside the holes, before gluing the tubes. That will stabilize the blank right where it matters the most, around the tubes.
 

Hubert H

Member
Joined
Jul 13, 2010
Messages
917
Location
Wolford, ND
This post shows the reason I come the IAP web site so often. Information that can't be found in books. Good Luck Michael, I'm sure you will do fine. Maybe a picture in a little bit. HWH
 

mdwilliams999

Member
Joined
Apr 18, 2011
Messages
73
Location
Glenville, NY
Ok,

Here is a pic of the 2 blanks I was planning to work with. I have already cut and drilled them. I tried adding thin CA to one of them and it just seems to get absorbed but not fill-in. I tried adding some medium CA and it sat there all day today and was still very sticky. I was considering going to Michael's (hobby store) and picking up some clear resin (I believe it's in powder from and you mix with water). Not sure if this is a good approach yet, or how long it needs to cure before I can turn it.
 

Attachments

  • DSC_0320.JPG
    DSC_0320.JPG
    65.4 KB · Views: 431
  • DSC_0321.JPG
    DSC_0321.JPG
    75.1 KB · Views: 370

robutacion

Member
Joined
Aug 6, 2009
Messages
6,514
Location
Australia - SA Adelaide Hills
Ok,

Here is a pic of the 2 blanks I was planning to work with. I have already cut and drilled them. I tried adding thin CA to one of them and it just seems to get absorbed but not fill-in. I tried adding some medium CA and it sat there all day today and was still very sticky. I was considering going to Michael's (hobby store) and picking up some clear resin (I believe it's in powder from and you mix with water). Not sure if this is a good approach yet, or how long it needs to cure before I can turn it.

OK Williams, now that we have a pic, it makes thinks a little easier to suggest and in this case, use the thin CA to soak in between the normal wood and the resin veins, let it soak, you need the CA to penetrate and deep as possible, if not straight thought..!

This will indicated that the whole area has had CA on it so, it should have harden and make things stick to each other (wood, solid resin).

Drill your blanks and start removing all that excess wood, most of what you see now will turn into shavings /sawdust, and the more important stuff is what is under all that, right to the thickness you need them to be.

Most of those resin pockets will be cut out and you will see if the new resin pockets/veins that appear as you turn, are solid (stabilized) with the thin CA you used before or, need some more, re-apply if necessary...!

I would suggest you to glue the brass tubes with 5 minute epoxy, it will give you a much better results, if the brass has been rubbed off with some coarse sandpaper and wiped clean with acetone or similar...!

All this should allow you to turn and finish that pen to a beauty so, back to the shed you go...!:eek::wink:

Looking forwards to the results...!

Cheers
George
 
Top Bottom