This is my first double pour

Signed-In Members Don't See This Ad
See more from navycop

navycop

Member
Joined
Nov 4, 2010
Messages
2,334
Location
Virginia Beach, VA 23454
I noticed in the pictures there is some pitting. You cant see it up close..
This a pen for a friend whose school colors are purple and gold.
I closed the window without uploading the pictures.. Will try again..
 
Last edited:
Signed-In Members Don't See This Ad

navycop

Member
Joined
Nov 4, 2010
Messages
2,334
Location
Virginia Beach, VA 23454
I noticed in the pictures there is some pitting. You cant see it up close..
This a pen for a friend whose school colors are purple and gold.
..
I forgot to hit upload the pictures on the first post...I opted to go "clipless" so the gold can be seen from all sides..Do you think I should include the centerband?
It might hide the misalignment at the middle??
 

Attachments

  • 1jul2012 017a.jpg
    1jul2012 017a.jpg
    27.1 KB · Views: 248
  • 1jul2012 018.jpg
    1jul2012 018.jpg
    13.8 KB · Views: 185
  • 1jul2012 017.JPG
    1jul2012 017.JPG
    70.3 KB · Views: 142
Last edited:

its_virgil

Member
Joined
Jan 1, 2004
Messages
8,127
Location
Wichita Falls, TX, USA.
Personally, I don't think the pitting is from a casting error but occurs during turning. I must only assume the material is polyresin. I find that gouges can be a bit agressive with polyresin and can cause pitting. I use a skew on most all materials so maybe I am a bit prejudiced. But, I can make that same pitting with my rough out gouge.
Do a good turn daily!
Don
 
Joined
Jun 28, 2010
Messages
1,830
Location
Pineville, Louisiana
Looks like you have good swirling with the colors but it looks to me like you got alot of air while mixing. The holes are round from what I can tell. When you mix the colors, you need to let them set still and let the bubble rise to the surface while the harder is taking effect. When you pour, you cant go crazy whipping the stirring stick around. You need to go slow.
 

Jjartwood

Member
Joined
Jan 30, 2011
Messages
697
Location
Chicopee,Ma
If you want to stay with no center band,pull the upper tube off pop the end cap off and
just turn it a little more,you may clear the pits and get a good flow on the body lines.
adding a center band to hide the misalignment is not the best choice you can make.
on the flip side,It's your pen,and only you will know when it's right
Mark
 

seamus7227

Member
Joined
Mar 18, 2009
Messages
6,220
Location
Wichita Falls, TX
Looks like you have good swirling with the colors but it looks to me like you got alot of air while mixing. The holes are round from what I can tell. When you mix the colors, you need to let them set still and let the bubble rise to the surface while the harder is taking effect. When you pour, you cant go crazy whipping the stirring stick around. You need to go slow.

I think i have to agree that those look like casting bubbles. The good thing is, if you were to take an air compressor and blow out those holes and then use some denatured alcohol, that will get those indentations clean and then you could apply a CA finish and fill them in.
 

Drstrangefart

Member
Joined
Sep 15, 2010
Messages
4,258
Location
Woodstock, Ga. U.S.A.
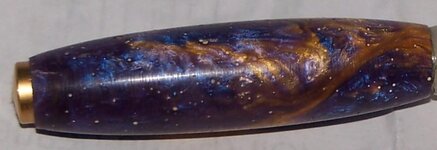
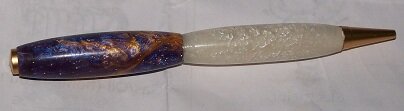
I would definitely re-mill the top barrel a little, add the centerband, and before you re-turn the barrel, drop some medium CA in all of the pits, let it set up, apply a few coats of medium CA to bring the surface back up a little and start fresh from there. It'll take a little while, but you'll be glad you did. I've had to do it a few times now. You may still have some small bubbles/pits in there, but you can also apply medium CA and polish it back with sandpaper or the first micromesh pad, add another layer, polish it back until you have a clean surface. It looks like you got a pretty good cast, colors look good. I hope you get to cast more and refine your touch. It looks like it's still a little thick at the cap which is a good thing in this case. You can turn a little deeper, getting the white out of the pits. Once you seal the white spots with CA, they're locked in. Turn it down a bit more before adding any medium CA to get rid of the white stuff in the pits. That's normally swarf caught in the pits and drying. The resin equivalent of sawdust. You can definitely get it looking a lot sharper.
 
Last edited:

ElMostro

Member
Joined
Mar 17, 2007
Messages
1,940
Location
San Antonio, TX.
If you are going to re-turn it you can minimize the pits by using some blue trans-tint on a piece of paper towel and applying it to the barrel after your final sanding, apply it as if it was your final sanding. The trans-tint will dye the white spots and they will not be as visible.

Eugene.
 

Drstrangefart

Member
Joined
Sep 15, 2010
Messages
4,258
Location
Woodstock, Ga. U.S.A.
If you are going to re-turn it you can minimize the pits by using some blue trans-tint on a piece of paper towel and applying it to the barrel after your final sanding, apply it as if it was your final sanding. The trans-tint will dye the white spots and they will not be as visible.

Eugene.

I may have to use that. Thanks!
 
Top Bottom