
You are using an out of date browser. It may not display this or other websites correctly.
You should upgrade or use an alternative browser.
You should upgrade or use an alternative browser.
Something other than a pen
- Thread starter ssajn
- Start date
Signed-In Members Don't See This Ad
See more from ssajn


Sounds great. Be careful with the bloodwood. If it is true bloodwood it is a tough wood to glue securely because of the resin in it. If it is this fake bloodwood that woodcraft sells, go for it. Look forward to seeing it.


Me too!!

 Thats impressive! Nice!

Signed-In Members Don't See This Ad
ssajn
Local Chapter Leader
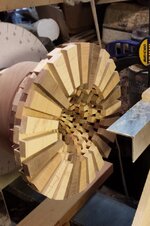
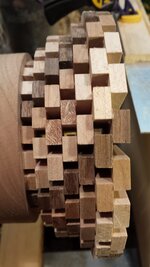
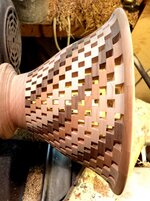
I'm using three woods on this one. Maple, cherry and walnut. Each row has 24 pieces. I'm using 2 maple, one cherry, and one walnut then repeating 6 times. The pattern will be a spiral.
The next bowl will be with 4 different woods. Maple, cherry, walnut and blood wood.
The next bowl will be with 4 different woods. Maple, cherry, walnut and blood wood.
wob50
Member
WOW looks great
jttheclockman
Member
I'm using three woods on this one. Maple, cherry and walnut. Each row has 24 pieces. I'm using 2 maple, one cherry, and one walnut then repeating 6 times. The pattern will be a spiral.
The next bowl will be with 4 different woods. Maple, cherry, walnut and blood wood.
Sounds great. Be careful with the bloodwood. If it is true bloodwood it is a tough wood to glue securely because of the resin in it. If it is this fake bloodwood that woodcraft sells, go for it. Look forward to seeing it.
wyone
Member
what kind of glue are you using? I see the method, but wondered what you were using for the glue and clamping method.
Amazing amount of work!
Amazing amount of work!
wyone
Member
I am nervous for YOU to turn it. LOL. I know I would be afraid one catch would destroy all of that amazing work. But you obviously are more skilled than I am in turning. I also think it would be an awesome turning if it was resin filled with like a blue or red and then turned.
I hate it that you people have me visualizing this stuff! I need more time and money to try it now.
I will be very anxiously waiting to see more of this project. I think it is really a work of art
I also think it would be an awesome turning if it was resin filled with like a blue or red and then turned.I hate it that you people have me visualizing this stuff! I need more time and money to try it now.
I will be very anxiously waiting to see more of this project. I think it is really a work of art
I've made a few of these styles of vessels....it has a unique way of showing you just how much "pucker power" you possess when you turn it.
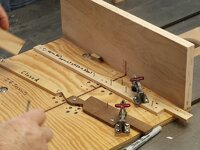
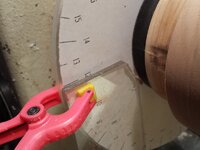
Your method using your indexing wheel to set the pieces and glue them up got my attention. If you get a moment, can you give us a brief explanation? I use an indexing jig that is mounted on my bench, yours is really interesting.
Can't wait to see the finished product~
Cheers
Bob
Your method using your indexing wheel to set the pieces and glue them up got my attention. If you get a moment, can you give us a brief explanation? I use an indexing jig that is mounted on my bench, yours is really interesting.
Can't wait to see the finished product~
Cheers
Bob
Last edited:
Bob Wemm
Member
Dave, that is extremely interesting, can't wait to see the finished piece.
Is the Segment length an optical illusion or is there a reason for them being so long???
Bob.
Is the Segment length an optical illusion or is there a reason for them being so long???
Bob.
JimB
Member
I know I don't have the patience or the skill to do that. Can't wait to see the finished project.
ssajn
Local Chapter Leader
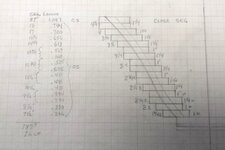
The woods I'm using on this one are maple, cherry and walnut.
Plan "A" is for the wall thickness to be 1/4".
Segment length is 1" to allow for "adjusting" wall thickness and design as I go.
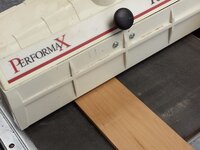
I'm using Titebond 2.
This morning I did turn the inside without incident. Tomorrow I'll put some more rings on. 9 more to go.
Here's a few more pics. I'll keep you posted as I progress.
Plan "A" is for the wall thickness to be 1/4".
Segment length is 1" to allow for "adjusting" wall thickness and design as I go.
I'm using Titebond 2.
This morning I did turn the inside without incident. Tomorrow I'll put some more rings on. 9 more to go.
Here's a few more pics. I'll keep you posted as I progress.
Attachments
ssajn
Local Chapter Leader
Here's an update.
Still working on Plan "A"
I got the bowl turned without and problems. I used a bowl gouge then went to a Hunter tool. The Hunter tool worked best.
Here's a few of the latest pics. A little more reshaping and thinning. Walls are now about 3/8"
Next pictures will be after parting off and finishing the bottom.
"One more cut".
Attachments

lwalper
Member
I know I don't have the patience or the skill to do that. Can't wait to see the finished project.
Me too!!
Bob Wemm
Member
Looking good Dave, I love the spiral effect.
Thanks for sharing this with us.
Bob.
Thanks for sharing this with us.
Bob.
Marnat3
Member
Thats impressive! Nice!