
TucsonCyclist
Member
Normally I wouldn't of posted this project, but I ignored the tutorial and tried a few different approaches and wanted to share this one.
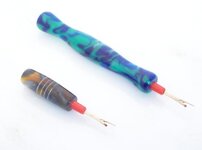
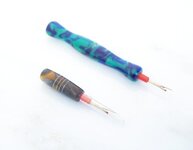
On these, I drilled a 1/4" hole in the blank. Added a drop or two of medium CA and shoved in a 1/4" dowel that was cut 1" longer than the depth of the hole. I chucked the dowel in the lathe and held the blank in place with the tail-stock while I turned and polished it. Once turned, I pulled out the dowel (one came right out and one didn't). I went back to the drill press and re-drilled the same hole to clean it out. Then I took a round file and enlarged the hole to .28". Once the test fit was satisfactory, I re-polished the top, added a few drops of medium CA, inserted the seamripper and set it ripper point down to cure. The clear protective cover slides on just as it did before.
I am working on one other proto-type but didn't have the correct drill bit.
The smaller one is the remained of the blank from the Electra pen I posted a few days ago. My wife wanted it, so there it is. And for the eagle eye's, no I didn't polish the grooves and I already heard about it from my wife.
C&C welcome.
Attachments
Last edited: