Question for John Underhill with casting system

Signed-In Members Don't See This Ad

NJturner

Member
Joined
Dec 4, 2006
Messages
169
Location
New Jersey, USA.
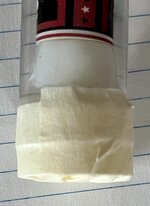
I am moving from component pen making to fully custom pens and needed to increase the lengths of my blanks to accommodate the change. I watched a great video from John Underhill on vertical pen blank casting using his system and I decided to purchase it. Works very well, but I am having a strange issue with build ups of air in the bottom of the tubes which pretty much make the ends of the blanks unusable. The remainder of the casting is perfectly clear, bubble free. Looking for some ideas on what I am doing and how I can change things to eliminate this. Also wondering on possible suggestions for turning off the casting tube - is there an easy, safe way to do this?

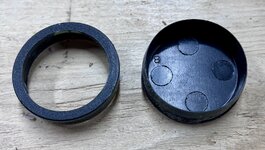
At present, I am cutting my tubes to 9" in length and plugging the lower end with the provided caps. I am using Alumilite Clear Slow. I fill the tubes to about 1/2" from the tops and use the system rack to load them in my pressure pot. I pressurize to 55 lbs for a period of at least 5 hours before removing the blanks. The pictures show what is happening. Ideas?

IMG_2211.jpg
IMG_2213.jpg
 
Signed-In Members Don't See This Ad

JohnU

Member
Joined
Jan 31, 2008
Messages
4,958
Location
Ottawa, Illinois
That's definitely a problem. I haven't experienced that with the caps but have an idea what the problem might be. I use Alumilite Clear and always warm Side B to around 90°-100° before mixing by using a light bulb and shop clamp light. If you can't find incadescent light bulbs, look for heating lamps for pets. Some use hot water to warm the resin container. Side A is naturally thinner so it stays room temp (in the 70°) Thinning side B will allow your resin to mix easier and faster, and be thin enough mixed to get in that inner seam and allows air to float up easier. Im guessing those air bubbles are from the air trapped between the clear tube and the black caps. When the resin is thinner, it fills that area easier removing trapped air. I'm not sure why the pressure doesn't compress them smaller than that but I think the resin thickness might be slowing down the time it takes for the air to be replaced by resin around the inner seal and by then it's too thick in it's curing stage to float all the way up.

I've had that issue with tube on clear casts where air was trapped under the tube along the tapered plug. I started filling them half full and then tilting the clear tube and tapping its bottom on the table to move the air before topping them off with resin. This will probably only work if your resin is thin enough. The mixed resin is usually around 78°-85° when I pour my clear casts (because side A is room temp and side B is warmed). I hope this helps. Feel free to reach out with any more issues or questions.
 

jttheclockman

Member
Joined
Feb 22, 2005
Messages
19,151
Location
NJ, USA.
I agree with John that the air bubbles are trapped between the black cap and the tube and just do not have enough time to rise to the top. I have never used that type resin so I do not know how fast it kicks off. But when I use silmar41 which is a poly resin I always heat the resin before I add the drops of catalyst. This thins the resin and actually dissipates most of the bubbles. My suggestion is also to heat the part that is thickest before pouring second part. Then when mixed you need to have a plan and that internal clock in your head when it starts to kick. Try not to over pour the amount of tubes. better to do a couple pours than try to get all in one pour. I also pour so that the resin trickles down the side of the tubes. You may want to spin the tube in the holder so this happens and finds it way in between those caps and the tubes quicker and it fills slowly giving time for bubbles to rise. Again timing is key. Doing too many at one time limits your time to get resin in tubes. That is why I am a huge fan of Liquid Diamonds epoxy resins. They are so thin and the open time is tremendous. I again refer back to kick time because taking out of the pot seems way too quick for me. Again I do not know reactions of that resin but I know again from what I see with Silmar, even after 24 hours in the pot the blanks can be soft. I put them in a toaster oven for about 1/2 hour and they harden.

As far as taking the tubes off, I ask you why do you want to? Anyway they turn off very easily when set on the lathe. I do warn you that they come off in big pieces and can fly off so wear face shield and they may also hit your hands but will not hurt you. Will say this do not rely on the product to be perfectly round because they will not be. Those tubes can alter shape under pressure and also when installed into rack . If you are looking to work off perfect round tubes then you need to turn them round. The longer the blank the more all these factors become relevant.
 

NJturner

Member
Joined
Dec 4, 2006
Messages
169
Location
New Jersey, USA.
Hi John -
Thank you for the quick reply! Your thoughts are appreciated. I was thinking somewhat along the same lines that temperature could be the issue, I just couldn't figure out how all the air ended up at the bottom of the tube, where I thought it would be the fastest to leave. I typically pour colored resin, but am making a bunch of demonstrators for a class I am teaching next week so these were meant to be clear. When pouring colors, I am very attentive to temperatures. I also have only poured in flat molds to date - this was my first try at vertical. Air and materials temps on the pour were around 68 degrees. I did not stir the resin, just did a slow pour to try and minimize the bubbles, but there were some still in the tubes.

I did heat the pressure pot with a heat gun to get it a bit warmer but didn't touch the resin. It makes sense that the resin was just too thick at these temps to let the air pass out of the tube before it got thicker, but it just seemed really strange to be only accumulating at the bottom. I did do some tube in blanks at the same time - same temps, but only 4 inch tubes - and all came perfectly clear, no bubbles.

Your system is pretty nice! I'll be working on getting these demolded and turned for the class. Gonna need some more tubes shortly!

Thanks again!
Kevin Seiler


That's definitely a problem. I haven't experienced that with the caps but have an idea what the problem might be. I use Alumilite Clear and always warm Side B to around 90°-100° before mixing by using a light bulb and shop clamp light. If you can't find incadescent light bulbs, look for heating lamps for pets. Some use hot water to warm the resin container. Side A is naturally thinner so it stays room temp (in the 70°) Thinning side B will allow your resin to mix easier and faster, and be thin enough mixed to get in that inner seam and allows air to float up easier. Im guessing those air bubbles are from the air trapped between the clear tube and the black caps. When the resin is thinner, it fills that area easier removing trapped air. I'm not sure why the pressure doesn't compress them smaller than that but I think the resin thickness might be slowing down the time it takes for the air to be replaced by resin around the inner seal and by then it's too thick in it's curing stage to float all the way up.

I've had that issue with tube on clear casts where air was trapped under the tube along the tapered plug. I started filling them half full and then tilting the clear tube and tapping its bottom on the table to move the air before topping them off with resin. This will probably only work if your resin is thin enough. The mixed resin is usually around 78°-85° when I pour my clear casts (because side A is room temp and side B is warmed). I hope this helps. Feel free to reach out with any more issues or questions.
 

NJturner

Member
Joined
Dec 4, 2006
Messages
169
Location
New Jersey, USA.
I agree with John that the air bubbles are trapped between the black cap and the tube and just do not have enough time to rise to the top. I have never used that type resin so I do not know how fast it kicks off. But when I use silmar41 which is a poly resin I always heat the resin before I add the drops of catalyst. This thins the resin and actually dissipates most of the bubbles. My suggestion is also to heat the part that is thickest before pouring second part. Then when mixed you need to have a plan and that internal clock in your head when it starts to kick. Try not to over pour the amount of tubes. better to do a couple pours than try to get all in one pour. I also pour so that the resin trickles down the side of the tubes. You may want to spin the tube in the holder so this happens and finds it way in between those caps and the tubes quicker and it fills slowly giving time for bubbles to rise. Again timing is key. Doing too many at one time limits your time to get resin in tubes. That is why I am a huge fan of Liquid Diamonds epoxy resins. They are so thin and the open time is tremendous. I again refer back to kick time because taking out of the pot seems way too quick for me. Again I do not know reactions of that resin but I know again from what I see with Silmar, even after 24 hours in the pot the blanks can be soft. I put them in a toaster oven for about 1/2 hour and they harden.

As far as taking the tubes off, I ask you why do you want to? Anyway they turn off very easily when set on the lathe. I do warn you that they come off in big pieces and can fly off so wear face shield and they may also hit your hands but will not hurt you. Will say this do not rely on the product to be perfectly round because they will not be. Those tubes can alter shape under pressure and also when installed into rack . If you are looking to work off perfect round tubes then you need to turn them round. The longer the blank the more all these factors become relevant.
Hi John -
I also think you and John are right - I will be doing some closer attention to temps on this for the next few pours. Since they were clear with no color or resin, I really didn't pay attention to the temp of the resin, just mixed and poured. Lesson learned. I have only cast Alumilite, but I'm going to try some of the other resins for comparison. The cost of all the resins just makes it a little tough to just do a little test - the two gallons of Alumilite set me back around $200, so I want to be sure to get my money's worth!

My question on the tubes was for turning on the lathe. I am a little concerned about pieces flying off as I turn them round - and your comments pretty much reflect my concern - large pieces hurling at things. The tubes did distort slightly during curing which I am still unsure if this will be an issue or not, but I think the tubes give enough thickness to the blank that I should be able to turn off the irregularities. I fully expected to true them to round and size them for my collet chuck, but I was going to do this in a new turners class, but with the potential for shrapnel coming off, I think I will pre-true them beforehand, so I don't scare anyone away!
 

jttheclockman

Member
Joined
Feb 22, 2005
Messages
19,151
Location
NJ, USA.
Hi John -
I also think you and John are right - I will be doing some closer attention to temps on this for the next few pours. Since they were clear with no color or resin, I really didn't pay attention to the temp of the resin, just mixed and poured. Lesson learned. I have only cast Alumilite, but I'm going to try some of the other resins for comparison. The cost of all the resins just makes it a little tough to just do a little test - the two gallons of Alumilite set me back around $200, so I want to be sure to get my money's worth!

My question on the tubes was for turning on the lathe. I am a little concerned about pieces flying off as I turn them round - and your comments pretty much reflect my concern - large pieces hurling at things. The tubes did distort slightly during curing which I am still unsure if this will be an issue or not, but I think the tubes give enough thickness to the blank that I should be able to turn off the irregularities. I fully expected to true them to round and size them for my collet chuck, but I was going to do this in a new turners class, but with the potential for shrapnel coming off, I think I will pre-true them beforehand, so I don't scare anyone away!
yea one thing I do when turning off the tubes is I hold my hand over the blank as I lightly turn them off so they usually just bounce off my hand. Good luck.
 

JohnU

Member
Joined
Jan 31, 2008
Messages
4,958
Location
Ottawa, Illinois
Sorry, I forgot to comment on turning the tubes off. It depends on what resin you use. When I use Silmar polyresin I score for. The side and peel it off. With Urethan resins, I leave it on. It sticks fairly well to it but turns off easily. I can hurt if a piece hits your finger while turning. I usually first swipe across the blank with a carbide cutter just to remove it then take my time turning the blank down. Epoxy resin doesn't stick to them as well and will fly off in larger pieces. At least the epoxy's I use.

Some more suggestions… for pouring longer tubes, if your getting some out of round shapes from the resin heating up, you can always get some more of the black caps and cut the center out to use at the top of the tube. It will help hold the shape better. I do this with the 1.5" dia tubes.

And if you're going to use epoxy resin in the vertical system, I would suggest wrapping the lower outer seam with tape. Some epoxies are very thin and take much longer to cure, so they can leak out the lower edge under pressure, and make a huge mess in the tank or rack.
 

Attachments

  • IMG_8047.jpeg
    IMG_8047.jpeg
    324.5 KB · Views: 25
  • IMG_8048.jpeg
    IMG_8048.jpeg
    203.4 KB · Views: 21

Kenny Durrant

Member
Joined
Sep 11, 2012
Messages
2,510
Location
Sachse Tx. 75048
Thought I might chime in and give a tip of my own. As for warming the resin I use and electric candle warmer I bought from Walmart. It heats up rather quickly and no open flame or coils. I weigh up the thick side of the resin and set it on the warming pad. Pretty easy and convenient.
 

NJturner

Member
Joined
Dec 4, 2006
Messages
169
Location
New Jersey, USA.
Sorry, I forgot to comment on turning the tubes off. It depends on what resin you use. When I use Silmar polyresin I score for. The side and peel it off. With Urethan resins, I leave it on. It sticks fairly well to it but turns off easily. I can hurt if a piece hits your finger while turning. I usually first swipe across the blank with a carbide cutter just to remove it then take my time turning the blank down. Epoxy resin doesn't stick to them as well and will fly off in larger pieces. At least the epoxy's I use.

Some more suggestions… for pouring longer tubes, if your getting some out of round shapes from the resin heating up, you can always get some more of the black caps and cut the center out to use at the top of the tube. It will help hold the shape better. I do this with the 1.5" dia tubes.

And if you're going to use epoxy resin in the vertical system, I would suggest wrapping the lower outer seam with tape. Some epoxies are very thin and take much longer to cure, so they can leak out the lower edge under pressure, and make a huge mess in the tank or rack.
Thanks for the reply JohnU! I wasn't sure if the heat of the cure was causing the tubes to deform a little, or on my first pour if the air intake baffle on my pressure pot had hit them and pushed them a bit. I was extra careful to locate the tubes and the air intake on the second pour to make sure neither interfered with the other - which they had on my first pour. Despite my being careful with placement and a slow intake and release of the air, 2 of the 6 tubes had some deformities - nothing major, but noticeable. I like the idea of putting a reinforcement ring elsewhere in the tube - might just do the job! I was actually thinking of using a piece of Schedule 40 PVC as an outer jacket to the clear casting tubes if I can get it sized correctly. Thinking the clear tube would act as the mold and the PVC would provide some strength. PVC would be reused, while the clear tube would remain with the blank. Since the air pressure from the open end is what is clearing the resin, I don't think the thicker sides should impact the process, just give it a little more strength....we shall see!

I have to say that my last pour was a number of tube-in pours - and your system rocked! The combination of tube, guide springs, and correct end plugs for the casting tube and the pen tube kept everything together and perfectly aligned. Found I needed a little bit of heat to soften the clear tube to get the delrin seated easily, but it was easy and worked quite well.

I will be demonstrating the casting process and basic pen creation to my local NJ AAW chapter this coming week. Your stuff will be a recommendation! Thanks for sharing your knowledge and skills!
 

ed4copies

Local Chapter Manager
Joined
Mar 25, 2005
Messages
24,529
Location
Racine, WI, USA.
In cases like this, where you plan to demo using John's system, please send me an email or "conversation" here.

I will give you a code for a discount for your "students" to order John's products in the following few days.
 

JohnU

Member
Joined
Jan 31, 2008
Messages
4,958
Location
Ottawa, Illinois
That's great Ed! Thanks!

Thanks for the input Kenny! I have one those also but I have to use my thicker cups to warm resin on it. My larger "go to" cups are too thin and get too hot. lol

Kevin if you can get pvc to the desired size it will be fine in the pressure tank. I've use straight pvc as a mold in the past with no issues, other than it was hard to demold. The clear tube will definitely eliminate that issue. The only unknown is how the clear tube will hold up inside where the heat can't escape as easily. It might distort inwards but only time will tell. Best of luck!

John
 

NJturner

Member
Joined
Dec 4, 2006
Messages
169
Location
New Jersey, USA.
That's great Ed! Thanks!

Thanks for the input Kenny! I have one those also but I have to use my thicker cups to warm resin on it. My larger "go to" cups are too thin and get too hot. lol

Kevin if you can get pvc to the desired size it will be fine in the pressure tank. I've use straight pvc as a mold in the past with no issues, other than it was hard to demold. The clear tube will definitely eliminate that issue. The only unknown is how the clear tube will hold up inside where the heat can't escape as easily. It might distort inwards but only time will tell. Best of luck!

John
The heat is my concern too. The PVC will be an insulator and will trap it in pretty tight, which may have the opposite effect of what I am going for. I'll give it a test and see what happens if I can find the right size PVC. I know when I did flat box molds, the heat got pretty high as the cure progressed and I don't think the thin tubes will hold up if they can't radiate it out. I initially tried PVC pipe molds with the inside coated with Stoner Release spray and they were really tough to demold, which is why I came to your system - beside the really high price of quality multi-tube 9" silicone molds. I don't do this enough to justify the price yet.

I did finish one of the tube-in molds and all went well. The plastic outer tube trimmed off without issue. It was a bit tough to demold the blank from the stoppers, as I poured it too high and didn't seat the lower stopper hard against the delrin, but a quick trim on the bandsaw fixed that!

Thank you again for all you give to the penturning community - I for one greatly appreciate it!
 

JohnU

Member
Joined
Jan 31, 2008
Messages
4,958
Location
Ottawa, Illinois
Thanks Kevin, that's great to hear. Yes there is a slight learning curve in the demolding process. You'll be a pro after a few times. Here's a video on how I do it, if you haven't seen it yet.


Thanks again and best of luck!
John
 

JohnU

Member
Joined
Jan 31, 2008
Messages
4,958
Location
Ottawa, Illinois
Another suggestion would be to place a 1"-2" block under one side of the casting rack when pouring the resin. This will tilt the blanks enough for the air to move easier as the resin enters the cavity. I do this sometimes when casting items with deeper voids. It also works well when stabilizing, giving the air a high point to float up.
 
Top Bottom