going kitless, ooops #1

Signed-In Members Don't See This Ad

duncsuss

Member
Joined
Jun 29, 2012
Messages
2,160
Location
Wilmington, MA
I started out by turning the acrylic blank round and putting it into the collet chuck, measured off how long I wanted to make the barrel and marked it on the outside.

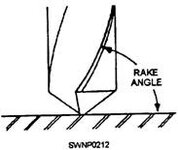
I re-read several tutorials and chose to drill out the center in several passes, planning to use a sequence of larger drill bits till I got to the 9mm which I'd tap with 10mm x 1 threads to receive the nib section.

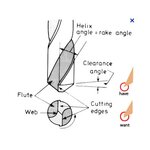
Did you know that a small drill bit gets stuck fast if you don't take care to make sure it doesn't get hot?

And that it will snap off when you try to reverse it out of the hole?

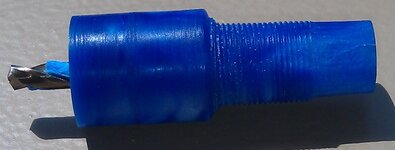
My "flexible response" to this was to turn it down and thread the outside, now I've got a threaded mandrel that I can use when I have to finish the finial end of a cap. :redface:
 

Attachments

  • IMAG0094.jpg
    IMAG0094.jpg
    63.2 KB · Views: 316
Last edited:
Signed-In Members Don't See This Ad

jd99

Member
Joined
Dec 14, 2010
Messages
764
Location
Ontario, CA United States
Try putting a 0 degree rake on the cutting edge of that drill bit next time, it kind of looks like the drill bit got sucked through on the break through and it snapped.

Acrylic.. (well most plastics) will grab the drill when there is a postive rake on the cutting edge.
 

duncsuss

Member
Joined
Jun 29, 2012
Messages
2,160
Location
Wilmington, MA
Try putting a 0 degree rake on the cutting edge of that drill bit next time, it kind of looks like the drill bit got sucked through on the break through and it snapped.

Acrylic.. (well most plastics) will grab the drill when there is a postive rake on the cutting edge.

Sorry if I misled you, I parted that piece of acrylic off from the rest of the blank after the drill bit was embedded and snapped off inside it.

I don't have any tool-room knowledge, so putting any kind of rake on a drill bit is way beyond me ... I can buy a bit and chuck it, that's my limit :biggrin:

Is there a particular kind of bit I can buy that works better with plastics?
 

LL Woodworks

Member
Joined
May 4, 2011
Messages
638
Location
North Texas
DAMHIKT - But I've learned that when drilling PR, I go no further than 1/4" at a time, backing the drill out, spraying with a water and dis washing solution each time. I don't go back into the PR until I'm satisfied the bit is cool; and I give a shot of water to the drilled hole every other time. Since I adopted this procedure I can't remember any failures. You can't get in a hurry, but the results have been good for me.

Good Luck
 

LL Woodworks

Member
Joined
May 4, 2011
Messages
638
Location
North Texas
Try putting a 0 degree rake on the cutting edge of that drill bit next time, it kind of looks like the drill bit got sucked through on the break through and it snapped.

Acrylic.. (well most plastics) will grab the drill when there is a postive rake on the cutting edge.

Danny - can you explain the 0 degree rake thing? Thanks
 

duncsuss

Member
Joined
Jun 29, 2012
Messages
2,160
Location
Wilmington, MA
DAMHIKT - But I've learned that when drilling PR, I go no further than 1/4" at a time, backing the drill out, spraying with a water and dis washing solution each time. I don't go back into the PR until I'm satisfied the bit is cool; and I give a shot of water to the drilled hole every other time. Since I adopted this procedure I can't remember any failures. You can't get in a hurry, but the results have been good for me.

Good Luck

Thanks.

The silly thing is I already learned to back out and spray water on the bit & into the hole when drilling acrylic blanks to take the brass tubes of pen kits ... but I do that using a drill press, not on the lathe.

(Horizontal boring doesn't generate anywhere near the same amount of heat as vertical drilling, does it? :rolleyes: )
 

frank123

Member
Joined
Feb 5, 2012
Messages
613
Location
Colorado
You didn't say how small the bit you started with was.

Generally, the smaller the bit the faster you have to spin it and the more frequently you have to back it out to clear chips (which are a major source of heat buildup).

There's no need to go with anything smaller than about a 6mm (or quarter inch) bit to start the hole. I usually go in full size from the start for anything up through 9 mm and full size from the start for short bores in larger sizes. I do start the hole with a center drill first, which gets it going straight and centered.

Touch the drill bit when you back it out to clear chips - if it's too hot to touch then let the bit and workpiece cool down (or just water flood them to do the cooling).

If it's feasible on your lathe, set the torque or belt tension low enough that it will lock up or slip before the bit breaks. Probably not something you can do with most lathes.
 

jd99

Member
Joined
Dec 14, 2010
Messages
764
Location
Ontario, CA United States
Try putting a 0 degree rake on the cutting edge of that drill bit next time, it kind of looks like the drill bit got sucked through on the break through and it snapped.

Acrylic.. (well most plastics) will grab the drill when there is a postive rake on the cutting edge.

Danny - can you explain the 0 degree rake thing? Thanks
You flaten the cutting edge, so the drill bit scrapes the material instead of trying to get under it, plastics have a tendency to grab and pull the drill bit through, like when you drill the hole for the tube when you get to the end the drill sucks through and chips the end of the hole that is because the plastic is grabbing that postive cutting edge, some metals do this also.

I have a second set of drills that I just flatten the cutting edge for drilling plastics, there is a special grind for plastics, but I just flatten the cutting edge, and it works fine.
Here is a site on grinding drills, it has some good info.
http://drillpointgrinders.com/drill_sharpening.htm
 

Attachments

  • rake1.jpg
    rake1.jpg
    4.5 KB · Views: 139
  • rake2.jpg
    rake2.jpg
    11.9 KB · Views: 139
Last edited:

duncsuss

Member
Joined
Jun 29, 2012
Messages
2,160
Location
Wilmington, MA
Thanks :)

I have a second set of drills that I just flatten the cutting edge for drilling plastics, there is a special grind for plastics, but I just flatten the cutting edge, and it works fine.

Just so I don't misunderstand what you mean ... do you flatten the cutting edge at the drill tip, or the leading edge of the spiral flute that runs up the bit? (Or both?)
 

Rich L

Member
Joined
Feb 1, 2012
Messages
263
Location
Centennial, CO
Rake angle is the angle the cutting edge makes with the material being cut. In this case you're not messing with the sharp edge on the flute - you're changing the cutting edges on the point of the drill. You've got two cutting edges that have positive rake therefore they try to dig under the material. If you stone down those two edges just a little so that the edge is perpendicular to the material you will have zero rake angle. The picture should get across the thought. It's like you had a drill with straight flutes - no spiral. The little orange inset at the bottom right shows a small vertical edge that has zero rake angle to the material you're cutting.

Hope that helps. If it doesn't just keep on asking. Google works, too.

Cheers,
Rich
 

Attachments

  • rake.jpg
    rake.jpg
    42.8 KB · Views: 149
Top Bottom