First Casting - Problem!!!

Signed-In Members Don't See This Ad

Bill Arnold

Member
Joined
Aug 19, 2008
Messages
140
Location
Thomasville, Georgia USA
I finally made my first attempt at casting a couple of pen blanks and bottle stopper blanks today. I wanted to keep it simple, so I used Pearl-Ex Black and Pearl-Ex White. I measured 3oz of Silmar41 into each of 2 paper cups, then added the dye to each cup - about 1/4tsp to each. After stirring the dye to mix it, I added 15 drops of MEKP to each cup, stirring thoroughly, but never whipping the mixture. The air temperature was in the mid-80s. I stirred each cup about every five minutes, keeping an eye on the thickness of each. They seemed to be coming along about the same and I was waiting for them to be thick enough not to just mesh together in the forms (PVC pipe). After 15-20 minutes, there was noticeable thickening, but both were still a bit loose to pour. When I checked again 3-4 minutes later, the black was what I thought would be thick enough in a couple more minutes, but the white had suddenly thickened to a point it was not pourable at all. What happened?
 
Signed-In Members Don't See This Ad
You missed "the moment".

Dyes can affect the time it takes to set. When we did it (long ago) the red could take over 24 hours, the black seemed like 24 seconds. And it is NOT consistent, have to watch closely when it starts to "set".

Good luck!!

(We still have a porch full of cups of single color blanks---looked like they could be kalleggoscopes, but never quite got there)
 
Last edited:
Bill, welcome to the wild, wonderful and addictive world of casting!:biggrin:

Failures like this will happen from time to time, even to the best casters out there. The only help I can offer (it has been a while since I played with this stuff) is to try to reduce the amount of MEKP in the colors that tend to "fire off" early for you. Also try to do your casting when it is a bit cooler out. (Silmar 41 is thermosetting so warm temps will tend to accelerate the process).

Have fun.....and keep keeping those notes! :good::good::good:
 
Last edited:
Once you get a noticeable thickening, it's time to pour. And right then. There is no time to waste. At these temps, 15 to 18 minutes is a pretty safe number to begin pouring. It takes several pours to get a feel for this. And FWIW, I never use more than 4 drops per ounce.

And as PR Princess says "keep keeping those notes!". You can't take too many notes.
 
Everything comes down to practice, practice, practice.

You missed "the moment".

Dyes can affect the time it takes to set. When we did it (long ago) the red could take over 24 hours, the black seemed like 24 seconds. And it is NOT consistent, have to watch closely when it starts to "set".

Good luck!!

(We still have a porch full of cups of single color blanks---looked like they could be kalleggoscopes, but never quite got there)


I too have many cups of single colors just part of the learning curve. The blacks and metalics seem to fire off fast so those I have learned to mix last. Also here in Colorado I only use 2 drops of MEKP per oz and it gives about a 10 to 15 minute spread on the colors, metalics and blacks are lucky to go 7 minutes. But there are so many factors that intervene. Are your molds heated? Is the PR heated? What is the moisture of the air?? What is the temperature?? It definitly comes down to pouring a lot and taking many many notes on the process. Eventually there comes a feeling which makes it much easier but it took me 3 gallons to get to that point and then I had my leg broke:frown::frown: and haven't poured for almost a year :frown:so I am sure I will be relearning everything again:rolleyes::rolleyes:. Just like pen turning practice, practice, practice.:bulgy-eyes:
 
You missed "the moment".

Dyes can affect the time it takes to set. ...

Yep, I sure missed the moment on the white. It was amazing to see how closely matched the curing was -- until!

Bill, welcome to the wild, wonderful and addictive world of casting!:biggrin:

... The only help I can offer (it has been a while since I played with this stuff) is to try to reduce the amount of MEKP in the colors that tend to "fire off" early for you.

Also try to do your casting when it is a bit cooler out. (Silmar 41 is thermosetting so warm temps will tend to accelerate the process). ...

Thanks for that welcome! :wink:

Cooler? This is south Georgia. I guess that means I wait until January? :)


Once you get a noticeable thickening, it's time to pour. And right then. There is no time to waste. At these temps, 15 to 18 minutes is a pretty safe number to begin pouring. It takes several pours to get a feel for this. And FWIW, I never use more than 4 drops per ounce.

And as PR Princess says "keep keeping those notes!". You can't take too many notes.

"Noticeable thickening" is what I thought I was waiting for. I've watched numerous videos demonstrating casting and, in each one, the emphasis was on not pouring too soon, otherwise you end up with a combination of the colors; i.e., in my case grey (black plus white) rather than black AND white.

I'll take your advice about less MEKP.

On what I hope is a more positive note: I had a couple of bottle stopper forms (1.5" PVC 2.5" long) sitting close by. The the white kicked suddenly, I glopped it into one of the forms. It didn't fill the form completely, but I can add to it to get the length as I have leftovers or screw up something else! :eek:
 
I'll second the thought to use a bit less MEKP. Also, as a head start, think about pouring one color into the mold...I do that on flats...may be worth a try on tubes.
 
... That would be when you use the coat hanger trick!!

I had a piece of wire ready to help the swirling. From what I've seen, each color needs to be at about the same consistency, then poured into a mold alternately or together with a swirling motion, then run the wire into the mold to add to the swirl. It seems I need to work on getting two colors to the same consistency first. Practice...practice...practice.
 
….or…you could just use Alumilite and avoid all the drama.

I'll certainly take that under advisement. I guess I was more concerned about the two-component blend. I need to study a bit more!

…IMHO the two component blend makes it very simple. With Alumilite its a 1 to 1 ratio. Equal parts A and B. At least for me, the simpler, the better. I have a tendency to really complicate things that are already complicated. I have no experience with PR, but from what I read, it sounds like there are a lot of outside influences on how you mix it, i.e., humidity, temperature, how you want it to flow, the mood your wife/significant other is in…..:wink:, yada, yada. Simple works for me. Again, just my .02¢:)
 
A well made alumilite blank takes experience and practice too. It's the exact same game as with PR but does have less components to screw up. Temperature affects alumilite, warmer it is faster it sets! different colors set up faster than others too, and then there is different weights to watch out for, so if you poured to soon the heavier color settles to the bottom. Yea...its a science that is very similar with both products. But..with alumilite you don't have mekp issues, your mixing will never change and you have much less wait time. I typically pour by the heat, which isn't so noticeable with PR. With alumilite you feel those cups heating in your hands and once they reach a certain hot, it's time to pour. the longer you wait the better the pour will be for color separation but then you also risk having some set in the cups.
 
This is a great thread, I have been having the same problem (Colors either blending together, or turning into "Gel" thats too dificult to work with/pour in my cup)

I'm hoping i get a better feeling for it, but for now, 2 32oz cans of PR resin down and lots of interesting blanks that just dont do what I wanted them to. :)
 
Results

The resin I poured right before I posted this thread was cured late yesterday, so I took some photos of the raw results this morning. I had left the molds in the pressure pot at 40psi overnight Monday into Tuesday.

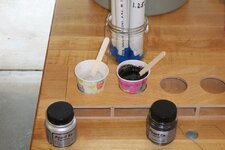
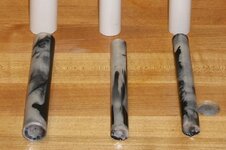
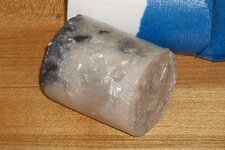
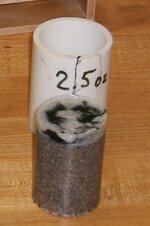
Left to right in the photos below:

1. My setup when mixing. One cup with Pearl White, one with Carbon Black. This was the second cup of white, since the first one had kicked so quick. The black was still quite liquid, so I added a few extra drops of MEKP to the white to kick it quicker. White wasn't as thick as I thought it should be when black started to kick, but I poured both anyway.

2. These are the resultant casts: one from a 3/4" mold, the other two from 1/2". I'll give it a couple of days to harden fully, then cut into them to see what I got.

3. This is the white that kicked suddenly. As I said earlier in this thread, I quickly dumped it into a 1.5" mold to use as a bottle stopper. I added some of the leftover white/black to it to build its height a bit more.

4. Before I worked with the black and white, I had mixed up some granite powder to make a bottle stopper blank. There was a little space left in the mold after the granite had kicked, so I added some of the leftover black/white mix.

Anyway, I sure learned a lot from this first attempt and even more from you guys after I posted this thread. Thanks for your guidance. I'll let you know what happens when I'm ready to have another go at casting. :)
 

Attachments

  • First_20140630_a.jpg
    First_20140630_a.jpg
    180.2 KB · Views: 148
  • First_20140630_b.jpg
    First_20140630_b.jpg
    183.3 KB · Views: 156
  • First_20140630_c.jpg
    First_20140630_c.jpg
    206.6 KB · Views: 181
  • First_20140630_d.jpg
    First_20140630_d.jpg
    122.8 KB · Views: 145
Thanks for starting this Bill.
I am interested in starting to cast my own as well.
@ scjohnson243 I'm with you, I think it will take a bit of practice/
Don W
 
For those of you just starting this addiction…Take extraordinary steps to record your results all through the process! If you haven't, you'll wish you had, I promise!:) I still pull out my "pouring journal" to make sure I'm not wasting any resin and that I get my combinations right. I have notes all over the place in it…up the side margins, in-between paragraphs, upside down on some pages and visa-versa:wink: I have filled it with things that I have learned along the way and then some!
 
For those of you just starting this addiction…Take extraordinary steps to record your results all through the process! If you haven't, you'll wish you had, I promise!:) I still pull out my "pouring journal" to make sure I'm not wasting any resin and that I get my combinations right. I have notes all over the place in it…up the side margins, in-between paragraphs, upside down on some pages and visa-versa:wink: I have filled it with things that I have learned along the way and then some!

You should publish it. :)
 
Marko, I'm interested in learning what type of information you keep in your journal - could you possibly post one entry just so we can see exactly what/how you are recording? I love numbers, and I would love to be able to record more, but at this point I dont even know what I could measure correctly...
 
Things i keep in my note book are
at top: how much resin,activator,pigments for each cup made that cast

below that: each tube i use has a number on it. i put a number and what got poured into that tube. then i add info such as did i use a wire to mix or pour one on top of another, or more or one color than the other.
I put that info then skip 3 lines in book and enter the next tube.

in those three lines one is for what the blank looked like after casting.
one of the other lines is what blank looked like after turning.
third line is for misc notes on that blank.

that's about it for now. take all this with a grain of salt as i'm currently on my 4th casting. but I work in a lab for a career so i have an idea of the type of info that will be needed for any given experiment. I really do need to get a excel spreadsheet set up so i can print the pages and attach pictures of blanks and pens made with each cast for a more visual reference.
 
Back
Top Bottom