Drilling a pin stripe

Signed-In Members Don't See This Ad

soligen

Member
Joined
May 11, 2010
Messages
1,085
Location
Sterling Heights, Michigan
I'm learning that this takes a LOT of practice to master. Any tiny movement or flaw along the many-part process yields an off-center hole.

Great thread though. I've learned a lot.

Definately. Other posts imply that drilling on the lathe is a easy way to get your holes centered up. My experience says it't not so easy, but I'm thinking it has a lot to do with using the shopsmith instead of a real lathe.

Even when I get the budget for a lathe, not sure where I would fit it - my shop is pretty small.

I have an 8mm bit that seems straight. I'll have to practice with that.

Right now, my vision is exceeding my capability - which sucks - I haven't completed a pen since memorial day because I can't make my visions work - and i'm just not satisfied doing the same things I did before.

My wife wants a celtic knot pen - but I blew that blank too on a skewed hole.
 
Last edited:
Signed-In Members Don't See This Ad

soligen

Member
Joined
May 11, 2010
Messages
1,085
Location
Sterling Heights, Michigan
Ok Dennis just so we got this straight .

You measured your drill bit and it is bent by .010"

You turned your blank round using the cross pattern of veneer on both ends as a center guide

You checked your blank to make sure it was very close to a perfect cylinder with a wrench which fit the blank the same along it's length

And you drilled your blanks using the same center points that were centered on the pattern that was formed by the cross of the pinstripe veneers

Is all of that correct ?
Then I guess it couldn't have been the drill bit , you must have done everything else wrong . :rolleyes:

Yes to all of that. And also I sweeted teh end face with my parting tool so it was square - so the bit would engage evenlt. And, I drilled SLOW
 

soligen

Member
Joined
May 11, 2010
Messages
1,085
Location
Sterling Heights, Michigan
Just to clarify some things. Please dont take this the wrong way, I'm not offended, and I dont intend to offend. Just want to keep the thread on a constructive path.

I rarely make statements like this, as it rubs against my modesty, but I have a supurb grasp of geometry, so my understanding of centering and alignment is not at issue. For example, the solution to the Herrignbone 360 just sort of popped into my head - I was actually trying to not think about it becasue it looked way too time consuming (for now). I did go ahead make a 1" section just to prove the solution. Point is that my conceptual understanding of what needs to happen is fine - it's something in the setup/execution/tool.

I'm a very meticulous person, and I like to tweak a tool to within an inch of it's life. Yes, I'm the guy who spends several days sanding his table saw top to flatten it. (used table saw - needed rust removal anyway - at least that's my excuse). I also do all my tool adjustments with a micrometer if possible.

I've aligned the tailstock using shims. I test the alingmnet by inserting a short bit and centering everything with the drive center. Then inserting a long bit to test if it's center aligns. Now, a crooked bit pretty much makes this impossible - so that is definately an issue - one I should have thought of, but you all are here to help with that :D

As far as turning round, I've mitigated the SS runout by making my own drive center - everything is marked so it gets mounted in the SS the exact same way every time. When I got the collet chuck I re-made the drive center. My drill chuck is also marked so it gets mounted the the MT the same way each time.

So, right now seems like adjusting the machine using a crooked bit is obviously inherently flawed, and the nature of the shop smith increases the challenge.

Next step is to get a straight bit and re-adjust, and get a short, stubby starter bit.

Although declaring the SS as inadequate for this task may end up the result, I'm not ready to decide that until I give this a go with a straight bit.
 

ed4copies

Local Chapter Manager
Joined
Mar 25, 2005
Messages
24,534
Location
Racine, WI, USA.
Your assumptions are incorrect. The center of the pattern is where I put the lathe centers, so once turned the center of the pattern is in the center of the blank, and the lathe center hole is the place to center the drill bit.


I believe all my initial questions were irrelevant. We are seeing the "exit wound" in the picture, are we not??

I, after great thought, realized the OTHER end is probably in the perfect center of the blank.

Correct?????????
 

soligen

Member
Joined
May 11, 2010
Messages
1,085
Location
Sterling Heights, Michigan
Shimming the tail isnt getting me where I need to be. I've come up with a modification to the tail to give me a pitch adjustment, which seems to be the issue. Yaw seems OK for now.

Off to the hardware store - maybe i'll buy more wood while I'm out too :)
 

jttheclockman

Member
Joined
Feb 22, 2005
Messages
19,177
Location
NJ, USA.
Do you have a drill press that is decent??? Maybe you would like to try the drilling on the drill press if the SS is giving you so much problems. There are another set of checks and balances needed with a drill press though too. It is good to read that you are meticulus about your setup so that answers alot of questions I brought up.
 

soligen

Member
Joined
May 11, 2010
Messages
1,085
Location
Sterling Heights, Michigan
Do you have a drill press that is decent??? Maybe you would like to try the drilling on the drill press if the SS is giving you so much problems. There are another set of checks and balances needed with a drill press though too. It is good to read that you are meticulus about your setup so that answers alot of questions I brought up.

My drill press is the shop smith, so same issues.
 

soligen

Member
Joined
May 11, 2010
Messages
1,085
Location
Sterling Heights, Michigan
Here is the report. Have straight bits now, and made a mod to the tailstock to help me get it aligned.

The shopsmith is defiantely less than ideal, as pressure on the bit flexes the tailstock back - go VEEEERRRRYY SLOW.

Adjusted eveything the best I could and ran 2 tests. One with the 8mm bit, and the other with the 7mm 5 star I picked up.

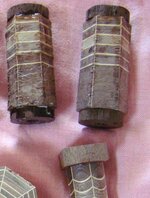
Not perfect, but very close. For my procedure I squared the end of the blank with my parting tool just before drilling, and used the parting tool to make a counter sink just larger than the bit to center the bit (you can see it in the pics)

These are ~2.4 inch blanks made from a 2 x 4. I cut them in 2 after drilling so you can see both ends together.

The 8mm brad point bit (from PSI) had some blow out (hard to see in the pic). The 7mm 5 star bit is cleaner and seemed to eject chips better.

I attempted to measure the wall thickness with my calipers. Kinda tough with the soft wood and all, but the variance seems to be within .01.

I think this is the limit of what the shopsmith is capable of.
 

Attachments

  • IMG_0090.jpg
    IMG_0090.jpg
    39.3 KB · Views: 104
Last edited:

phillywood

Member
Joined
May 10, 2010
Messages
2,067
Location
San Antonio, TX, 78250, USA
Dennis, it appears that you are beating the dead horse, goon line to san antonio and see on craigs list how many shopsmiths are for sale. I think you are spending off a lot of time to reinvent the wagon wheel here. for being an Data Architect you are meticulous and I give you that, but for doing your penturning you don't have the righ tool to accomodate your talent, or curiosity. Do yourself a favor and go with the flow and .001 is pretty darn close, unless you get a top of the line machinist lathe, you ain't going to achieve perfect holes. YOualready sepent lots of time on this and you could have made the pen for your wife had yougone to friend and borrowed his lathe. Other wise your gonna drive yourslef insane,buddy. Good luck, I am sure you'll do the right thing and figure this out.
 

DurocShark

Member
Joined
Jul 26, 2008
Messages
3,622
Location
Anaheim, CA
Gotcha. I thought he said that was already done. Misread the post.

I hope they stay straight through harder woods too.
 

soligen

Member
Joined
May 11, 2010
Messages
1,085
Location
Sterling Heights, Michigan
So did I read that right, all you changed was drill bits?

The bad bit was also the one I used to set up the machine, so both the bit and the machine setup were bad. When I re set up the machine with a staight bit, I couldn't adjust it enough - I was at the limit of adjustment using shims, and needed more with a straight bit, so I fashioned a dohicky.
 

soligen

Member
Joined
May 11, 2010
Messages
1,085
Location
Sterling Heights, Michigan
Phillip,

Yup - you are right. If I was paid an hourly wage for frustration, I could have bought a new lathe.

Unfortuantely, part of my personality is also insisting on solving the challenge - sometimes even when common sense says give up.
 

soligen

Member
Joined
May 11, 2010
Messages
1,085
Location
Sterling Heights, Michigan
Here is another question.

When I looked at the lathes in Woodcraft, a way to adjust the tailstock is not readily evident (I may have missed it).

How do you tweak a real lathe for alignment? Or, do you just live with what you get? Anyone ahve a link to a lathe setup procedure?
 

DurocShark

Member
Joined
Jul 26, 2008
Messages
3,622
Location
Anaheim, CA
On my TCP I shimmed the tailstock "wiggle"... Side to side play. It didn't need anything vertically. I just used that self adhesive aluminum tape for shim material, making sure I was dead center after each application. Slick and sticks. I figure it'll have to be replaced ever few years or so. But now that I have this nice Delta 12" VS I won't have to.
 

ThomJ

Member
Joined
May 14, 2010
Messages
807
Location
Fairlee, VT
after all my years as a machinist I learned one thng, once you have trued & tweeked everything up, then you need to learn the little things your machine seems to do on its own.
 

mb757

Member
Joined
Jul 30, 2007
Messages
120
Location
Wisconsin.
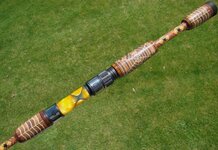
I have found a little different way to drill a hole in a blank that will put it directly in the center. I will start with a sacrificial piece of wood and drill a hole the correct size that is needed. I then mount the sacrificial piece on the mandrel and turn the outside diameter to the same size as the blank that I need to drill. After I have the outside sized correctly I will part off a couple of pieces about ½" thick and then glue them on the end of the blank I want to drill. After the glue sets up I will chuck it in my lathe and I can then use the hole in the center of the sacrificial piece as a guide to start my drill. The hole of the sacrificial piece will keep the bit from wandering until it gets a bite in the wood of the blank. I then drill half way through, turn the piece end for end and finish drilling from the other end. When done correctly you will be able to drill directly in the center. It may not work for every one, but it works for me. Mark
 

Attachments

  • DSC01855.jpg
    DSC01855.jpg
    49.7 KB · Views: 81
  • center drill.jpg
    center drill.jpg
    13.4 KB · Views: 79
  • DSC02754.jpg
    DSC02754.jpg
    79.3 KB · Views: 87
Top Bottom