Drilling a pin stripe

Signed-In Members Don't See This Ad

soligen

Member
Joined
May 11, 2010
Messages
1,085
Location
Sterling Heights, Michigan
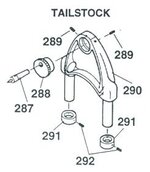
I got my collet chuck this week, and I'm still learning how to drill on the lathe. First practice attempt with a blank made from a 2x4 was off center by about .03 on one end, so I 'll be tweaking the tail stock alignment and re-testing before a drill a real blank.

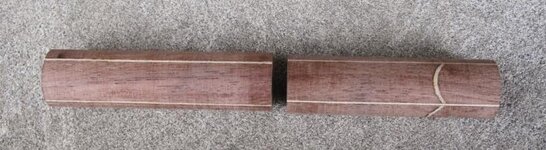
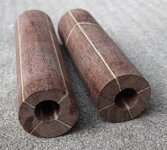
Here is the question: I just made a segmented blank that includes pin stripes and an arch (reminiscent of a spider web). I need to get it right down the center. Would you guys recomend drilling the blank whole, or cutting it to fit the tubes first and drilling the parts seperate?

We'll probably see both answers, so please comment as to why.

Thanks
 
Signed-In Members Don't See This Ad

ed4copies

Local Chapter Manager
Joined
Mar 25, 2005
Messages
24,529
Location
Racine, WI, USA.
IF you drift, you will drift LESS in a shorter blank, so I would, generally cut first.

There may be exceptions, but I can't think of why!!

IF you don't drift, it is immaterial HOW you drill.
 

ldb2000

Member
Joined
Sep 11, 2007
Messages
5,381
Location
Laurence Harbor, NJ, USA.
+1 what Ed said . Any drift , no matter how small , will be multiplied by the length you are drilling . Also the further your quill on the tailstock is extended the greater the error will be so a short blank will drill much more accurately .
 

workinforwood

Member
Joined
Mar 1, 2007
Messages
8,173
Location
Eaton Rapids, Michigan, USA.
Yes, when I drill long, I go half way then flip the rod and come in from the other side. For a blank like you are describing, and assuming it is a 2 piece kit pen, twist or cap makes no difference, still two pieces...I would put the entire thing in the chuck, drill 2.125 inches deep or whatever the length might be for the first section, then unchuck, cut the blank, re-chuck and drill the second half. This will help you not have a blowout in the middle section so the two sections can flow together as one. If the two sections are different size bits, drill the smaller one first! This way after you trim the first section off, the second section already has a pilot hole started for the larger bit and the two sections will flow perfectly into one another even if they where to be microscopcially off center, they will be the same flowing hole.

Tune your tailstock
Use a pilot bit.
Use the shortest length drill bit you can
Insert the blank into the collet so that it barely sticks out the end of the collet.
 

soligen

Member
Joined
May 11, 2010
Messages
1,085
Location
Sterling Heights, Michigan
Thanks guys.

Working on the tail stock (what a PITA). I'm using a counter sink bit as a pilot - short and fat.

Unfortuantely I cant insert the blank all the way into the collet, as the shopsmith doesnt have a MT in the headstock. I can insert it about 1 3/4 inches.
 

its_virgil

Member
Joined
Jan 1, 2004
Messages
8,127
Location
Wichita Falls, TX, USA.
Beat me to it. I was going to give the same advice. Accurate drilling on the lathe holding with a collet chuck is most accurate if the blank is rounded to a perfect cylinder. The closer the blank is to a perfect cylinder the more accurate the drilled hole will be. For the one piece pens such as the one piece slimline, cigar and the one piece click, I round the blank, drill half way through, reverse the blank and grill the other half with almost dead on accuracy. Most of the time when my drilling is off the blank is not a perfect enough cylinder.
Do a good turn daily!
Don

Just be careful then rounding your blank . Try to make it as uniform as you can , use your calipers .
 

PenMan1

Member
Joined
Jul 8, 2009
Messages
6,380
Location
Eatonton, Georgia
Thanks guys.

Working on the tail stock (what a PITA). I'm using a counter sink bit as a pilot - short and fat.

Unfortuantely I cant insert the blank all the way into the collet, as the shopsmith doesnt have a MT in the headstock. I can insert it about 1 3/4 inches.

You need to buy a little set of pilot bits. They are inexpensive and really help.
 

soligen

Member
Joined
May 11, 2010
Messages
1,085
Location
Sterling Heights, Michigan
I'm a frustrated camper. Tweaked things and my test drilling went great.

So I put in my segmented blank, and did it all the same way - as far as I can tell - and they suck.

I just keep getting things in my head to do - but to carry them off I need to drill through the center.

I think I need to go do something else. :frown::frown::frown:

The one on the right is not quite as bad as the one on the left.
 

Attachments

  • IMG_0088.jpg
    IMG_0088.jpg
    41.7 KB · Views: 143
  • IMG_0089.jpg
    IMG_0089.jpg
    66.1 KB · Views: 189

ldb2000

Member
Joined
Sep 11, 2007
Messages
5,381
Location
Laurence Harbor, NJ, USA.
Something to check , are your drill bits straight ? the cheaper Chinese bits are not always perfectly straight . Also try not to extend the tailstock quill too far . It's a pain but I usually don't let the quill extend more then an inch or so then I wind it in and start again . Once the hole starts to go off center it is almost impossible to correct it and your hole will be off center .
 

soligen

Member
Joined
May 11, 2010
Messages
1,085
Location
Sterling Heights, Michigan
hmmm - didn't consider a crooked bit. It's the one that came with my PSI starter kit, so I'm sure it's a low end bit.

Checking ........

Damn - are you good. It's out by about .01 inches. Is that enough to cause the what you see in the pics?

Woodcraft is close to me. any bit recomendation?
 

ed4copies

Local Chapter Manager
Joined
Mar 25, 2005
Messages
24,529
Location
Racine, WI, USA.
Let's "Back up the bus" as my son says!!

When you turned your blanks round, how did you find the center? Did you take the center of the BLANK or the center of the PATTERN?

Did the white lines cross in the middle, or was there a hole in the middle (depends how the blank was assembled)?

Was the blank cut when you turned it cylindrical?
 

DurocShark

Member
Joined
Jul 26, 2008
Messages
3,622
Location
Anaheim, CA
For critical holes like you're doing I wouldn't use anything other than a high end bit. Woodcraft sells Colt 5 Stars and they're outstanding. You can get bits as good online for much less, but if you're stuck with local stores, Woodcraft will be it. Be prepared to drop $25 on a bit.
 

ed4copies

Local Chapter Manager
Joined
Mar 25, 2005
Messages
24,529
Location
Racine, WI, USA.
hmmm - didn't consider a crooked bit. It's the one that came with my PSI starter kit, so I'm sure it's a low end bit.

Checking ........

Damn - are you good. It's out by about .01 inches. Is that enough to cause the what you see in the pics?

Woodcraft is close to me. any bit recomendation?

Yes, roll it across their checkout table or, better yet the top of a table saw and make sure it rolls smoothly.
 

ldb2000

Member
Joined
Sep 11, 2007
Messages
5,381
Location
Laurence Harbor, NJ, USA.
hmmm - didn't consider a crooked bit. It's the one that came with my PSI starter kit, so I'm sure it's a low end bit.

Checking ........

Damn - are you good. It's out by about .01 inches. Is that enough to cause the what you see in the pics?

Woodcraft is close to me. any bit recomendation?

Yes .01" is enough to throw it way out over a 2" blank especially if you are extending your tailstock quill very much . When the bit starts to wander off center it will get pulled in that direction quite fast so every little bit adds up fast . I have heard the 5 star bits are very good but haven't tried them yet so I will defer to Dons recommendation .
 

DurocShark

Member
Joined
Jul 26, 2008
Messages
3,622
Location
Anaheim, CA
I've been slowly replacing my Wood River bits with the 5 Stars. It's like night and day. But at over $20 a pop for the larger sizes, I'm gonna end up with a really expensive set of bits! It doesn't seem too bad though if I pick one up whenever I'm in the store.

I also like the PSI "Gorilla Grind" bits. They cut fast and cool and are super cheap. I've got a couple of those as well and they're not quite 5 Stars, but darn close.
 

soligen

Member
Joined
May 11, 2010
Messages
1,085
Location
Sterling Heights, Michigan
ok - I'll have to get a new bit and try again.

Just FYI if it makes any difference. I'm on a shop smith, so its the head that extends (while spinning the wood). The tail stock on a SS does not extend.
 

randyrls

Member
Joined
Feb 2, 2006
Messages
4,829
Location
Harrisburg, PA 17112
Woodcraft is close to me. any bit recomendation?


Drill Doctor and good quality bits. Some like the Colt bits. some prefer brad point bits, but they really are not intended for drilling end grain and they put a lot of stress on the blank. Just what you do not want when drilling a segmented blank.

If you can, start with a countersink bit, or a pointed spotting bit. Then drill. The idea is to use a bit that is short, stiff and sharp pointed.
 

randyrls

Member
Joined
Feb 2, 2006
Messages
4,829
Location
Harrisburg, PA 17112
ok - I'll have to get a new bit and try again.

Just FYI if it makes any difference. I'm on a shop smith, so its the head that extends (while spinning the wood). The tail stock on a SS does not extend.

Does your SS have the two bearing quill? I never liked drilling in lathe mode on the SS. The adjustment of the tailstock is crucial.
 

soligen

Member
Joined
May 11, 2010
Messages
1,085
Location
Sterling Heights, Michigan
Let's "Back up the bus" as my son says!!

When you turned your blanks round, how did you find the center? Did you take the center of the BLANK or the center of the PATTERN?

Did the white lines cross in the middle, or was there a hole in the middle (depends how the blank was assembled)?

Was the blank cut when you turned it cylindrical?

When I turned them round, I used the center of the pattern as the center points. The pin stripes handily crossed at the desired center point. There was no hole in the center of the blank.
 

soligen

Member
Joined
May 11, 2010
Messages
1,085
Location
Sterling Heights, Michigan
Does your SS have the two bearing quill? I never liked drilling in lathe mode on the SS. The adjustment of the tailstock is crucial.

Yes, I upgraded to the 2 bearing quill when I re-built it (the machine was made the same year I was born :biggrin:). I've been shimming the tailstock with metal HVAC tape to make adjustments.
 

soligen

Member
Joined
May 11, 2010
Messages
1,085
Location
Sterling Heights, Michigan
Drill Doctor and good quality bits. Some like the Colt bits. some prefer brad point bits, but they really are not intended for drilling end grain and they put a lot of stress on the blank. Just what you do not want when drilling a segmented blank.

If you can, start with a countersink bit, or a pointed spotting bit. Then drill. The idea is to use a bit that is short, stiff and sharp pointed.

Did you mean the brad point bits arn't meant for end grain, or the Colt?

I dont see a Colt 8mm bit. Are "O" and 8mm the same thing?
 

jttheclockman

Member
Joined
Feb 22, 2005
Messages
19,154
Location
NJ, USA.
It is not the bit at all. You did not turn the blank perfectly round. You did not use a starter bit to start the hole. You did not center the bit in the pattern.

Go back to the beginning of the project. You started with a square blank if I read this right. You then tried to round this to rod shape to fit in a collet chuck. Then you used the pattern to drill the hole in what you thought was center. What is to say the pattern was in the center of the round blank you now turned???? If you are doing something like this you need to treat it as if you were doing a celtic knot and either work with a round blank to start with or a square blank to start with. You drill your holes in the blank you start with. You don't switch from one to the other and expect to drill dead center. Maybe you will get lucky but 9 out of 10 times you will not. If I read your original post correct that is what I would contribute as my 2¢
 

ldb2000

Member
Joined
Sep 11, 2007
Messages
5,381
Location
Laurence Harbor, NJ, USA.
Ok Dennis just so we got this straight .

You measured your drill bit and it is bent by .010"

You turned your blank round using the cross pattern of veneer on both ends as a center guide

You checked your blank to make sure it was very close to a perfect cylinder with a wrench which fit the blank the same along it's length

And you drilled your blanks using the same center points that were centered on the pattern that was formed by the cross of the pinstripe veneers

Is all of that correct ?
Then I guess it couldn't have been the drill bit , you must have done everything else wrong . :rolleyes:
 
Last edited:

jttheclockman

Member
Joined
Feb 22, 2005
Messages
19,154
Location
NJ, USA.
If a bit is bent you will get an oblong or out of round hole or an enlarged hole. Is the hole larger than what the bit is??? I am betting that you did not center the design in the round shape. So many things have to go right to do what I am assuming you tried to do. You needed to be dead on center of the stripes when making the indent marks for the dead center and the live center to make the blank round. Your lathe must turn true to get a true round blank now. You must then drill your pilot holes with the starter bits 90 degress to the blank dead center of the stripe pattern. Your collet chuck now has to run true and the tail stock must travel straight and true, so that you can drill this straight hole and yes the drill bit must be of good quality.

I am not saying you did not do all these things but just suggesting there can be alot more things wrong than a bent bit. Good luck with your fix and look forward to seing a finished product. Isn't pen making fun??:)
 

Parson

Member
Joined
Jun 10, 2009
Messages
798
Location
Houston, Texas
I'm learning that this takes a LOT of practice to master. Any tiny movement or flaw along the many-part process yields an off-center hole.

Great thread though. I've learned a lot.
 

ldb2000

Member
Joined
Sep 11, 2007
Messages
5,381
Location
Laurence Harbor, NJ, USA.
Yes John if the bit is spinning you will get an out of round or oversized hole but when you drill on the lathe the bit is stationary and the work turns so if the bit is bent it will enter the wood at a slight angle then continue to follow that angle and exit the wood off center .
 

DurocShark

Member
Joined
Jul 26, 2008
Messages
3,622
Location
Anaheim, CA
Here's a trick I've found to help when drilling critically centered holes:

You rounded the blank between centers, which means you already have a dimple marking the two centers, right?

Leaving the drive center in the headstock, chuck up your drill bit on the tail stock. Mount the blank as if the drill bit was the live center and you're turning between centers. Now advance the bit an inch or so into the blank. So far the hole will be dead center.

Now you can mount the blank in your chuck of choice. Since I have only a scroll chuck, I put the blank on the bit and use that bit to hold it centered while I tighten the scroll chuck. (A matching solid rod or punch is better to use for 7mm or smaller holes when centering the blank in a scroll chuck... The bit is thin enough to flex otherwise. Larger bits don't have this problem.) Now I can drill through the rest of the blank with accuracy.

This method depends on your headstock and tailstock being in perfect alignment, and your drill chuck and bit being square and straight. If any of those things is off, nothing you do will make a difference. If everything is on, you'll have a 95% success rate, even with a scroll chuck!
 

jttheclockman

Member
Joined
Feb 22, 2005
Messages
19,154
Location
NJ, USA.
Then he needs to show us the other side of the blank also. I still think there is so many other factors to think about than a bent bit. If he has a bent bit then he needs to replace it but am surprised he did not notice the bent bit way before this. I am sure he will figure it out. Well I added my ideas. Good luck and as mentioned I am waiting to see the final results. By the way I think it is MaxMan400 that makes those blanks and maybe he will chime in here.
 
Last edited:

KenV

Member
Joined
Oct 28, 2005
Messages
4,720
Location
Juneau, Alaska.
Shopsmith May be the weak link.

Having a shopsmith in the garage -- and not using for this kind of application -- I have the strong estimate that you are encountering one of the weaknesses of the shopsmith system. The tailstock mount is a bear to adjust to machinist tolerances. There is an cam based circular fitting that goes into a removable endpiece that also needs to be carefully adjusted.

Or -- you are using the table in horizontal drilling mode, and the table is less than rock solids and has a number of tuning adjustments that are good for general flat work, but will not get you to machinist precisions without a lot of effort (every adjustment send you back to the start of the adjustment process).

Then as Randy noted, the two bearing quill drops the runout, but the shop smith was never designed for high precision work and mine has about 10 thousands runout on a good day with the quill retracted.

Can you make the shopsmith work for this application -- yes, but be prepared to do a lot (read a awful lot) of measurement and adjustments each an every time you try to do this and plan on using a fair number of test pieces making sure all is really in adjustment before committing a complex valuable piece for drilling.
 

ldb2000

Member
Joined
Sep 11, 2007
Messages
5,381
Location
Laurence Harbor, NJ, USA.
That would work Don with a straight bit but if the bit is bent it will still wander off center . once the bit wanders off center it will flex and follow the hole or if you can keep it centered it will create an oversized hole on exit and will vibrate the heck out of everything .
I could only afford the HF drill bit set and several bits are slightly off so I've been there . It mainly happens with the smaller sized bits , those under about 3/8" , the heavier bits just create oversized holes due to their stiffness .
 

KenV

Member
Joined
Oct 28, 2005
Messages
4,720
Location
Juneau, Alaska.
Shop Smith

The shopsmith headstock slides along two steel tubes. The tailstock is fixed and is removable. It has two aluminum large pins that slide into the end frame of the base and are clamped with a pressure pad. There is a sleeve on each pin for height adjustment. The MT2 taper is on a aluminum disk that rotates in the end piece.

Adjustments are iterative and involve 4 set screws.
 

Attachments

  • tailstockexpview.jpg
    tailstockexpview.jpg
    10.9 KB · Views: 85

workinforwood

Member
Joined
Mar 1, 2007
Messages
8,173
Location
Eaton Rapids, Michigan, USA.
One thing I didnt' see mentioned is drill speed and aggressive plunging. Drilling too fast, loads the bit real fast. If the bit is overloaded, then some dust and debris can start to push to the outside of the cutters rather than just staying in the flutes of a drill bit. When this happens, it will push the bit off course to one side. You need to drill at a slow speed and constantly pull the bit out to unload it. Just a thought, just in case you or anyone else decides they can drill on a lathe all the way through in one shot.
 

Texatdurango

Member
Joined
Apr 23, 2007
Messages
4,649
Location
Show Low, Arizona
Looks like everything under the sun has been suggested except one thing so I'll mention it since it has helped me.

Everyone pretty well agrees that putting a drill bit into a chuck attached to the tailstock is pretty accurate but the tailstock seems to be half a mile from the blank when you drill.

Every hole I drill on the lathe, I start with a "center drill". These are very short, very rigid bits designed for marking the center of a piece. These bits have no flex or wobble whatsoever and I started searching for bits to replace my long bits I was using and found what I consider the perfect bit for pen making.

The most common type of drill bit we encounter is the "Jobber" length bit but there are bits much shorter that all but do away with the length/wobble/flex problem, they are called "Screw machine" or "Stub length" bits.

Here is an example of two 1/2" bits:

Jobber length - cutting depth= 4 1/2", overall length= 6"
Screw machine length - cutting depth= 2 1/4", overall length= 3 3/4"

At 3 3/4" long, I find that bits this diameter are about the same as using a center drill... VERY rigid, no wobble, no flexing AND they are a lot closer to the work, making for nicer holes. There is a reason metal lathes and mills use them..... they are more accurate!

An example of what the difference is, the photo shows the screw machine bits next to the jobber bits they replaced.

The bit you use is important but as a few have mentiuoned, it appears that your accuracy at finding the center of your pattern then drilling precicely at the center is probably the problem here.

I would work on practicing and improving my skills rather than trying to find fault with .001" here or .001" there in your tooling, since the blanks you showed show more than a few thousandths off.

Little machine shop and Discount-tools are two good sources to find both center drills and screw machine drills if you are ever interested.
 

Attachments

  • 100_7060.jpg
    100_7060.jpg
    56.6 KB · Views: 103
Signed-In Members Don't See This Ad

soligen

Member
Joined
May 11, 2010
Messages
1,085
Location
Sterling Heights, Michigan
jttheclockman;1038901You started with a square blank if I read this right. You then tried to round this to rod shape to fit in a collet chuck. Then you used the pattern to drill the hole in what you thought was center. What is to say the pattern was in the center of the round blank you now turned???? [/quote said:
Your assumptions are incorrect. The center of the pattern is where I put the lathe centers, so once turned the center of the pattern is in the center of the blank, and the lathe center hole is the place to center the drill bit.
 
Top Bottom