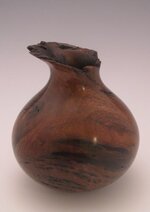
Desert walnut

Signed-In Members Don't See This Ad
See more from David Keller

David Keller

Member
Joined
Nov 30, 2009
Messages
1,618
Location
Enid,OK
Here's a funky little hollow form/vase inspired by a turning I saw a few months back. The inspiration piece was done by a guy named Curt Fuller, and his is much nicer than this one.

The wood was labeled desert walnut when I bought it... Whatever that is! It's about 4" tall and is finished with shellac, BLO, and wipe on poly. I'll probably knock a little of the shine off of it at some point.

Comments and criticism welcome.
desert-walnut-HF-1.jpg

desert-walnut-HF2.jpg
 
Signed-In Members Don't See This Ad

Dave S

Member
Joined
May 31, 2010
Messages
74
Location
West Branch, MI.
WOW!!! You are a real inspiration, whats this about the 6th or 7th turning you've posted in the last few days. I have a mountian of beautiful wood, but not wanting to touch it until my skill level is up to the quality of wood I have (I'm Turner John's dad) he always gives me a "cut of the action". I think I'm going to my shop in the morning and "go for it". I'm really suprised how much I enjoy seeing your turnings, using small blocks, maybe someday.........
Thank You
Dave
 

robutacion

Member
Joined
Aug 6, 2009
Messages
6,514
Location
Australia - SA Adelaide Hills
Here's a funky little hollow form/vase inspired by a turning I saw a few months back. The inspiration piece was done by a guy named Curt Fuller, and his is much nicer than this one.

The wood was labeled desert walnut when I bought it... Whatever that is! It's about 4" tall and is finished with shellac, BLO, and wipe on poly. I'll probably knock a little of the shine off of it at some point.

Comments and criticism welcome.
/QUOTE]

Actually David, I reckon you need more gloss on it...!

In my opinion, these type of pieces where natural flaws protrude through the external surface, look better if the surrounding wood look either very gloss (mirror/liquid glass type) or matt. Your's at the moment is a little over satin, a mild gloss in fact, from what I can see from the 2 pics...!

I reckon some more of the same finish until your create more/enough depth as you would do with the CA in a pen, will probably look even better to a great look it already has.

And Dave S, the best way you can tackle your situation and stop thinking you aren't ready for such turnings, is in fact set your mind to try/give it a go. Some of the best suggestions I can give you are as follow;

-* Find a small root ball, about 5" to 8" in size (raw/rough stuff), these are dumped nearly every day, at the local dumps. There are not always from tree, in this case small trees that have been pulled out from the ground but most of the ideal size are in fact not from trees but from shrubs/bushes that people have in their back-yard and then decide to pull them out either because they died, got too big or a number of other possibilities that will apply.

Nevertheless, either through the local dump or any dump to a tree arborist/stump removal people, friends, neighbours, etc., you should be able to get some of these. The most important thing at this stage is you need GREEN WOOD, keep any dry or dead stuff for later. The green wood will be a lot easier to work with and a lot less sharp on the "oops...!"

-* Try to find exactly how these pieces are safely mounted on the lathe, either by reading on the subject, watch videos or ask directly to someone that can show you how its done, if necessary.

-* Equip yourself with some of the "fundamental/essential" tools require, either by buying or making them. Again, info and pics of these tools will be provided in your search/quest.

-* Get yourself some safety equipment, if you haven't already have it for your pens. A full face mask, dust mask (not so crucial with green wood), a good fit set of gloves, these are now available doe less than $5.00 and can really save you some skin, and anything else you feel necessary...!

-* Check your blank/root ball/whatever for stones, dirt and other stuff, if has been under ground, this will save your tools...!

-* Turn that lathe speed right down, go as slow as possible...!

-* Grab a spare pair or two of under pants and have them close to you in the shed/work-shop (a little toilet paper is advised)..!:eek::biggrin:

-* Kiss the wife goodbye, and go to work/get dusty, you don't know what you're missing...!!!:wink::)

While a couple of my last suggestions are in animation mode, one would be surprised how true they can be, particularly the last one...!

There is an old saying often used by the people of the Northern Territory here in Australia, and that is, "you will never, never know if you will never, never go...!". This may have to do with one of the most used advertisement slogans for people to go and visit the NT but, its meaning is totally true and applicable in this situation, you have to give it a go...!

I hope this is of some help to you...!

Cheers
George

 

greggas

Member
Joined
Jun 21, 2009
Messages
1,109
Location
North Easton, MA
David;

Nice job...great job capturing the natural shap of that wood.......reminds me of a class I took with Al Hockenberry at last years AAW
 

David Keller

Member
Joined
Nov 30, 2009
Messages
1,618
Location
Enid,OK
Thanks for the kind words. George, maybe I'll give it a few more coats to test your theory.

WOW!!! You are a real inspiration, whats this about the 6th or 7th turning you've posted in the last few days. I have a mountian of beautiful wood, but not wanting to touch it until my skill level is up to the quality of wood I have (I'm Turner John's dad) he always gives me a "cut of the action". I think I'm going to my shop in the morning and "go for it". I'm really suprised how much I enjoy seeing your turnings, using small blocks, maybe someday.........
Thank You
Dave

Dave, I'd take what you learned at the class and jump right in. It seems like John has stumbled upon a never ending supply of fantastic cherry burl, so I wouldn't feel bad if you muck up a piece or two... I know I've destroyed plenty of nice wood. That's part of the fun.

As for the small forms, I like them because they require less time to complete. I can really work on form, and if I miss the mark(which happens more often than I'd like), I haven't wasted a lot of time or wood in the process.

Speaking of a 'cut of the action', I sent John a nice little chunk of some pretty wood that I think arrived at his place today. I suggested that you might get a blank or two out of it.

Finally, thanks for the saw blade and circle jig! I'm not sure I've mastered the jig(blade tension issue), but I'm gonna give it another try soon.
 

David Keller

Member
Joined
Nov 30, 2009
Messages
1,618
Location
Enid,OK
Looks real good to me. How many coats of poly and time involved applying the poly, overall.

Thanks. I'd guess there are about a half dozen coats of WOP applied over about a week or ten days. I tend to turn several things and then finish them in groups, so there's not much actual time in doing it, but it's quite spread out.
 

greggas

Member
Joined
Jun 21, 2009
Messages
1,109
Location
North Easton, MA
David, I forgot to ask you about desert walnut.....I had never heard of that before ( not here in Boston anyways :)) is it similar to desert ironwood?
 

David Keller

Member
Joined
Nov 30, 2009
Messages
1,618
Location
Enid,OK
David, I forgot to ask you about desert walnut.....I had never heard of that before ( not here in Boston anyways :)) is it similar to desert ironwood?

It's a new one on me too! I bought the wood from another turner, and that's the way it came labeled. The person I bought it from had purchased it from someone else who actually found it in the desert near Tucson, AZ. It's funky looking stuff, and it's not as dense or dusty as ironwood. I don't know that it's actually walnut, but the coloring is about right. I've got a few more chunks of this, so I'll probably post something else from it when the inspiration strikes.
 
Top Bottom