Cracked Pens??

Signed-In Members Don't See This Ad

AFTACP

Member
Joined
Dec 30, 2014
Messages
24
Location
Pennsylvania
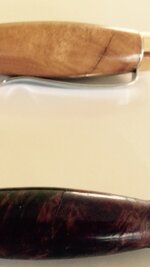
Attached is a pic of two cigar pens I finished roughly 3 weeks ago. They are unstabilized Yellow Box Burl and Vasticola Burl. They have not moved from a 70 degree room and have remained on an acrylic pen stand (no drops). These cracks were not at all visible during or after turning the pen.

I have read a bit on here about possible reasons (humidity, coefficient of expansion). I've had these blanks for over a year in the same 70 degree environment with not much change in the humidity. I know the blanks being unstabilized doesn't help but these cracks just appeared out of nowhere. Any help would be greatly appreciated to help avoid this in the future.
 

Attachments

  • image.jpg
    image.jpg
    83.8 KB · Views: 415
Signed-In Members Don't See This Ad

Krash

Member
Joined
Feb 10, 2014
Messages
1,259
Location
Albuquerque, NM
Wow, weird.

The only thing I can think of is internal pressure from the brass sleeve and voids in the glue. I am thinking that if your bore hole for the sleeve was not straight, i.e. you're drill press had some run out, which caused some torqueing pressure, and because of the run out a gap was created where the glue did not bond, the torqueing pressure would be pulling away from the gap, possibly being relieved by a crack in the now very thin material.

What kind of glue do you use?
 

mike4066

Member
Joined
Sep 24, 2014
Messages
353
Location
Akron, Ohio
I had that happen to one of mine.

The hole I drilled in the blank was slightly curved because I didn't have it secured well enough. When I did the glue up I had to use a lot of force to get the tube in. A few weeks later I started seeing cracks in the CA finish along the burl lines. I assume it's because I forced the tube in and created a lot of pressure in the thin blank.
 

AFTACP

Member
Joined
Dec 30, 2014
Messages
24
Location
Pennsylvania
I use a medium CA glue to glue the tubes in (Satellite City I believe). I'm usually very careful about making sure the tube is covered and the interior of the blank. There was no difficulty in inserting the tubes. Thanks!
 

jttheclockman

Member
Joined
Feb 22, 2005
Messages
19,151
Location
NJ, USA.
There is not one single person here that can tell you why that cracked. There will be ideas as what can cause cracks and you will read many of them.

But i will add my thoughts. First off there are a number of things you did not tell us. You did not say what type glue you used to glue the tube in. You did not tell us if you sealed the ends of the blank after it was milled. You did not tell us the moisture content of the blank. You did not tell us how you finished them and so on.

With that all said you have to remember wood is wood. You are thining that wood so its structure is now comprimised You are attaching that wood to an inmovable object (tube) with a solid form of glue unless you used epoxy.You have introduced heat into that wood by turning and sanding. You have now opened pores of that wood and so on. Stabilizing will help but not a cure all. Fix the cracks by celebrating them and highlighting them. Do not try to hide them. That is a burl and there are natural inclusions in the wood to begin with. Add some dark filler and resand and refinish.

As far as preventing this in the future. Use stabilized wood or woods that are more natural not to crack. Good luck.
 

Edgar

New Member Advocate
Staff member
Joined
Feb 6, 2013
Messages
6,899
Location
Alvin, TX 77511
Besides making sure the tube is well covered, it's also a good idea to work the tube in and out while simultaneously twisting it back and forth to make sure that the tube is fully covered and that the glue is spread as uniformly as possible, both on the tube and inside the hole.

With medium CA, you should usually have about 15-20 seconds of working time if the humidity isn't too high. Move the tube into final position just as you feel the glue starting to set up.

I generally use medium CA also, but move up to thick CA when the humidity gets high. However, here in the Texas Gulf Coast, I sometimes only get about 5 seconds of working time, even with the thick stuff.
 

low_48

Member
Joined
Jul 1, 2004
Messages
2,176
Location
Peoria, IL, USA.
My opinion is that they were there when you turned them. That first one shows discoloration in the crack. The color may have been in the wood, or from air drying. The second is a burl. They crack in odd places when drying. Cracks like those may only show up with magnification until the wood dries a little, or stresses are relieved during turning.
 

1080Wayne

Member
Joined
Feb 5, 2006
Messages
3,344
Location
Brownfield, Alberta, Canada.
To expand a bit on what John has said . Any piece of wood has internal stresses contained within it . A burl will have a lot more than a straight grained piece . Removing wood from the outside to get to pen diameter may release or build up or change the location of some of them . Drilling the hole will cause similar changes . Woods strength properties can also vary considerably , along the grain and around the tree . The combination of all of those , the other factors John mentioned , and probably some more , likely caused your problem . One other more remote possibility . If the blanks were fully waxed , they may not have been dry , even though you had them for a year .
 

low_48

Member
Joined
Jul 1, 2004
Messages
2,176
Location
Peoria, IL, USA.
My opinion is that they were there when you turned them. That first one shows discoloration in the crack. The color may have been in the wood, or from air drying. The second is a burl. They crack in odd places when drying. Cracks like those may only show up with magnification until the wood dries a little, or stresses are relieved during turning.

Another point to consider on the first pen, that crack is cross grain. Any stress loading from assembly will crack at the point of least strength. That is with the grain, and not across it. Cross grain cracking does occur in drying due to uneven shrinkage.
 

jsolie

Member
Joined
Apr 25, 2013
Messages
2,100
Location
Sunny Murrieta, CA
That's unfortunate. Is there any chance someone could have borrowed the pens at different times over the last couple weeks and taken them outside of that 70F/21C degree environment? I would imagine that it's a bit lower than 70F/21C degrees outside...
 

AFTACP

Member
Joined
Dec 30, 2014
Messages
24
Location
Pennsylvania
Thanks for all the replies and insight. The pens have not moved from my workshop for a year roughly. Outside it's 20 degrees but they've been bundled up at 70 for a year plus.

The Yellow Box upon closer examination does look like it could have been there the whole time. It is the Vasticola that is puzzling to me. The upper barrel has a large crack as well.

For informational purposes:

I used Medium CA to glue the tubes in.

I did coat the ends of the blanks with thin CA prior to turning.

I wet sanded with walnut oil from 150-600 grit, then used MM progressively up to 12,000 grit.

Applied 4 coats of Pens Plus and an additional 2 coats of Microcrystalline Wax.

As to moisture content, I don't have a moisture meter. But as I said they were temperature controlled at 70 degrees in a normal humidity.

Thanks again for the help. I guess back on the lathe they go :frown: Should I wait a bit to repair them (see if any more cracks appear or the current ones spread) or fix them now?
 

Wood Butcher

Local Chapter Leader
Joined
Jun 8, 2005
Messages
970
Location
Westfield, IN, USA.
I'm probably waaaay off but here goes anyway; you mentioned wet sanding, is it possible given the very thin wood at the ends, the wood swelled then shrunk after drying out? I tried the wet sanding several years ago and went back to dry sanding. I saw no improvement in the finish and decided that the water wasn't necessary. I have a nice Jr Gent made with cocobolo and it has 3 full length cracks in one section and a single crack in the other. I am convinced the wood was wet when it was turned and finished. The reason for my certainty is that I can see the brass tube at the bottom of the crack.....shrinkage for sure. I have found that if the blank has been waxed, it's wet. I haven't found a fool proof way of drying that doesn't adversely affect the blank. Was the blank waxed?
WB
 

AFTACP

Member
Joined
Dec 30, 2014
Messages
24
Location
Pennsylvania
That is an interesting point. I have recently started using the walnut oil to wet sand as I can see it makes a huge difference in the finish. The Yellow Box blank was waxed. The Vasticola was not.
 

EdGallop41

Member
Joined
Jan 15, 2015
Messages
34
Location
Stuart VA
Odd that there are two blanks with the same unusual cracks, in the same location, and with two different woods. I remember burs causing cracks at the ends but fixed that problem by lightly cleaning with a rat tail. I've never had cracks like yours before but would assume it is not the wood. I suspect your tubes had wrinkles or other deformity. The cap insertion likely made it bulge at that point. I've had cracks in Cocobolo like yours, many times, and it is an easy repair, but the other is more of a challenge.
 
Top Bottom