CNC to Laser Conversion

Signed-In Members Don't See This Ad

BRobbins629

Passed Away Dec 28, 2021
In Memoriam
Joined
Mar 8, 2006
Messages
4,037
Location
Richmond, VA, USA.
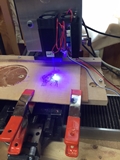
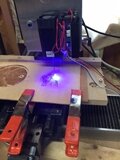
After having some fun with the 1w Chinese engraver from Gearbest, I decided to see if I could incorporate a laser onto my CNC - a project I have been thinking about for quite a while. I went with a 2w laser diode from ebay that came with a driver that could be controlled with the Mach3 software already on the machine. Using the spindle control to turn the laser on and off and the PWM capability to control the power, I now had complete control of both hardware and software and can make use of my radial axis.

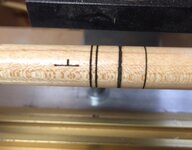
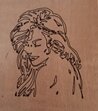
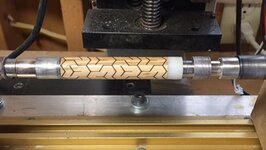
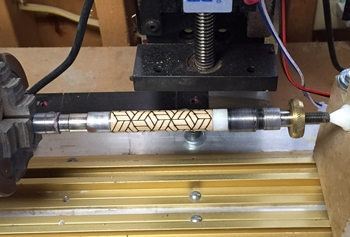
Foe vector graphics, there is a free GCode generator for InkScape from Jtechphotonics (also has great info on conversion). The picture below uses that feature. Having control, also enables me to write my own GCode, even varying the power within a file which should enable shading. Also below are 2 of my favorite patterns. All code written in Excel. This is what I call fun.


attachment.php
attachment.php
attachment.php


attachment.php
 

Attachments

  • CNC with laser.JPG
    CNC with laser.JPG
    21.7 KB · Views: 407
  • CNC laser 2.JPG
    CNC laser 2.JPG
    13 KB · Views: 410
  • IMG_0803.JPG
    IMG_0803.JPG
    72.9 KB · Views: 448
  • IMG_0804.JPG
    IMG_0804.JPG
    63.1 KB · Views: 484
Signed-In Members Don't See This Ad

hanau

Member
Joined
Jan 5, 2007
Messages
1,384
Location
thomasville, nc, USA.
Bruce very interesting
I am starting to learn about lasers.

Could you post a link to the ebay laser you bought and how did you connect it to your cnc spindle?
 

BRobbins629

Passed Away Dec 28, 2021
In Memoriam
Joined
Mar 8, 2006
Messages
4,037
Location
Richmond, VA, USA.
Bruce very interesting
I am starting to learn about lasers.

Could you post a link to the ebay laser you bought and how did you connect it to your cnc spindle?
Here's the link for the laser:
445nm 2000mW 2W Blue Laser Module TTL Signal Outer Driver CNC Cutter Engraving | eBay

As for mounting it, I attached it to a 1/8" aluminum plate. Long ago I put T-track on my Z axis and use that for all my spindles, so the plate fastens to the track with 2 bolts.

The details of the electrical hookup and Mach3 settings can be found here:
https://jtechphotonics.com/?page_id=1436

Plug in for Inkscape here:
https://jtechphotonics.com/?page_id=2012
 

Terredax

Banned
Joined
Nov 1, 2015
Messages
892
Since this set-up utilizes the parallel port and a DB25 cable, could it be used in conjunction with a machine that is running through the Ethernet connection with a smooth stepper and run separate machines with the same computer and Mach3? At separate times of course.
 

BRobbins629

Passed Away Dec 28, 2021
In Memoriam
Joined
Mar 8, 2006
Messages
4,037
Location
Richmond, VA, USA.
Since this set-up utilizes the parallel port and a DB25 cable, could it be used in conjunction with a machine that is running through the Ethernet connection with a smooth stepper and run separate machines with the same computer and Mach3? At separate times of course.
If you can turn the spindle on and off with the smooth stepper, it should work by wiring as you would the spindle. A good question for jtechphotonics or cnczone. I'm sure others have done this.
 

robutacion

Member
Joined
Aug 6, 2009
Messages
6,514
Location
Australia - SA Adelaide Hills
Well well, I love what you did, great work indeed.

I have the CNC and most software what I'm lacking is the brains to work it all up as it is much less, fiddling around it as you did, damn...!:frown:

The next question would be, would I need to go that far with my CNC? not a chance...!:wink::)

Cheers
George
 

BRobbins629

Passed Away Dec 28, 2021
In Memoriam
Joined
Mar 8, 2006
Messages
4,037
Location
Richmond, VA, USA.
How's the transition at the start/stop point in the round?
Although I've only just begun to play with this, so far it looks pretty good. May need to run a test for that. I've been using M3 and M5 commands to turn the laser on and off and there's some discussion about using other commands such as M10/M11 to avoid a little delay. Since I have it hooked up for the power to respond to spindle speed commands, I may also try just setting that to 0 when I want the laser off. Also need some time to see how well I can use a raster path to do more complex drawings. Some say not so well with Mach3, but I think I may have a way.
 

low_48

Member
Joined
Jul 1, 2004
Messages
2,176
Location
Peoria, IL, USA.
How's the transition at the start/stop point in the round?
Although I've only just begun to play with this, so far it looks pretty good. May need to run a test for that. I've been using M3 and M5 commands to turn the laser on and off and there's some discussion about using other commands such as M10/M11 to avoid a little delay. Since I have it hooked up for the power to respond to spindle speed commands, I may also try just setting that to 0 when I want the laser off. Also need some time to see how well I can use a raster path to do more complex drawings. Some say not so well with Mach3, but I think I may have a way.

Any pictures of the transition "seam"?
 

BRobbins629

Passed Away Dec 28, 2021
In Memoriam
Joined
Mar 8, 2006
Messages
4,037
Location
Richmond, VA, USA.
Any pictures of the transition "seam"?

Here's some tests I ran today. As requested, the first is the transition seam on a radial piece at 3 different powers. The start/stop position is at the horizontal line. The one on the far left is done by turning on and off the laser using M3/M5 codes. The next 3 are using an M3 code to turn on the laser at 0 power and then SXX to start the laser.

attachment.php


The next two pictures are a test of speed and power settings. One uses M3/M5 commands to turn off and on; the other uses the SXX commands. S0 to turn off and SXX to define the power in %. Note the extra little burn on the left of some of the lines when using M3 to turn laser on. Appears to be a little delay before starting to move. Pretty much gone when using SXX command.
attachment.php


attachment.php
 

Attachments

  • radial test.JPG
    radial test.JPG
    94.3 KB · Views: 237
  • Power test m control.JPG
    Power test m control.JPG
    75.8 KB · Views: 278
  • power test s control.JPG
    power test s control.JPG
    82.5 KB · Views: 238
Last edited:
Top Bottom