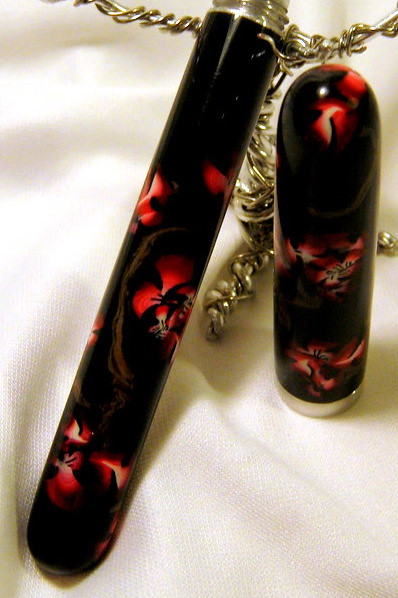
Cherry Blossom~Closed End Experiment

Signed-In Members Don't See This Ad
See more from creativewriting

Signed-In Members Don't See This Ad

skiprat

Passed Away Mar 22, 2022
In Memoriam
Joined
Oct 19, 2006
Messages
7,812
Location
In a Skip in Wales
Most of the PC pens we've seen have been extremely colourful but this one seems to be even more vibrant with only the two (?) colours.:eek: Just like everyone else, I think it's stunning and is very capable of not needing a clip. A pen like that shouldn't be hidden in a pocket, it should be on display. Maybe a stand like they use for Samurai swords.:biggrin:
 

workinforwood

Member
Joined
Mar 1, 2007
Messages
8,173
Location
Eaton Rapids, Michigan, USA.
Most of the PC pens we've seen have been extremely colourful but this one seems to be even more vibrant with only the two (?) colours.:eek: Just like everyone else, I think it's stunning and is very capable of not needing a clip. A pen like that shouldn't be hidden in a pocket, it should be on display. Maybe a stand like they use for Samurai swords.:biggrin:

I don't disagree. It should be on a display over my fireplace! :biggrin:
 
Joined
Aug 7, 2009
Messages
700
Location
Jamestown, NC
Thanks Skip and Jeff!

Jeff I was experimenting with a similar technique on another pen. The problem I run into is the clay has to be built on the the pen and fully finished before adding the clip. If I made the slot in the metal before it was covered I would lose it. Then I thought about making a special piece to fit in the slot and leaving it in while I was wrapping and rolling (sounds fun eh'). The problem was during finishing I CA'd the piece in and pretty much destroyed the clay around the hole trying to get it in. I may try and make the slit after finishing the pen, but I have been hesitant knowing I may destroy the piece and all the work that went into it.

I noticed a company by the name of Yard-O-Led (Art Brown Catalog) attaches a clip with two small rivet/screws from the outside. I may have to give this a try as well, but I don't want the rivets or screws to be a distraction or eye-soar.

Thanks for letting me bounce ideas off of ya!
K
 

phillywood

Member
Joined
May 10, 2010
Messages
2,067
Location
San Antonio, TX, 78250, USA
Keith, First off it's a beatiful pen. I wish you had abetter picture so we all can share your enthusiasm, on the other hands, I am wondering why you're stressing out on the clip? It's your design and as an artist you decide what goes on it. In addition, why not slip the pen in a clear plastic pen holder like the covers that they use for the ladies make up stuff or if you really want to get fancy then you can put it in thin leather case that will fit in your pocket witha clip that way the integrity of your design would still be preserved. My wife is half japeneese and I grew to learn that oriental art is different in nature than the western one. I strongly believe that you hould stick to the design that originally pleased youto make this pen in the first place.
 

PaulDoug

Member
Joined
Mar 2, 2008
Messages
3,488
Location
Benton City, WA.
No clip! That pen is awesome the way it is. A clip would only detract from it's elegance.

There that's my opinion! Not worth anything.
 
Joined
Aug 7, 2009
Messages
700
Location
Jamestown, NC
I promised some members a closer look at the details. The pictures I took are much larger then I posted, but I didn't want to throw anybody off by posting a huge picture of a pen.
4663665358_1bca360f70_b.jpg
 
Last edited:
Joined
Aug 7, 2009
Messages
700
Location
Jamestown, NC
I am wondering why you're stressing out on the clip? It's your design and as an artist you decide what goes on it.
Philly thanks for the imput:). My intention was only to have the know-how when or if I want to add a clip to this style of pen. For this specific pen I didn't want a clip. My dilema was trying to figure out how to add a clip to this style of pen if one was requested by a customer. I am a newbie when it comes to kitless so my general knowledge of clips and components is much lower then other members on the site:bulgy-eyes:!
 

Russianwolf

Member
Joined
Jul 13, 2007
Messages
5,690
Location
Martinsburg, WV, USA.
Then I thought about making a special piece to fit in the slot and leaving it in while I was wrapping and rolling (sounds fun eh'). The problem was during finishing I CA'd the piece in and pretty much destroyed the clay around the hole trying to get it in.
K

try using UHMD or Delrin for the fill piece. CA won't stick to it.
 

phillywood

Member
Joined
May 10, 2010
Messages
2,067
Location
San Antonio, TX, 78250, USA
Philly thanks for the imput:). My intention was only to have the know-how when or if I want to add a clip to this style of pen. For this specific pen I didn't want a clip. My dilema was trying to figure out how to add a clip to this style of pen if one was requested by a customer. I am a newbie when it comes to kitless so my general knowledge of clips and components is much lower then other members on the site:bulgy-eyes:!
Keith thanks for clarifying the issue now I can see what you are looking for. Perhaps for a newbie i sure put my foot in my mouth. huh?
BTW, i was wondering about the process, as how youdid the whole thing or is that a kit?
 
Joined
Aug 7, 2009
Messages
700
Location
Jamestown, NC
Philly, there is no kit. The body and nib sections start as a 1/2" aluminum rod, drilled, turned and threaded on the lathe. I turned the body so it is the same shape as the clay that covers it. The cap I start with 5/8 stock. The center band is the highest part and from there I knock it down to make room for the clay. The overall thickness of the polymer is around an 1/8" or so. I apply the branches and the cane slices and roll it smooth. It is very easy to shape with the core inside. After that everything is baked, wet sanded, and CA'd.
 

ldb2000

Member
Joined
Sep 11, 2007
Messages
5,381
Location
Laurence Harbor, NJ, USA.
Sorry Keith , I couldn't answer any earlier today , I had to go sit in court ....no they didn't finally catch up with me :eek:.... Jury duty !!! :mad: yuck !!! sat all day listened to a bunch of cr#% went to selection , listened to allot more cr#% then waited in the jury pool room for the rest of the day :mad::mad::mad:. Just got home and I'm starving so I'll get back to you in a bit . I think Skippy finally had a good idea :tongue:, a Samurai Sword stand for that pen , and make a matching ballpoint for the second (hariki , I think that is how it is spelled :confused:)Dagger .:biggrin:
 

jskeen

Member
Joined
Oct 11, 2007
Messages
1,754
Location
Crosby, Texas, USA.
Oh, my god! I can't believe I didn't think of that! That's almost perfect. A proper daisho (matched pair of swords) usually consists of a wakizashi and standard katana, the first being a shorter sword between 1 and 2 feet, and the latter a fairly generic term for any sword longer than about 24 inches.

They are almost always displayed edge up, longer blade on top with the tip to the right. Google daisho and you will get tons of pics, but only the ones showing two blades are technically correct. The etymology of the word itself specifies two swords, not two swords and a dagger.

Perfect for this pen though. :)
 

ldb2000

Member
Joined
Sep 11, 2007
Messages
5,381
Location
Laurence Harbor, NJ, USA.
Thank you James . As you can see I am woefully ignorant of the correct traditional names for the swords , but I know a good design idea when I see one and Skippy hit a homerun with this one . I can help you with some design ideas for the core of the ballpoint Keith but you gotta work your magic with the PC
 
Top Bottom